How to Add a Token Logo and Price to MEW’s Permanent Default Token List
Adding a token to MEW requires two separate data paths: identity metadata and live market pricing. First, the token repository can publish the name, symbol, decimals, network, contract address, and logo.
However, that repository cannot create a live price. MEW must receive pricing from an accepted market-data source. This guide explains both paths. Therefore, token owners can avoid confusing a successful logo submission with price support.
Updated: July 17, 2026.
What Is MEW’s Permanent Default Token List?
MyEtherWallet, usually called MEW, provides interfaces for Ethereum and several compatible blockchain networks. A default token can appear automatically after MEW recognizes its contract. Users should not import that token manually.
By contrast, custom tokens may remain local to one browser. Therefore, custom imports do not provide global visibility. Read the official MEW custom-token guide before testing permanent support.
Why Permanent Token Metadata Matters
Correct metadata helps users identify the intended contract. Furthermore, a verified logo reduces confusion between similar symbols. Token owners may also improve other wallet listings. For example, follow Tokpie’s Trezor token guide. Then, review the MetaMask token logo guide for another important wallet workflow.
Understand the Logo and Price Split
The Token Repository Controls Identity Data
The public MEW repository accepts network-specific token files. These files describe the token and its official contract. Next, a separate image file supplies the token logo. After review, MEW maintainers may merge both files.
MEW’s Market Backend Controls Price Data
A metadata pull request does not set any USD price. Therefore, never place a fixed price inside token JSON. Instead, MEW must map the exact network and contract to an accepted live market asset. Many projects first pursue market tracking. Tokpie explains exchange token listing in a separate guide.
Furthermore, projects can review Tokpie’s CoinMarketCap listing guide before requesting price support. Projects can also open the Tokpie exchange platform without leaving this publication.
Prepare Everything Before Opening GitHub
Collect the Canonical Token Details
Record the token name, on-chain symbol, checksum contract address, decimals, website, support contact, and social links. Then, verify those values on the correct blockchain explorer. Never copy details from a similarly named token. For external explorers, add verification links with nofollow. For example, use the relevant contract page carefully.
Choose the Correct Blockchain Directory
MEW separates token files by network. Therefore, an Ethereum token and a BNB Smart Chain token use different directories. For example, a BEP-20 token belongs inside the BSC directory. Do not place it inside Ethereum’s token folder. Ethereum owners can inspect the MEW Ethereum token directory. However, BSC owners must use the BSC folder.
Prepare the Token Logo
Use a square PNG with a transparent background. MEW recommends a 128 by 128 pixel image. Next, compress the image without destroying transparency. A small file loads faster across web and mobile interfaces. The image filename should contain the symbol, checksum contract address, and network suffix.
SYMBOL-0xChecksumContractAddress-network.pngFor a BNB Smart Chain token, use the network suffix shown by current repository examples.
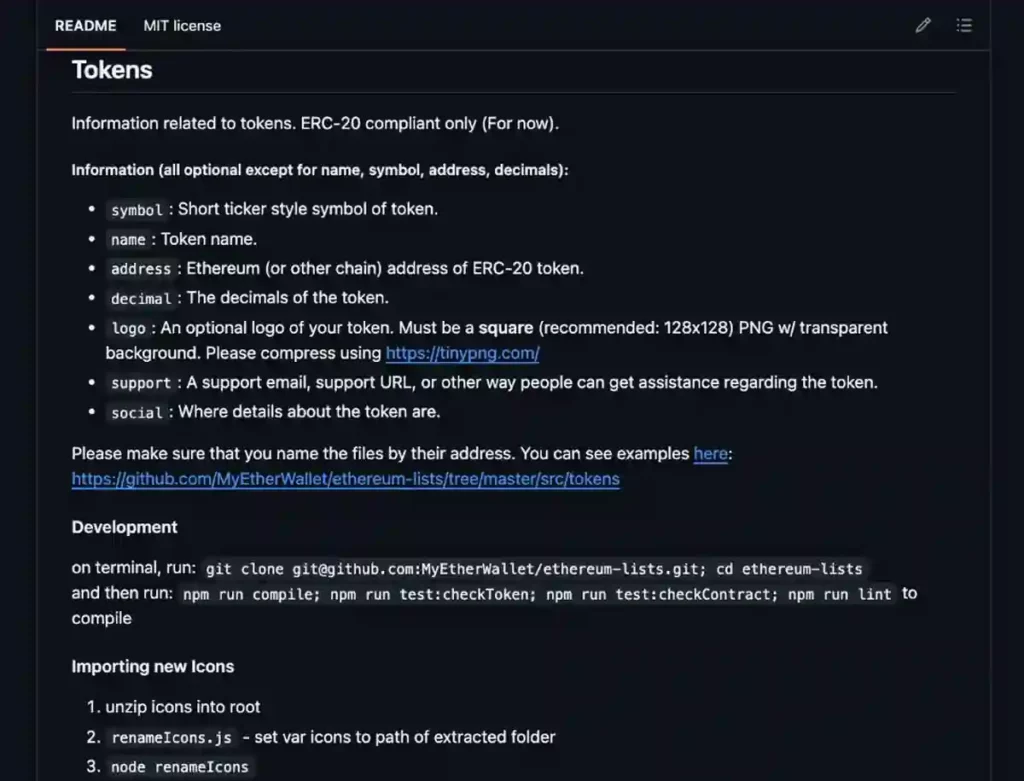
Logo Checklist
- Use PNG format.
- Keep the image square.
- Use a transparent background.
- Prefer 128 by 128 pixels.
- Use the checksum contract address.
- Match the repository naming pattern.
Fork the Official MEW Token Repository
The next stage uses the official MEW ethereum-lists repository. First, confirm your GitHub account is correct. Then, fork the repository before adding network-specific files.
Why BSC Tokens Still Use ethereum-lists
The repository name reflects MEW’s history. However, the same repository now contains several supported blockchain networks. Therefore, a BNB Smart Chain owner still forks the complete repository. The token later enters the BSC subdirectory.
src/tokens/bsc/By contrast, Ethereum tokens use their own network directory. Never place a BEP-20 file inside Ethereum’s folder.
Create the GitHub Fork
Click the repository’s Fork control. Next, select the intended GitHub account as the new repository owner. Keep the repository name unchanged. Also, copying only the master branch is enough for a normal contribution.
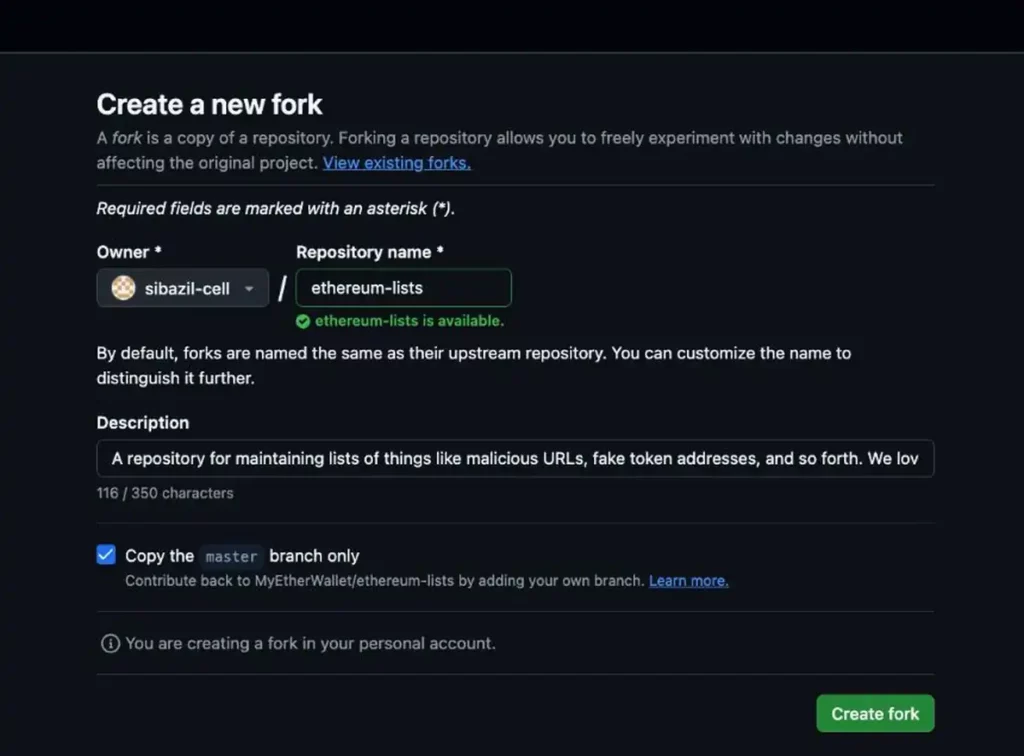
Confirm the Fork Was Created
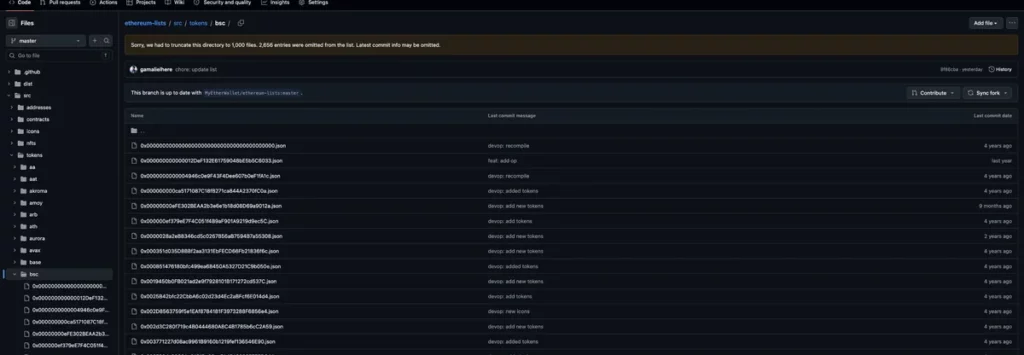
GitHub redirects to the new personal repository. Confirm that the page states it was forked from MyEtherWallet. Furthermore, confirm that the master branch matches the upstream repository before creating any token files.
GITHUB-FORK-CREATED-SUCCESSFULLY.webp
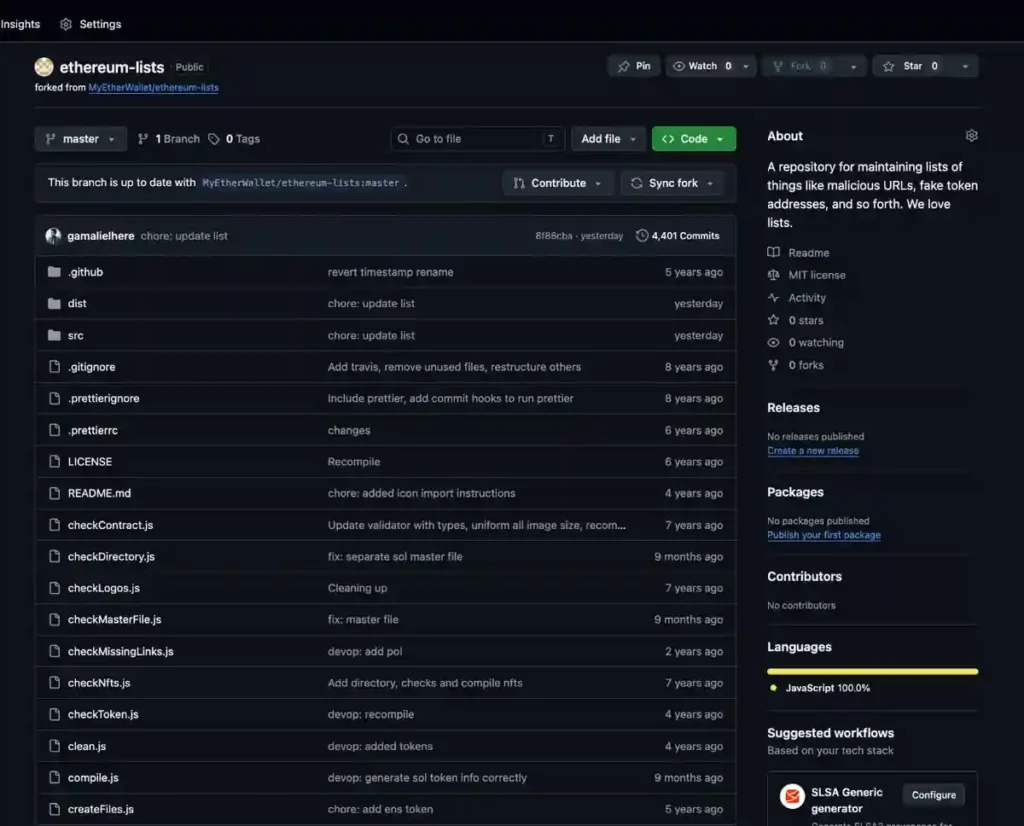
Open the BSC Token Directory
After creating the fork, open src, then tokens, and finally bsc. The complete path must read src/tokens/bsc. Therefore, verify the breadcrumb before creating any file.
Search for an Existing Contract File
Before adding anything, search the repository for the complete contract address. This prevents duplicate token records. GitHub may truncate large directories. Therefore, use repository code search instead of checking only visible filenames. The expected token filename uses the checksum contract address followed by the JSON extension.
0xChecksumContractAddress.jsonIf a matching file exists, update that record instead. However, create a new file when the search returns no match.
Create a Dedicated Token Branch
Open the current branch menu inside the BSC directory. Then, enter a clear branch name for your token submission.
add-your-token-symbol-bscNext, create the new branch from master. GitHub should select that branch automatically after creation. Confirm the new branch name beside the file tree. Therefore, later changes will stay separate from your master branch.
Create the BSC Token Metadata File
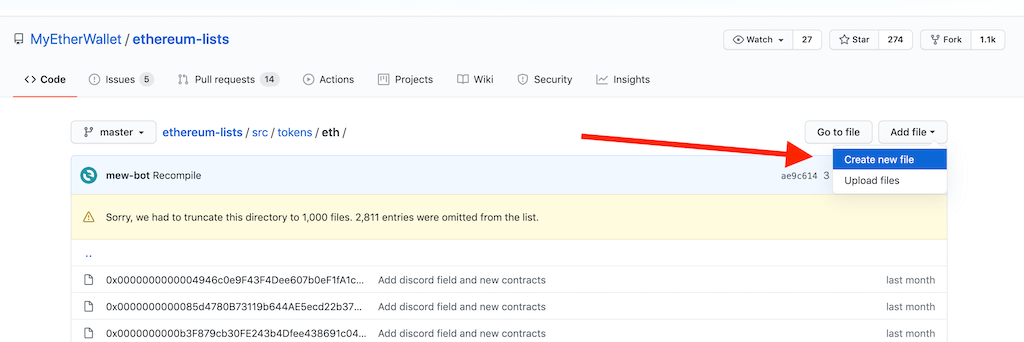
Use the Add file menu inside src/tokens/bsc. Then, select the option for creating a new file.
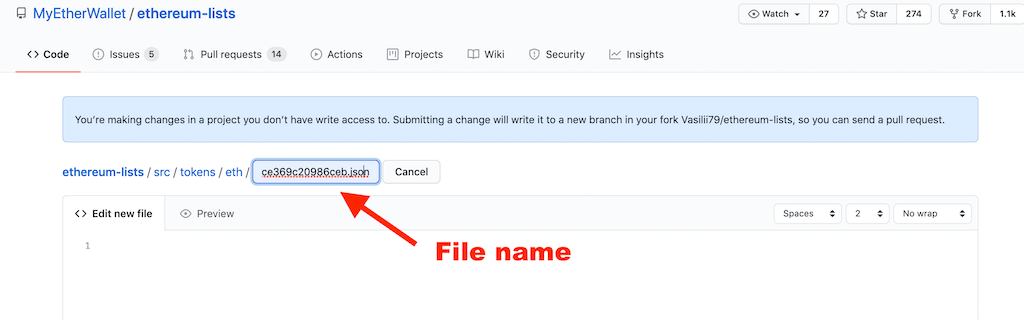
Name the File With the Checksum Contract Address
Enter the complete checksum contract address as the filename. Next, add the .json extension without extra characters.
0xChecksumContractAddress.jsonThen, paste the token metadata into the editor. Check every address character before continuing.
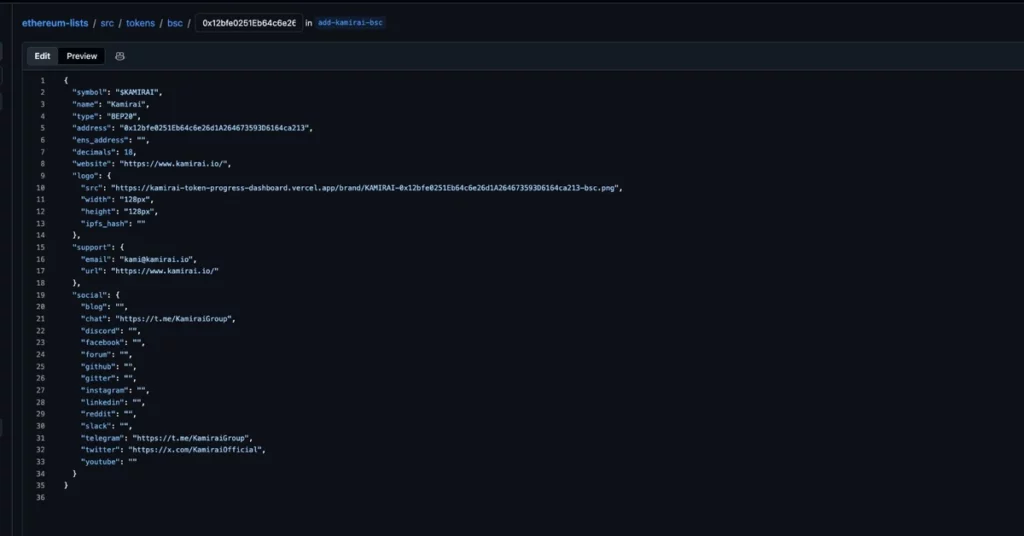
Use the Supported MEW Token Fields
Set type to BEP20 for BNB Smart Chain tokens. Also, enter decimals as an integer. The symbol should match the contract’s on-chain symbol. However, avoid changing punctuation for marketing preferences.
{
  "symbol": "TOKEN",
  "name": "Token Name",
  "type": "BEP20",
  "address": "0xChecksumContractAddress",
  "ens_address": "",
  "decimals": 18,
  "website": "https://example.com/",
  "logo": {
    "src": "https://example.com/token-logo.png",
    "width": "128px",
    "height": "128px",
    "ipfs_hash": ""
  },
  "support": {
    "email": "[email protected]",
    "url": "https://example.com/support"
  },
  "social": {
    "blog": "",
    "chat": "",
    "discord": "",
    "facebook": "",
    "forum": "",
    "github": "",
    "gitter": "",
    "instagram": "",
    "linkedin": "",
    "reddit": "",
    "slack": "",
    "telegram": "",
    "twitter": "",
    "youtube": ""
  }
}
Do Not Add Unsupported Price or Audit Fields
MEW validates token objects against a fixed field list. Therefore, unsupported keys can make automated checks fail. Review the current MEW token validator before using a new field. Put tracker pages and security audits in the pull request description. However, keep them outside the token JSON.
Commit the Metadata File to Your Branch
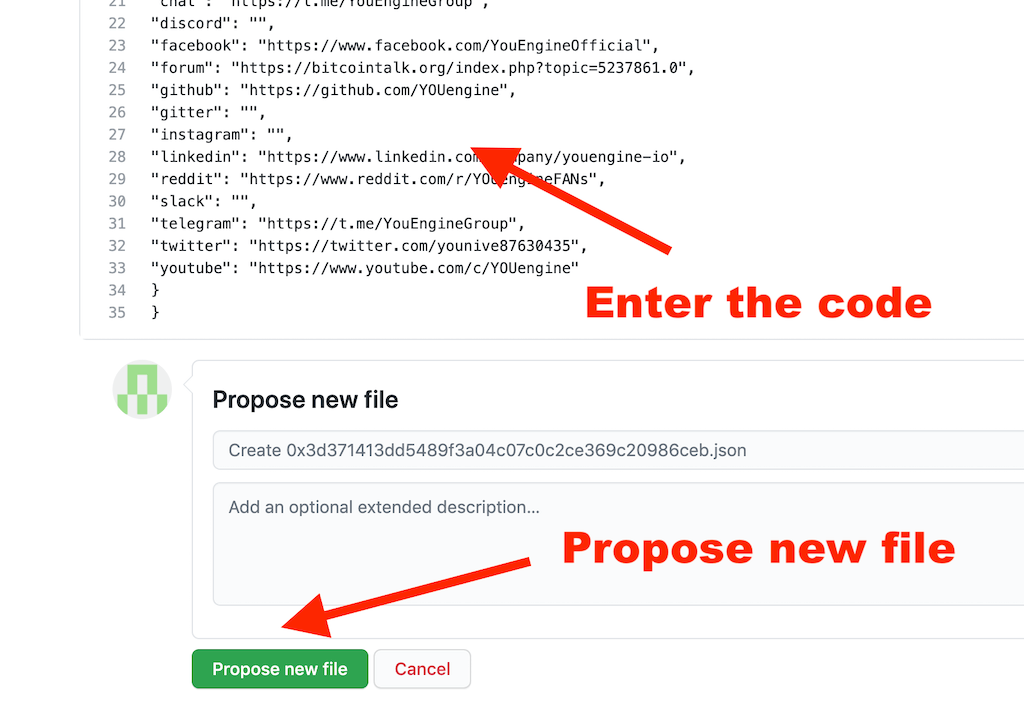
Choose a clear commit message describing the token metadata addition. Then, commit directly to your dedicated branch. After that, reopen the file from GitHub. Confirm that the saved JSON matches the approved content.
Upload the Token Logo to the MEW Icons Directory
The metadata file and repository icon are separate files. Therefore, upload the approved PNG after committing the JSON.
Return to your dedicated branch. Next, open src, then open the icons directory.
src/icons/Confirm the branch name before uploading anything. Otherwise, GitHub may place the icon on the wrong branch.
Use the Repository Icon Naming Pattern
Name the PNG with the token symbol, checksum contract address, and correct network suffix.
SYMBOL-0xChecksumContractAddress-bsc.pngFor other networks, inspect nearby icons and use their current suffix. However, never guess the network label.
Keep the Final PNG Ready for Review
Use the approved 128 by 128 transparent PNG. Then, verify the filename contains no spaces or hidden characters. The hosted logo.src remains useful. However, it does not replace the repository icon in this contribution.
Upload and Commit the Icon
Select Add file, then choose the upload option. After that, select the final PNG from your computer. Confirm the displayed filename carefully. Next, choose a short commit message describing the token icon. Commit directly to the same dedicated branch. Therefore, the JSON and PNG will enter one pull request.
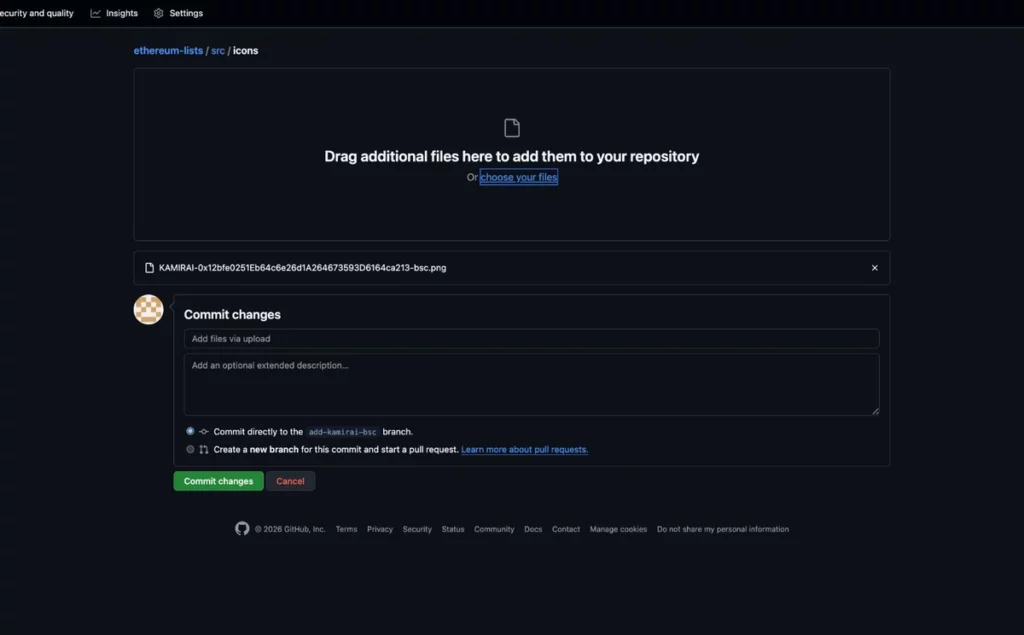
Verify the Uploaded File
Open the committed icon from GitHub. Confirm its branch, filename, dimensions, transparency, and visible file size. Then, record the commit link as evidence. You will also use that link during later troubleshooting.
Review the Token Branch Before Opening a Pull Request
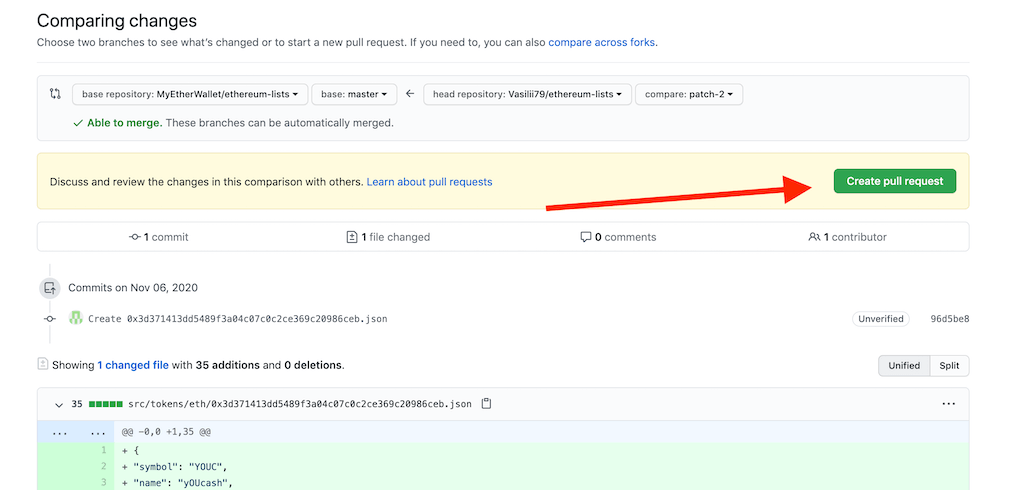
Open GitHub’s compare view against the latest upstream master branch. Do not compare only against your fork.
Confirm the Base and Head Branches
The base repository should be MyEtherWallet’s official repository. Next, select master as the base branch. Your fork should be the head repository. Then, select the dedicated token branch as the comparison branch. GitHub should report that the branches can merge automatically. However, this message does not replace repository tests.
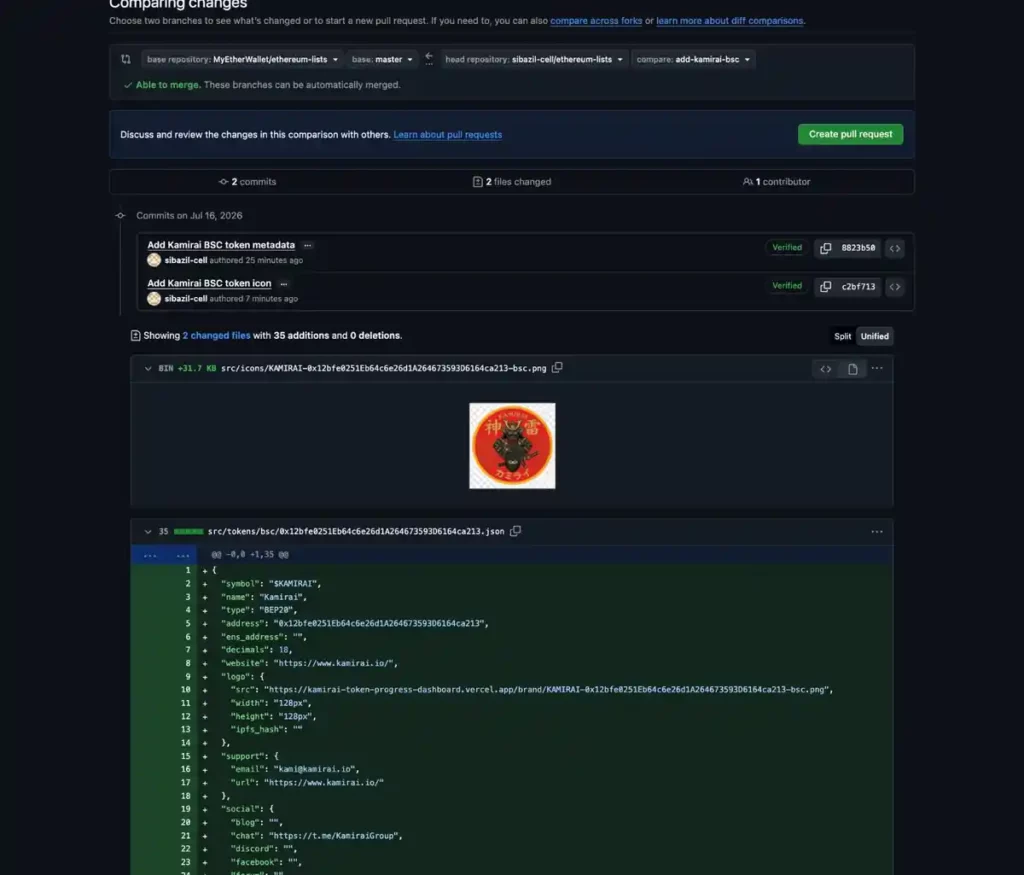
Inspect Every Changed File
Review the commit count, file count, additions, and deletions. Then, inspect every displayed filename and diff. The source changes should include the network token JSON and its repository icon. Remove unrelated files before continuing.
Confirm the Icon Can Match by Address
MEW’s generator extracts the checksum address from each icon filename. Therefore, the address casing must remain exact. The generator matches icons by checksum address, not only by symbol. A network suffix can remain after the address. Review the current MEW address extraction code when checking unusual filenames.
Run the Current MEW Pull Request Checks
Read the official MEW pull request workflow before testing your branch.
npm install
npm run compile
npm run lint
npm run test:checkMasterFile
npm run test:checkToken
npm run test:checkContract
npm run test:checkNft
The token validator checks required fields, supported token types, address format, and exact object keys. Therefore, unsupported price, audit, or tracker fields must remain outside the token JSON.
Review Generated Distribution Files
The compile command rebuilds MEW’s distribution lists. After that, inspect every generated file before committing it.
dist/tokens/NETWORK/tokens-NETWORK.json
dist/tokens/NETWORK/tokens-NETWORK.min.json
dist/master-file.json
Include the network-specific generated changes when compilation updates them. However, exclude unrelated generator noise. Furthermore, confirm the generated master entry contains the correct network, address, symbol, and repository icon URL.
Commit the Three Generated Files
For a BSC submission, compilation updates two network files and the global master list.
dist/tokens/bsc/tokens-bsc.jsondist/tokens/bsc/tokens-bsc.min.jsondist/master-file.json
The normal JSON remains readable. However, the minified version stores identical data without extra formatting. The master list uses the repository icon URL. Therefore, confirm it does not depend only on the hosted logo. Commit these files to the same token branch. Then, compare that branch against upstream master again.
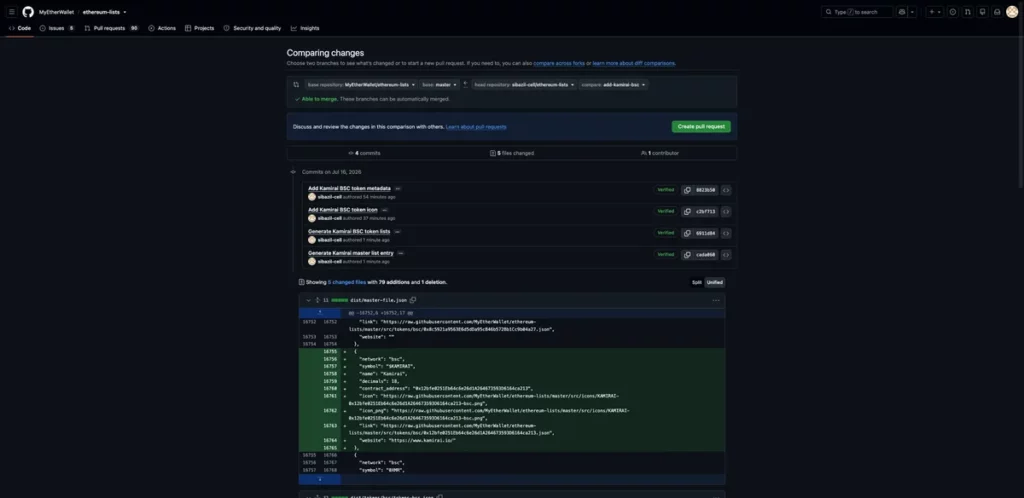
Check the Final Comparison Summary
GitHub should show only intended source and generated files. Furthermore, it should report automatic merge ability. Review every addition and deletion carefully. A minified file may appear as one replaced line.
Open the MEW Token Pull Request
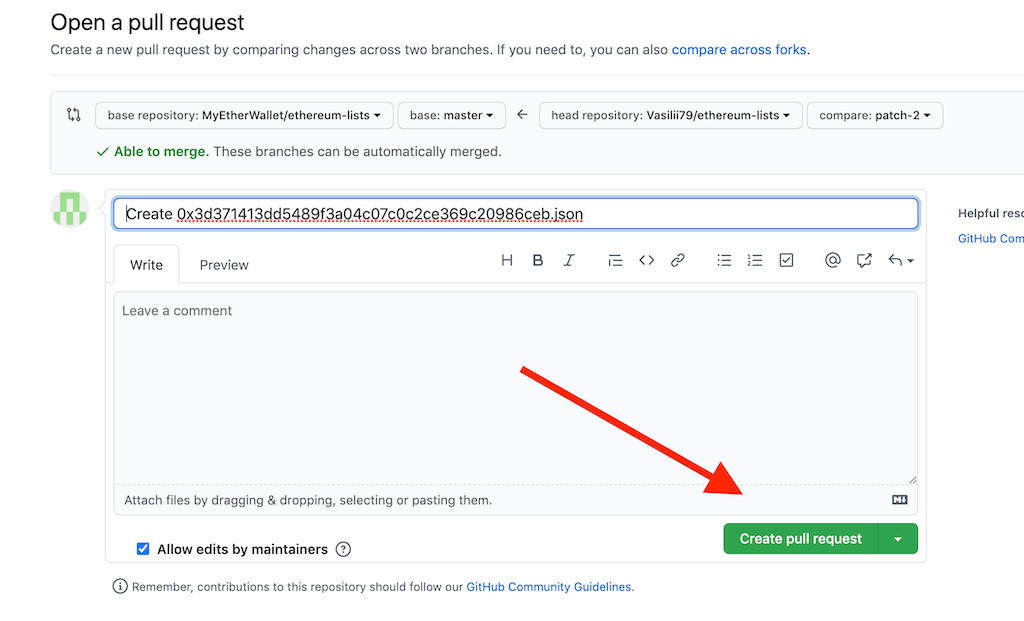
When the comparison is clean, select Create pull request. Next, confirm both repositories and branches again.
Confirm the Pull Request Direction
The base must be the official MyEtherWallet repository. Select master as the base branch. The head must be your fork and dedicated token branch. Otherwise, the contribution may target the wrong repository.
Write a Verifiable Pull Request Description
Use a direct title containing the token name, symbol, and network. Then, summarize the metadata and icon changes. Include these verification details in the description:
- Network and token standard.
- Checksum contract address.
- On-chain symbol and decimals.
- Official website and support contact.
- Blockchain explorer link.
- Public market-tracker page.
- Independent security-audit links.
- Complete list of changed files.
Keep tracker and audit links outside token JSON. However, they can help maintainers verify the project.
Record the Pull Request Number
Create the pull request only after reviewing its preview. Then, save its number and permanent GitHub URL.
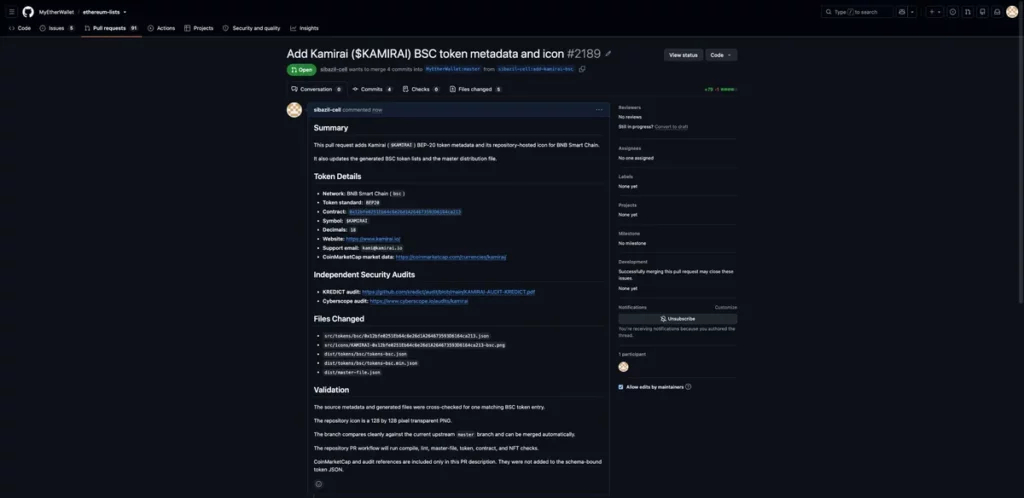
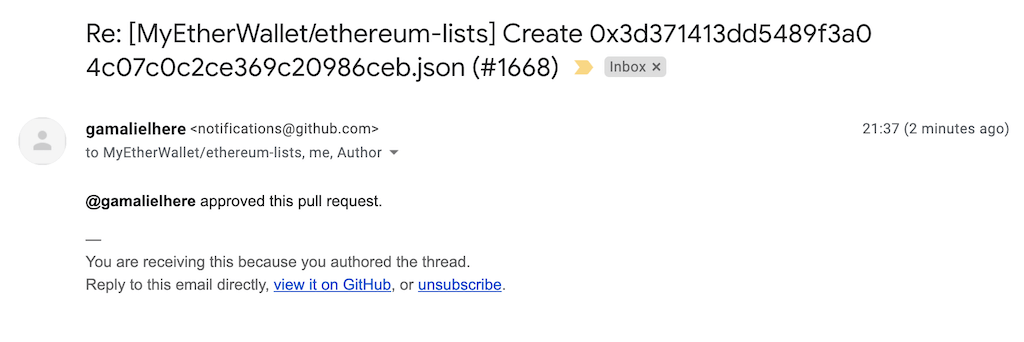
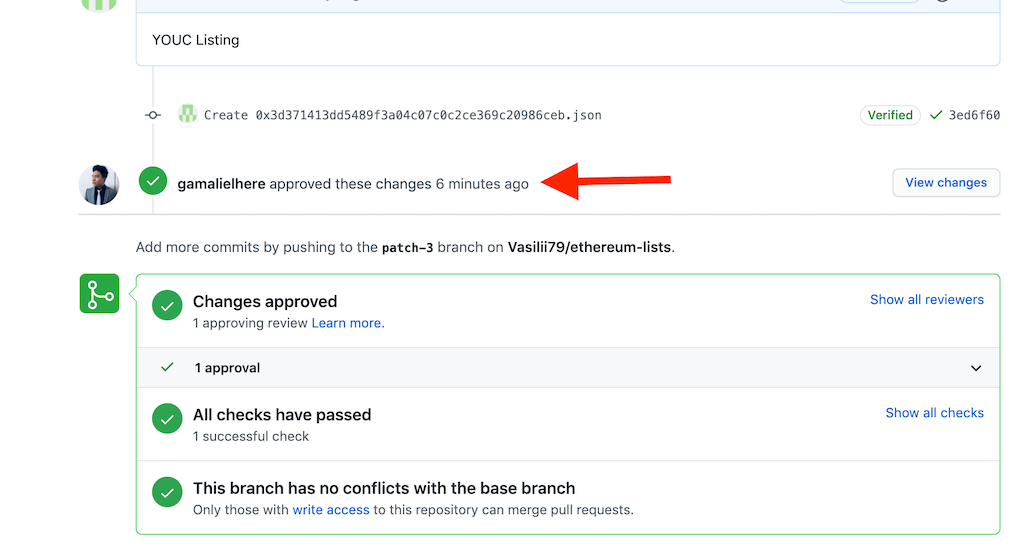
Track the Pull Request Approval Status
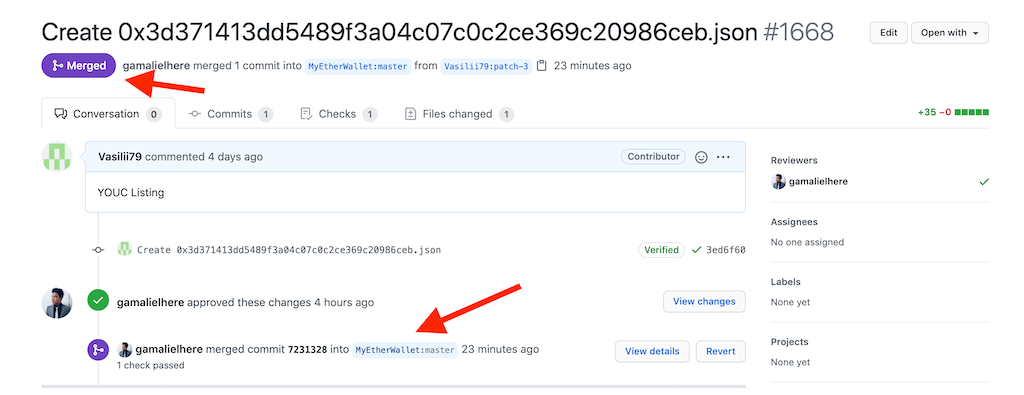
Open the MEW pull-request list and search using the saved pull request number. Then, compare the result with a previously merged MEW token contribution. Tokpie also keeps the original approval-status reference available for returning readers. Do not open duplicate pull requests for the same token. Instead, push later corrections to the existing branch.
MEW Pull Request Statistics: Last 24 Months
A public GitHub review on July 17, 2026 found 51 pull requests opened during the previous 24 months. None were merged. Six were closed without a merge, while 45 remained open. This equals 0% merged, 11.8% closed without merge, and 88.2% still open. However, GitHub does not label unmerged closures as rejections. Four of the six were closed by their authors. The remaining two had unavailable actor data.
Public repository results for pull requests opened during the measured 24-month period.
Public GitHub snapshot taken July 17, 2026. Cohort: PRs created from July 17, 2024 through July 17, 2026.
How Long Does It Take to Add a Token Logo and Price to MEW?
Short answer: no guaranteed end-to-end timeline exists. Preparing correct metadata and artwork can take one to three working days. Maintainer review is the unpredictable stage. No PR opened in the measured period reached merge. The median open request was already 118 days old. The oldest had waited about 691 days. Therefore, owners should plan for months, not days.
After a merge, the logo still needs a MEW product build. The same period contained 36 stable web releases. Their median gap was about 17 days. Three quarters of release gaps were about 25 days or shorter. Therefore, check the logo roughly two to four weeks after merge. This estimate is not an SLA. Live pricing follows a separate provider process. The public MEW web path is CoinGecko-based. CoinMarketCap alone does not activate price data. Without CoinGecko, a project needs a manual MEW decision. No public deadline exists, and price may remain unavailable after the logo appears.
Request MEW Price Support Without CoinGecko
A merged metadata pull request still does not guarantee a live price. Therefore, contact MEW separately about pricing.
Use an Official MEW Support Channel
Email [email protected] after the pull request receives its number. Alternatively, contact support inside the MEW wallet app. However, email handles technical links more clearly.
Review MEW’s official support safety guidance before sending anything. Never use unsolicited Telegram messages or direct messages. Also, never provide a recovery phrase or private key.
Combine Metadata and Price Context in One Ticket
The first support email should include the pull request number, URL, network, contract, and market page. Furthermore, include independent audits and explain that CoinGecko support is unavailable. Ask whether MEW accepts CoinMarketCap or another non-CoinGecko provider. Do not assume any provider is guaranteed.
Information to Include in the Price Request
- Token name and on-chain symbol.
- Exact network and checksum contract.
- Decimals and official website.
- Pull request number and URL.
- CoinMarketCap asset page.
- Independent audit reports.
- Available markets, liquidity, and volume evidence.
- A request for the supported price provider.
Initial MEW Support Email Template
Subject: [TOKEN NAME] ([SYMBOL]) on [NETWORK] — MEW PR #[PR NUMBER] and price request

Hello MEW Support,

We opened a contribution for our token metadata and logo:
[PULL REQUEST URL]

Network: [NETWORK]
Contract: [CHECKSUM CONTRACT]
Symbol: [SYMBOL]
Decimals: [DECIMALS]
Website: [WEBSITE]
Market page: [MARKET PAGE URL]
Audits: [AUDIT URLS]

CoinGecko support is unavailable and will not be pursued.

Can MEW use this market page or another supported provider for a live USD price?

Please also confirm whether the pull request contains the required default-token metadata.

Best regards,
[PROJECT TEAM]
Follow Up After the Pull Request Is Merged
After merge, reply inside the original support email thread. Therefore, MEW receives one complete case history. Provide the merged pull request and merge commit. Then, repeat the exact network and contract address.
Ask MEW to confirm the price-mapping status and expected rollout scope. Avoid creating a second parallel ticket. If support already activated pricing, a separate follow-up request is unnecessary. Continue with final verification instead.
Post-Merge Price Follow-Up Template
Hello MEW Support,

The token metadata and logo pull request has now been merged:
[PULL REQUEST URL]

Merge commit: [MERGE COMMIT URL]
Network: [NETWORK]
Contract: [CHECKSUM CONTRACT]
Symbol: [SYMBOL]

Please assess and activate live USD price mapping for this exact asset.

Market page: [MARKET PAGE URL]
Audits: [AUDIT URLS]

CoinGecko will not be available for this asset.

If the cited market page cannot be used, please identify an accepted provider.

Please also confirm the expected rollout scope and status.

Best regards,
[PROJECT TEAM]
Verify the Token Logo and Live Price in MEW
Begin verification only after repository deployment and price-backend confirmation. Some caches may require additional time.
Test With a Clean MEW Session
Open a private browser session or unused browser profile. Then, connect a test wallet without custom token settings. Select the correct blockchain network. Search using the exact checksum contract address whenever MEW supports contract search. Furthermore, test MEW Portfolio and the current MEW mobile application. Product coverage can differ during rollout.
Verify Identity and Price Separately
- Confirm the token appears without a manual custom import.
- Confirm the network and contract address.
- Confirm the name, symbol, decimals, and logo.
- Confirm a live USD price appears.
- Confirm portfolio value uses that price.
- Compare the value with the cited market page.
Small price differences can occur because providers update at different times. However, a missing price requires follow-up.
Save Final Verification Evidence
Capture screenshots showing the MEW product, network, logo, price, and contract context. Record the test date and version. If anything remains missing, reply inside the existing support thread. Include screenshots and the affected MEW product.
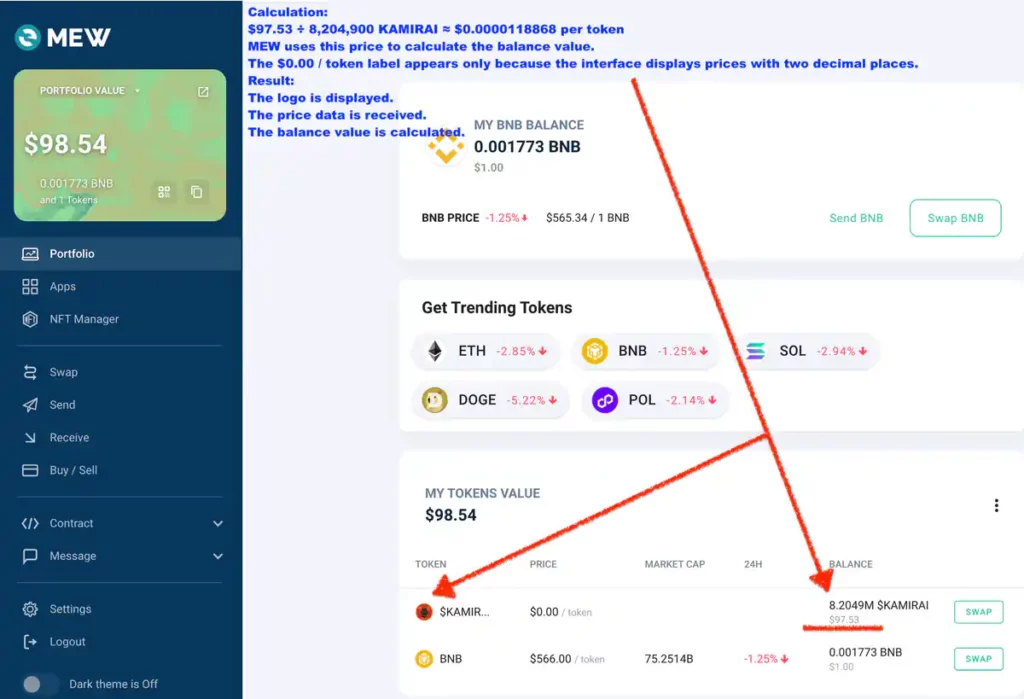
Successful MEW Token Addition Example: Logo and Dynamic Price
This real MEW example shows what a successful token addition looks like. The wallet displays the token logo and values 8,204,900 tokens at $97.53. Therefore, MEW is receiving a dynamic price of about $0.0000118868 per token. The Price column still shows $0.00 because the interface rounds small unit prices to two decimals. However, the non-zero USD balance proves that live pricing works and contributes to the total portfolio value.
Useful MEW and Token Listing Resources
These checked resources extend the workflow with official references, wallet guides, tracker submissions, and token-growth options. All links below were available when this guide was updated. However, platforms can change their forms and requirements.
Guides for Wallets and Blockchain Networks
- Add token branding by following the Trust Wallet token guide.
- Next, prepare another hardware-wallet submission with the Ledger token guide.
- List a TON asset with Tokpie’s TON token listing guide.
- Prepare a TRC-20 asset using the TRON token integration guide.
- Understand Solana submissions through the Solana token guide.
- Then, review the Base blockchain token guide.
- Prepare Polygon visibility with the Polygon token listing guide.
- Prepare Arbitrum visibility with the Arbitrum token listing guide.
- Review Tokpie’s Ethereum overview for basic ETH context.
- Furthermore, learn what Trezor is before submitting token data.
- Explore the Tokpie and MakerDAO ecosystem guide for another Ethereum use case.
Token Trackers and Explorer Updates
- Prepare a tracker submission with the CoinGecko token listing guide.
- Update supply and capitalization through the CoinMarketCap supply guide.
- Next, update explorer metadata with the BscScan and Etherscan update guide.
- Add a tracked asset using the TokenInsight listing guide.
- Request explorer pricing through the BscScan and Etherscan price guide.
- Then, submit the asset with the Blockspot listing guide.
- Submit another tracker request with the Coincost listing guide.
- Add the asset using the DigitalCoinPrice listing guide.
- Furthermore, use the CoinDataFlow listing guide.
- Prepare CoinCheckup data with the CoinCheckup listing guide.
- Submit the asset through the Live Coin Watch listing guide.
- Next, follow the CoinCodex listing guide.
- Compare more services through Tokpie’s top cryptocurrency trackers guide.
- Add the asset using the CoinPaprika listing guide.
- Then, use the Coinranking listing guide.
- Prepare another submission with the BitDegree listing guide.
- Publish token events through the Coindar listing guide.
- Finally, review the CoinLore listing guide.
Token Growth, Liquidity, and Exchange Resources
- Build a stronger project with the successful cryptocurrency guide.
- Increase decentralized-market depth with the PancakeSwap and Uniswap liquidity guide.
- Gain community visibility through the token voting platforms guide.
- Improve public supply data with the token circulation guide.
- Add fiat purchase methods through the bank card and Apple Pay guide.
- Prepare an exchange application with the Binance token listing guide.
- Furthermore, study cryptocurrency trends and global trade.
- Use the AI-enhanced crypto project guide for content and operations.
- Prepare another exchange listing with the Coinbase token guide.
- Explore Tokpie’s self-listing and fundraising application.
- Consider managed support through the token listing and liquidity outsourcing guide.
- Submit a project through the Tokpie listing application form.
- For questions, contact Tokpie through its official Telegram channel.
Legacy MEW Screenshot Archive
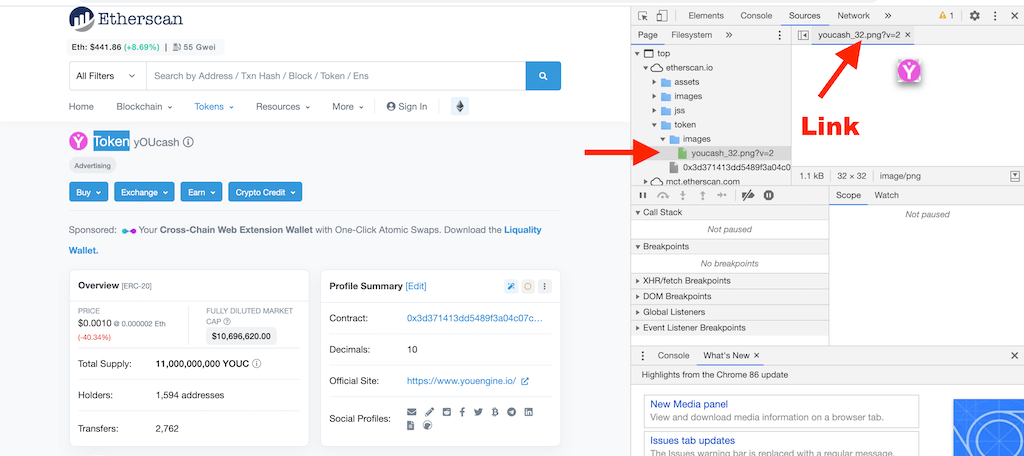
The current screenshots above show the new workflow. However, these original Tokpie images remain available for historical comparison.
- Open the legacy screenshot for creating a MEW token file on GitHub.
- Review the legacy screenshot for naming the MEW metadata file.
- See the earlier example for finding a hosted token-logo URL.
- Open the legacy screenshot for proposing a token file on GitHub.
- Review the first historical MEW pull-request creation screen.
- Then, review the second historical MEW pull-request confirmation screen.
- See the legacy GitHub approval email example.
- Review the historical pull-request approval message.
- Open the legacy screenshot showing a merged MEW pull request.
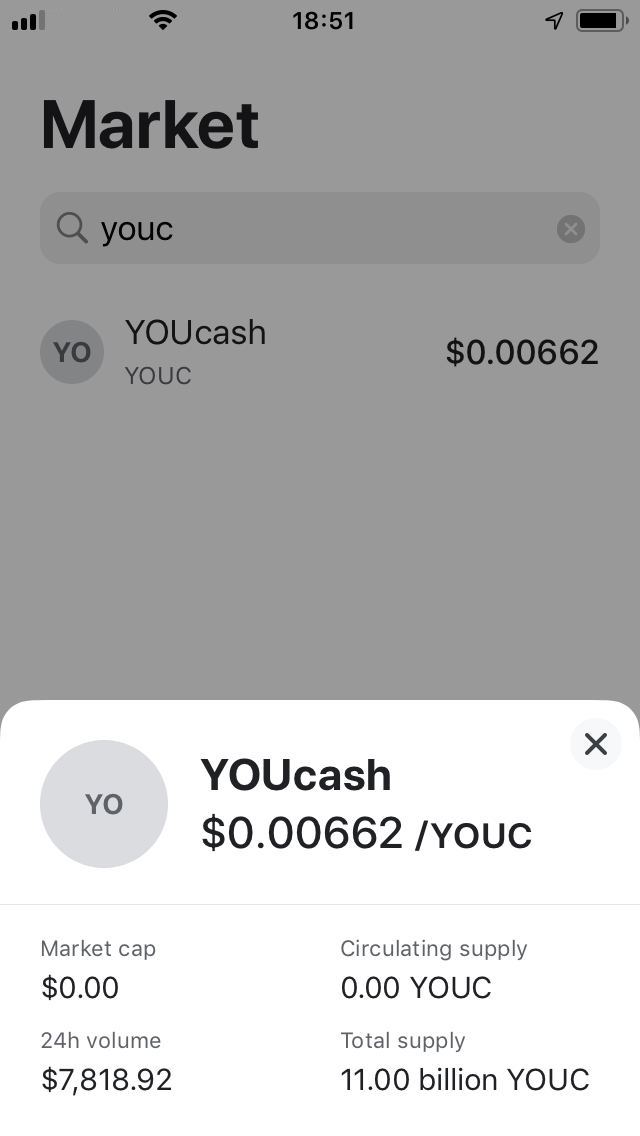
- Compare the earlier token-not-listed MEW example.
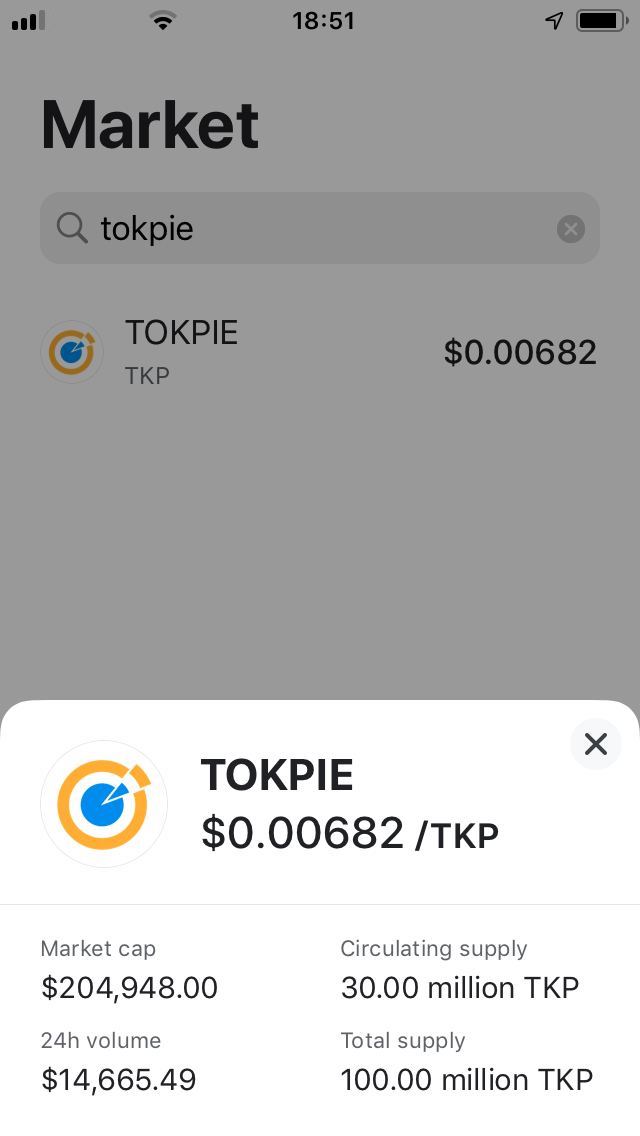
- Finally, compare the earlier permanent-token MEW example.