CoinGecko is a cryptocurrency ranking and tracking website providing valuable information about cryptocurrencies. Getting your altcoin listed on CoinGecko is essential to establishing its legitimacy and visibility in the crypto industry. So, this article provides a step-by-step guide on how to list token on the CoinGecko. Also, you’ll learn about the advantages of CoinGecko listing, requirements to meet, and solutions to potential reasons for refusal. Following the steps outlined here will increase the chances of successfully listing your token on this major cryptocurrency data aggregator. Also, projects preparing for CoinGecko should review a realistic centralized exchange listing budget before selecting venues that must support active markets, tight spreads, and reliable trading data.
Updated: July 06, 2026.
What’s CoinGecko (CG)?
So, Coingecko is a popular cryptocurrency ranking and information website that tracks thousands of cryptocurrencies and provides essential data on each coin, such as market capitalization, volume, price, listings, team, and community. It aims to provide cryptocurrency users with a comprehensive overview of the crypto market. Many crypto enthusiasts and investors trust the site to research different coins and find new investment opportunities. Also, judge the superior cryptocurrency trackers.
Advantages
CoinGecko is undoubtedly a powerful coin-tracking platform: its daily traffic is second only to CoinMarketCap. For example, CG’s monthly visits are around 22.9 million in 2024, according to SimilarWeb (table below). Additional vital advantages of being listed on Coingecko include the following:
- High visibility and exposure to crypto investors and the wider crypto community.
- Credibility and legitimacy as Coingecko only lists established coins traded on reputable exchanges.
- Ranking due to critical metrics, which can attract investors looking to invest in top-ranked coins.
- Regular updates on crucial stats, news, and events to keep the community informed.
- Easy to compare your currency with competitors using Coingecko’s comprehensive data and rankings.
- Make a token price visible in the MetaMask.
CoinGecko Average Monthly Visits by Year
The table below compares annual average monthly visits and normalizes the traffic bar against the highest year in the dataset.
| Year | Average Monthly Visits | YoY Change | Compared with 2023 Peak | Traffic Bar |
|---|---|---|---|---|
| 2022 | 22.1M | Baseline | -26.1% | |
| 2023 | 29.9M | +35.3% | Peak year | |
| 2024 | 22.9M | -23.4% | -23.4% | |
| 2025 | 23.195M | +1.3% | -22.4% | |
| 2026 | 19.45M | -16.1% | -34.9% |
Note: Traffic bars are normalized against the highest value in this table, where 2023 equals 100%. YoY means year-over-year change.
Add AI‑Powered Insights with CoinGecko’s Model Context Protocol (MCP)
While your token is awaiting approval, empower your team with CoinGecko’s new Model Context Protocol (MCP). MCP is an open standard that lets large‑language models and other AI agents securely tap directly into CoinGecko’s real‑time price, volume, and market‑cap endpoints—no SQL or Python required. Simply ask questions in plain English via Claude, Cursor, or n8n workflows and receive on‑chain‑fresh answers that you can stream into internal dashboards, trading bots, or investor reports. Paid‑plan holders can even spin up a local MCP server for higher rate limits and access to pro endpoints, with an authenticated remote option coming soon. Leveraging MCP helps you validate KPIs, spot anomalies, and prove liquidity—exactly the metrics CoinGecko’s listing team evaluates.
Steps for adding a coin to Coingecko
The process of adding a coin to Coingecko includes four primary steps:
- You should list a token on at least one exchange, but the more – the better.
- A blockchain startup’s representative should take the cake of the coin’s liquidity and trading volume.
- You need to update your coin Info on GeckoTerminal.
- A token issuer shall create an account on Coingecko.com.
- You must fill out and submit the CG’s form correctly.
So, to succeed with listing your currency on Coingecko, use the detailed descriptions of all the steps below:
Step 1. Get listed on Exchanges
First, you must list your altcoin on at least one exchange from the CG’s list of supported exchanges. However, having a coin available for trading on 2-3 decent exchanges is also a positive factor for Coingecko’s team. Why? Because during a review, the CG’s managers prioritize coins by the number of markets/exchanges. In the process of choosing an exchange, give preference to those exchanges that are supported by Coingecko and CMC simultaneously. For example, both trackers support the Tokpie cryptocurrency exchange. So, you can always list a token on Tokpie by filling out a short form. As a result, your currency will appear on Coingecko, CMC, and many other popular trackers, wallets, explorers, and platforms.
Step 2. Improve Trade Volume, Liquidity, Spread, and Market Depth
Trade volume, liquidity, spread, and market depth are other vital factors for pushing an asset to the Coingecko. For example, listing a coin on the most reputable exchange is useless if your market lacks BIDs, ASKs (liquidity), and trade vol. So, to pass verification smoothly, keep the following metrics for your coin’s market:
- Trade Volume: $50,000 daily.
- Spread – the difference between the highest BID and lowest ASK: should be below 1%.
- Liquidity – the worth of BIDs and ASKs inside the 2% spread: should be $500-$1500 each.
- Market depth – the number of BIDs and ASKs in your order book: should be at least 25 BIDs and 25 ASKs.
So, remember, Coingecko wants to list coins that attract traffic. It means that CG tries to list assets that are popular among traders. That’s why CG’s managers review trade volume, liquidity, spread, and market depth. Also, find more information about liquidity. Besides, some MM software solutions help to automate the process.
Step 3. Update information on GeckoTerminal
To list your token on CoinGecko, you must first update your coin’s information on GeckoTerminal, as explained in steps 4-5 below. However, please note that GeckoTerminal only tracks data from decentralized exchanges (DEXs), not centralized ones. Therefore, you need to do the following:
- Create a pool for your token on a reputable DEX like PancakeSwap, Uniswap, Raydium, or similar. Once this is done, your token’s page on GeckoTerminal will automatically populate.
- Afterward, simply submit the update request form via this link: GeckoTerminal Update Request.
GeckoTerminal is an effective and user-friendly tool that fetches real-time data, such as coin price and volume, from decentralized exchanges. Moreover, it’s entirely free to use. In addition, updating token information on GeckoTerminal paves the way for your token’s potential listing on CoinGecko. The CoinGecko team relies on GeckoTerminal’s data to verify listings.
Consequently, the more accessible your token’s information is on GeckoTerminal, the closer it gets to being listed on CoinGecko. Furthermore, your data will be available through the GeckoTerminal API, which enhances your token’s visibility to developers and makes it accessible in more places. Also, it’s a good idea to complete the coin audit before submitting the Coingecko’s request. Compare contract auditors’ pricing now.
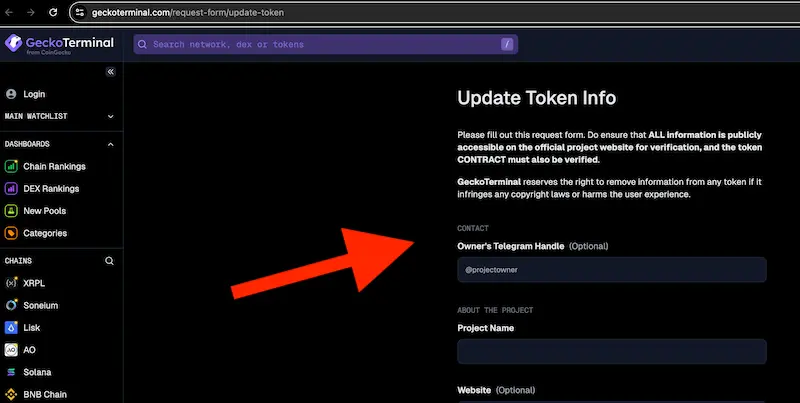
What’s GeckoTerminal?
GeckoTerminal is vital for any coin aiming for a CoinGecko listing. However, you must first create a pool on a decentralized exchange (DEX) like PancakeSwap, Uniswap, or Raydium. Therefore, your token’s page on GeckoTerminal emerges automatically. Then, you can submit the token update form. Moreover, GeckoTerminal fetches price and volume data at zero cost. But it only tracks decentralized exchanges. Furthermore, the CoinGecko team relies on this data to support your main listing application. So, updating your token info on GeckoTerminal is essential for a smoother CoinGecko listing process. Additionally, developers can access your token via the GeckoTerminal API. Consequently, your currency gains broader exposure across multiple platforms.
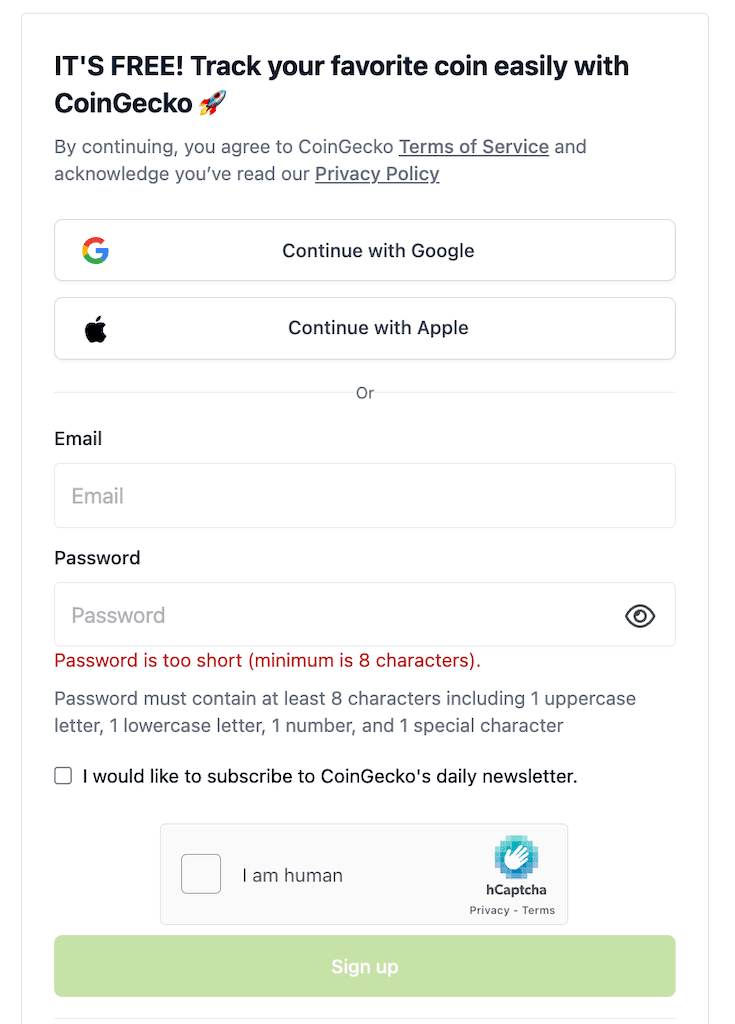
Step 4. Register on CG
The next step is registration. From the main CG page, press the [Sign up] button.

Better use your official email address. It’s good to use your website domain email address. For example, instead of [email protected], use an official email address like info@yourwebsitedomain address.
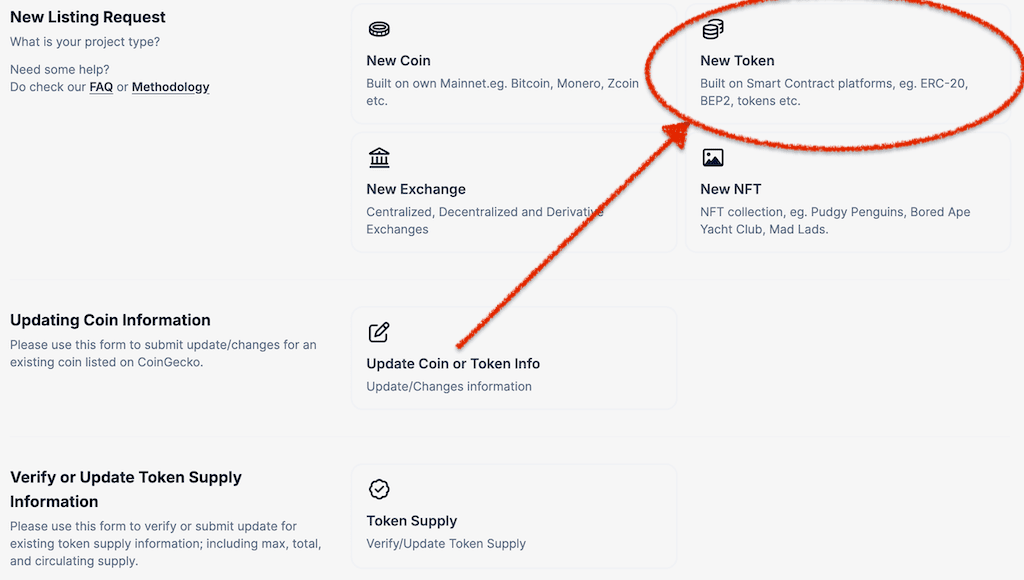
Step 5. Fill out and submit the form
Now, it’s time to carefully fill out Coingecko’s listing application form and submit it for review. The CG team will review the application manually and verify the coin details before approving the listing. So, do the following:
- Log in to your CG account (after registration).
- Open the request-dedicated page and press the “Token” tab.
- Fill out the form with details. Here below you will find the step-by-step instructions for filling out the Coingecko token application form. But if you need more information, ask for the professional help: [email protected].
How to fill in Coingecko request form.
CoinGecko token submission form: updated field-by-field guide
Use this section after your project has a working website, public documentation, verifiable contract data, and at least one active market that CoinGecko can check. The goal is not to “sell” the project to reviewers. The goal is to submit accurate, consistent, and verifiable information so the CoinGecko team can review the token without unnecessary back-and-forth.
A. Quick checklist before submitting to CoinGecko
Prepare this checklist before you try to list token on Coingecko. Treat each item as a verification point, not a marketing point.
- RequiredOfficial project website with the token name, ticker, contract address, chain, and social links.
- RequiredActive market evidence from an exchange or DEX page that CoinGecko can inspect.
- RequiredCorrect blockchain platform, token contract address, decimals, and explorer link.
- RequiredToken supply data: max supply, total supply, burn wallets, circulating supply, and locked or vested wallets where applicable.
- RecommendedWhitepaper or docs explaining tokenomics, allocation, vesting, roadmap, and utility.
- RecommendedAudit links, verified contract source code, and public repository links if available.
- AvoidSubmitting vague claims, unverifiable market links, inactive social channels, or inconsistent token data.
B. Step-by-step CoinGecko submission timeline
Prepare evidence
Collect website, whitepaper, exchange or DEX market pages, explorer pages, supply data, community links, token logo, and public verification materials.
Publish ownership proof
Before filling the form, publish a public verification post from an official social account linked on the project website. Include the project identity and GeckoTerminal page if available.
Fill the form
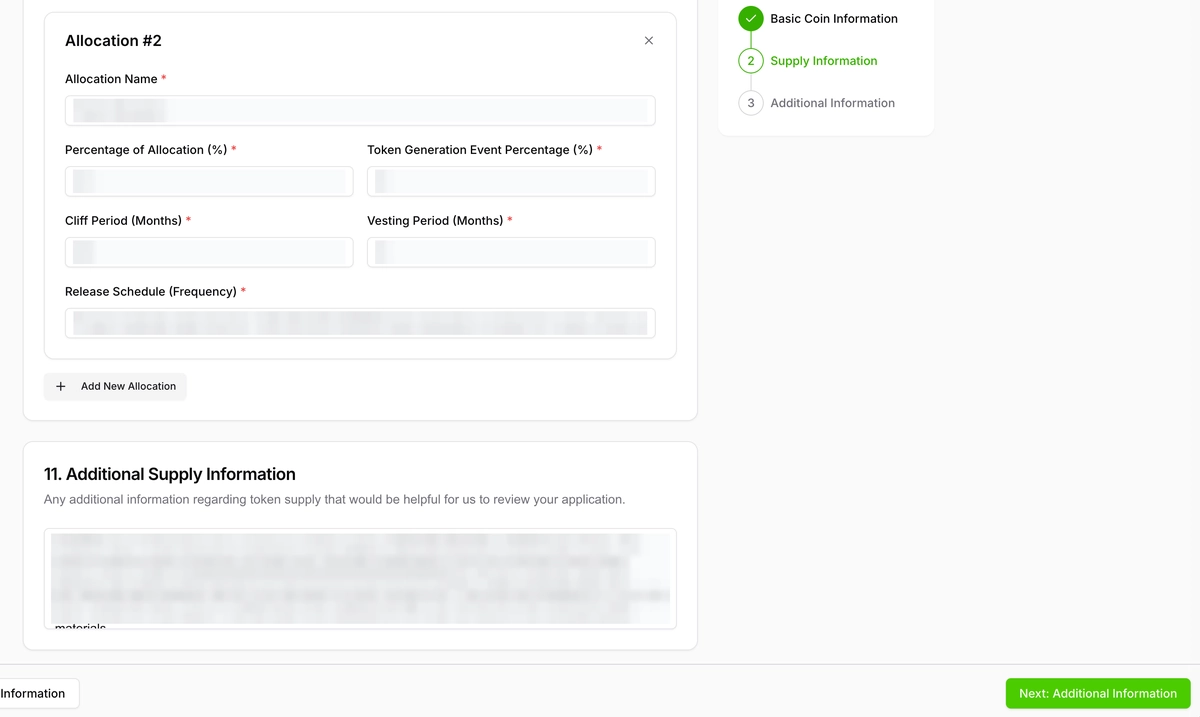
Log in, open the Request and Listing area, choose New Coin/Token Listing, select the listing type, and complete all mandatory fields.
Submit and monitor
Choose Regular Pass or Fast Pass, accept the terms, submit the request, save the Request ID, reply to the verification post with the ID, and monitor the dashboard.
C. Required evidence pack
| Evidence type | What to prepare | Why it matters |
|---|---|---|
| Project identity | Token name, symbol, website, docs, submitter role, and official contact. | Helps reviewers confirm that the request comes from the actual project team. |
| Market evidence | Direct trading-pair pages from CEXs or DEX pools, with active trading where applicable. | Helps CoinGecko verify that the asset has a public market and price source. |
| Contract evidence | Explorer token page, chain, exact contract address, and decimals. | Prevents wrong-contract listings and inaccurate token metadata. |
| Supply evidence | Max supply, total supply, burned wallets, locked wallets, circulating supply, allocation schedule, and public API endpoints if used. | Supports market-cap, ranking, and circulating-supply review. |
| Community evidence | Official X, Telegram, Discord, Medium, YouTube, GitHub, and other active channels where available. | Shows that the project has public communication channels and verifiable ownership signals. |
| Security evidence | Verified contract source, audit report, repository links, and admin/ownership notes if relevant. | May help reviewers evaluate transparency and smart-contract risk. |
D. Field-by-field form guidance
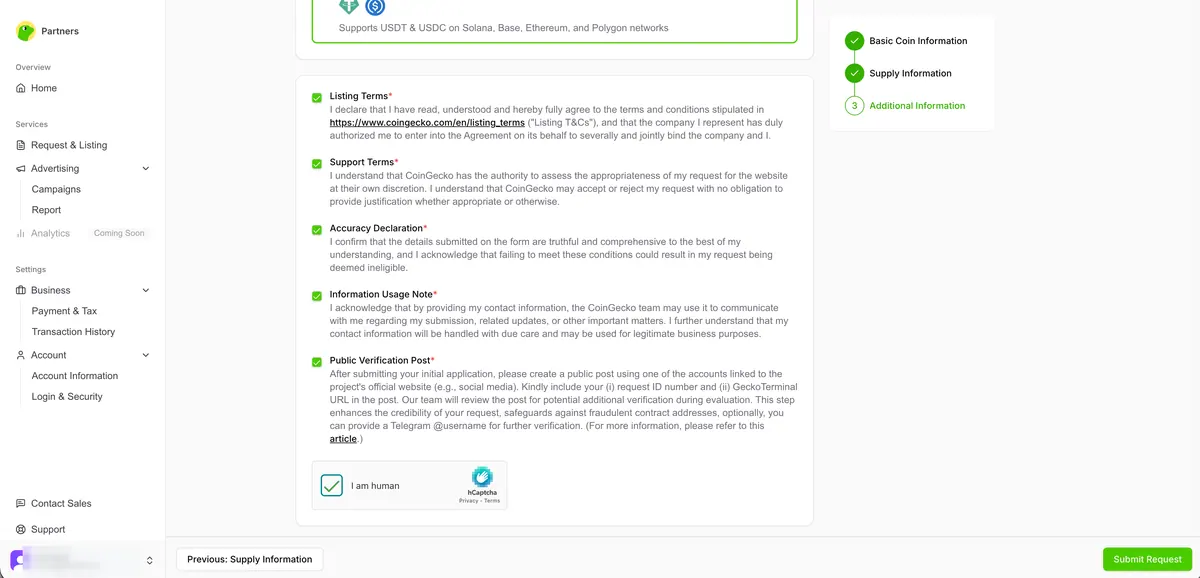
Public verification before the form
CoinGecko’s current verification flow asks projects to create a public verification post before filling the Listing or Update request. Use an official social account that is linked directly from the project website. Mention that the project is preparing to submit a CoinGecko request, include the GeckoTerminal URL if the project is already visible there, and add a Telegram contact if the team wants to make follow-up verification easier.
After submission, use the Request ID from the confirmation email or dashboard and reply to the original verification post with that exact ID. This helps CoinGecko connect the form, the public post, and the project’s official social account.
Choose Active Listing or Preview Listing based on launch status
Choose the listing type that reflects the real status of your token. Use Active Listing only when the token is already launched and has active market evidence. Use Preview Listing only when the live form offers that path and your token is not yet launched.

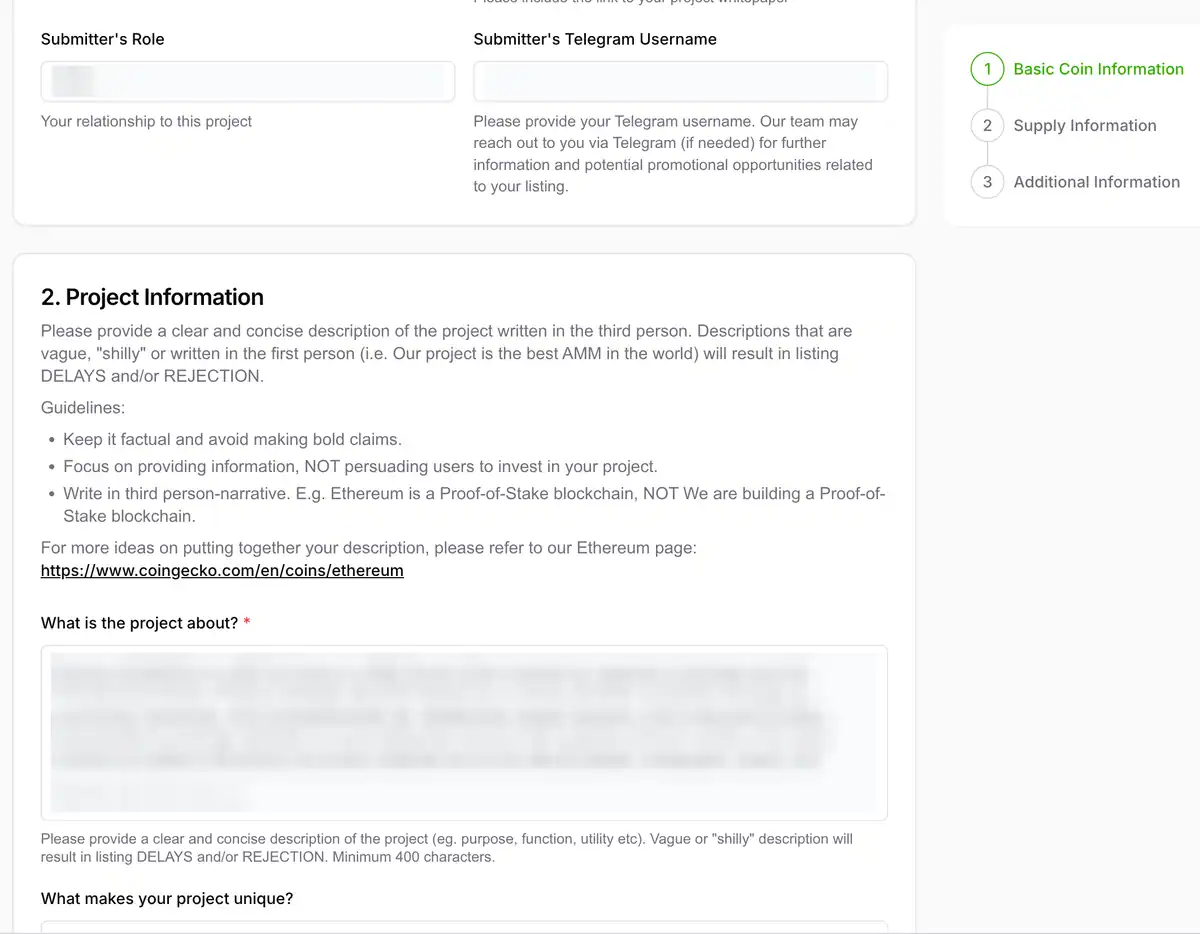
Basic coin/token information
Enter the official coin or token name and symbol. The name, ticker, website, whitepaper, contract explorer, exchange pages, and public verification post should all match. Do not add extra promotional wording to the token name unless that is the official registered name used across your project materials.
Add official website, whitepaper, submitter role, and Telegram contact if available. Use a project-domain email when possible and describe the submitter’s role accurately. If the submitter is an agency or listing manager, make the relationship clear in the remarks or additional information area.
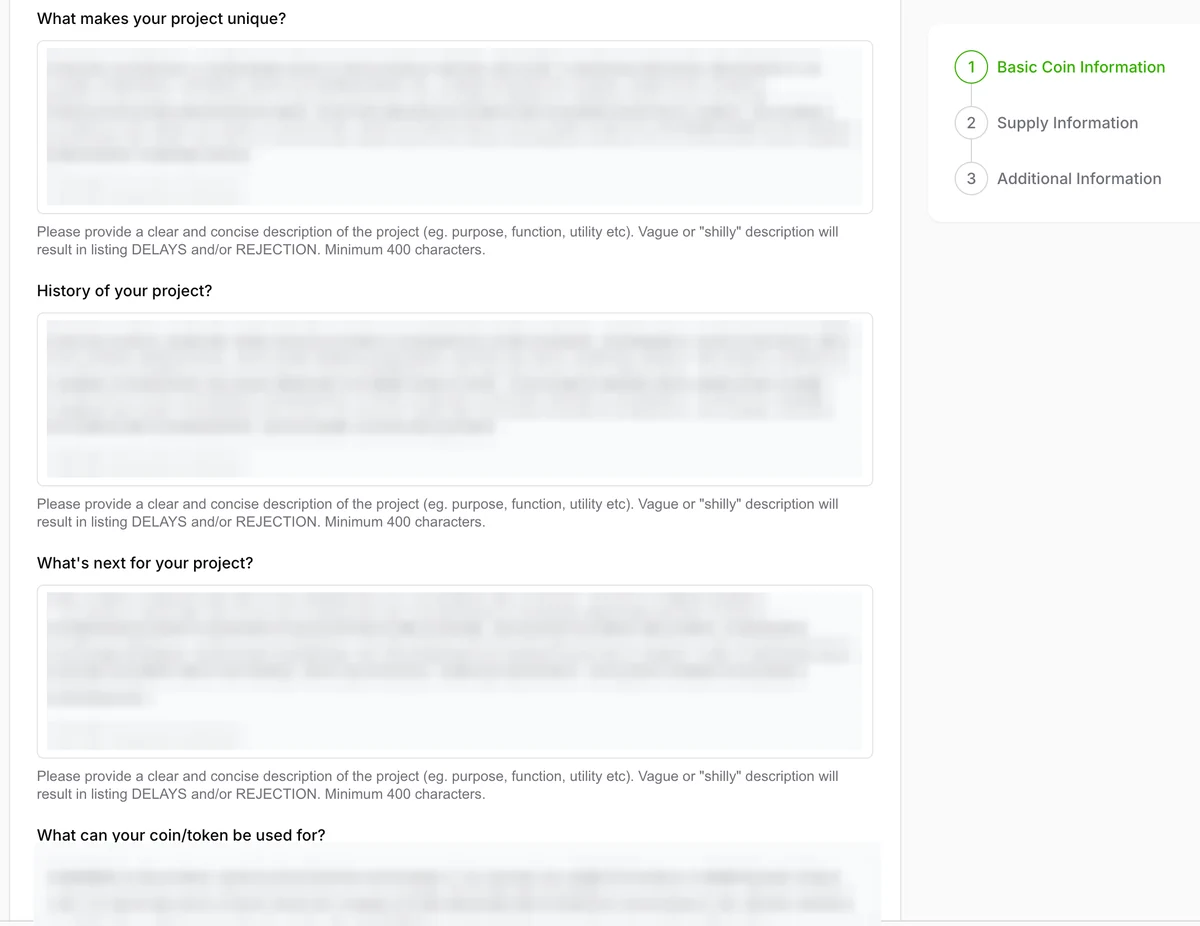
Project description, uniqueness, history, roadmap, and utility
Write the project overview in factual, third-person language. Explain what the project does, what problem it addresses, which chain it uses, and how the token fits into the ecosystem. Avoid “best,” “revolutionary,” “guaranteed,” or price-focused language.
Explain what makes the project unique without making unsupported claims. If you mention a DEX, game, DAO, staking module, burn mechanism, or AI feature, state whether it is live, in testnet, or planned. A roadmap item should not be described as a live product.
Summarize the project history and major verified milestones. Include contract deployment, launch, audits, product releases, pool creation, exchange listing, or other dated facts that can be checked.
Describe the roadmap and the token utility clearly. Focus on practical use cases such as governance, fees, access, staking, payments, in-product usage, or ecosystem incentives only if they are documented by the project.
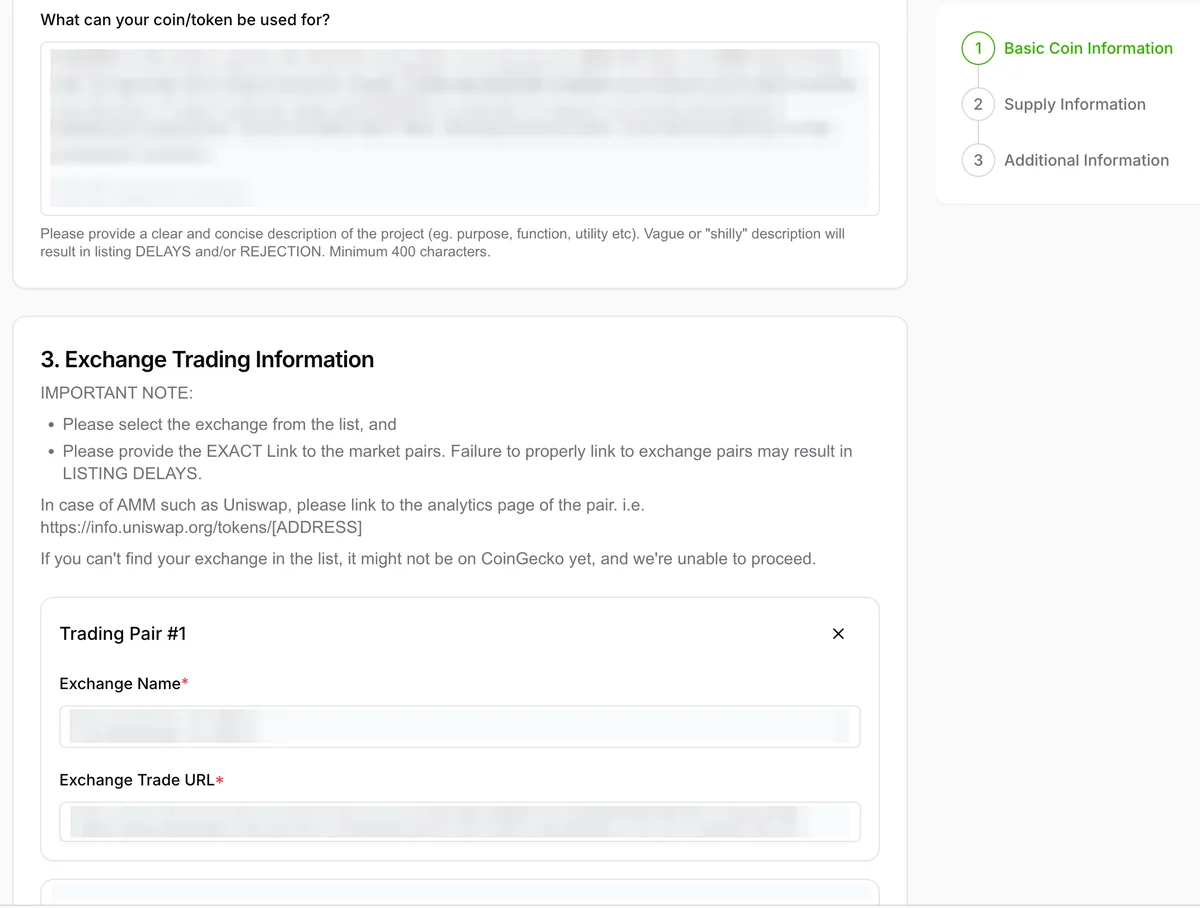
Market and trading-pair evidence
Provide every active trading pair and official market page. Add direct market URLs for centralized exchange pairs or DEX pools, not only the exchange homepage. The trading pair, token symbol, token contract, and chain should match your submitted token data.
Market, explorer, and contract data must match public on-chain and trading records. If the token trades on more than one venue, list the strongest verifiable markets first and keep the remarks field free of exaggerated liquidity claims.
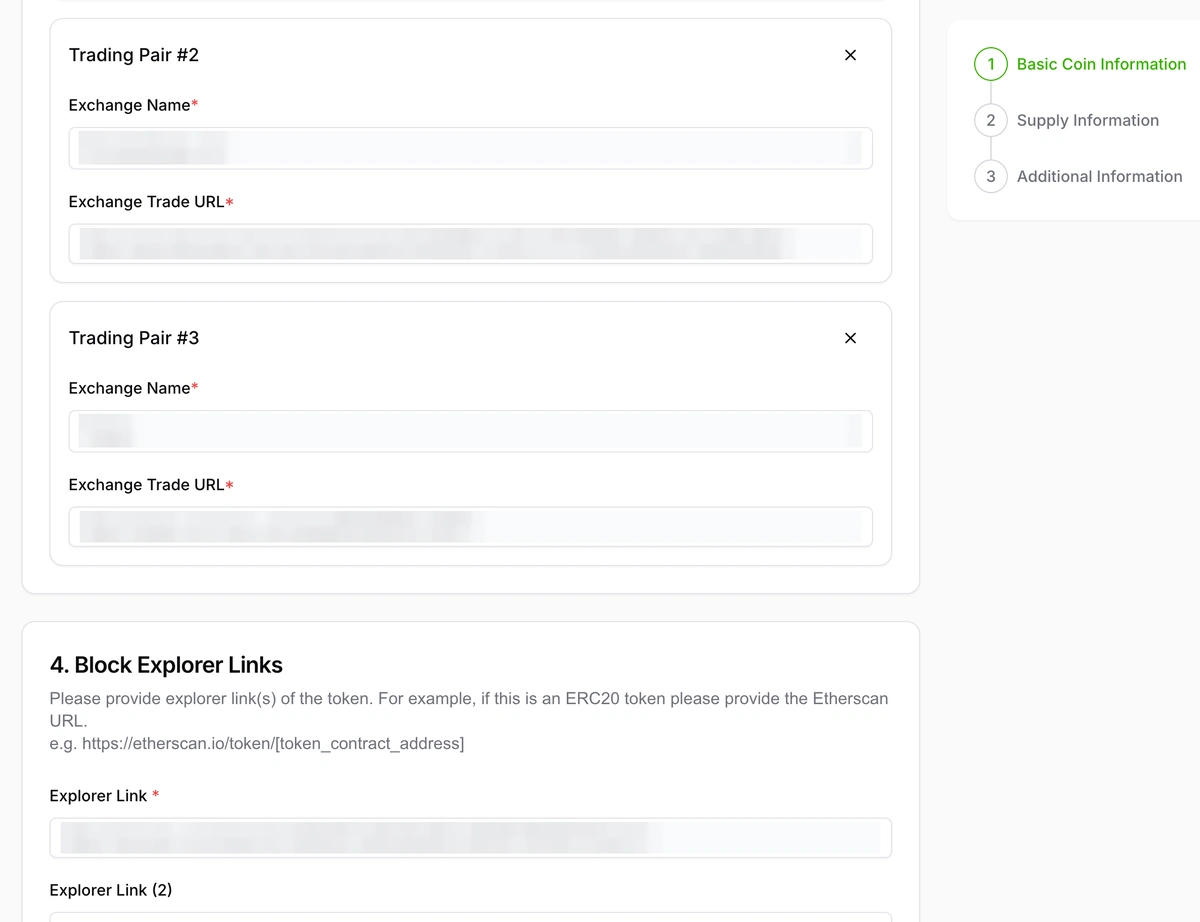
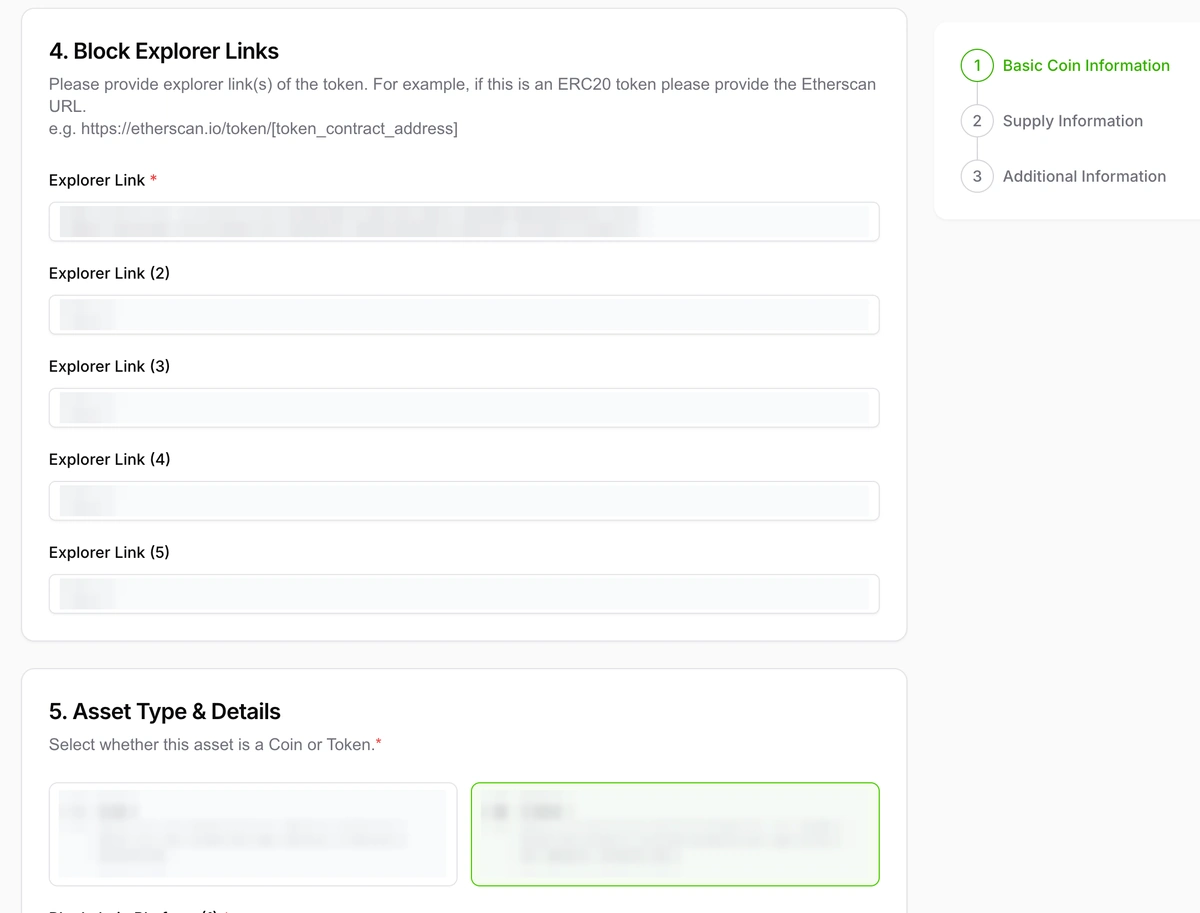
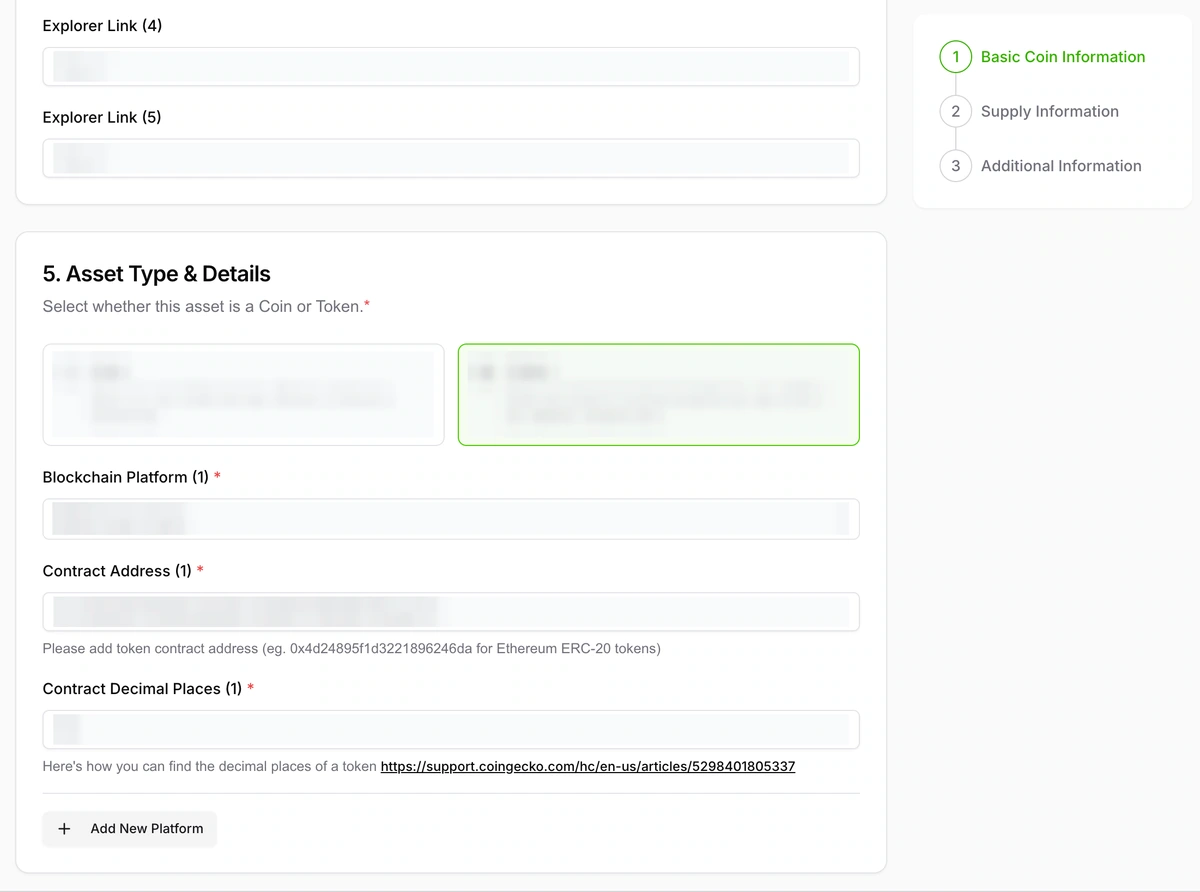
Explorer links, asset type, blockchain, contract address, and decimals
Add token-level explorer links and select token built on smart contract platform. Use the token page on the explorer, not a random transaction or wallet page.
Select the blockchain platform and enter the exact contract address and decimals. Copy the contract address from the explorer and verify decimals directly from the token contract or explorer metadata. Wrong chain or wrong contract data can delay review or lead to rejection.

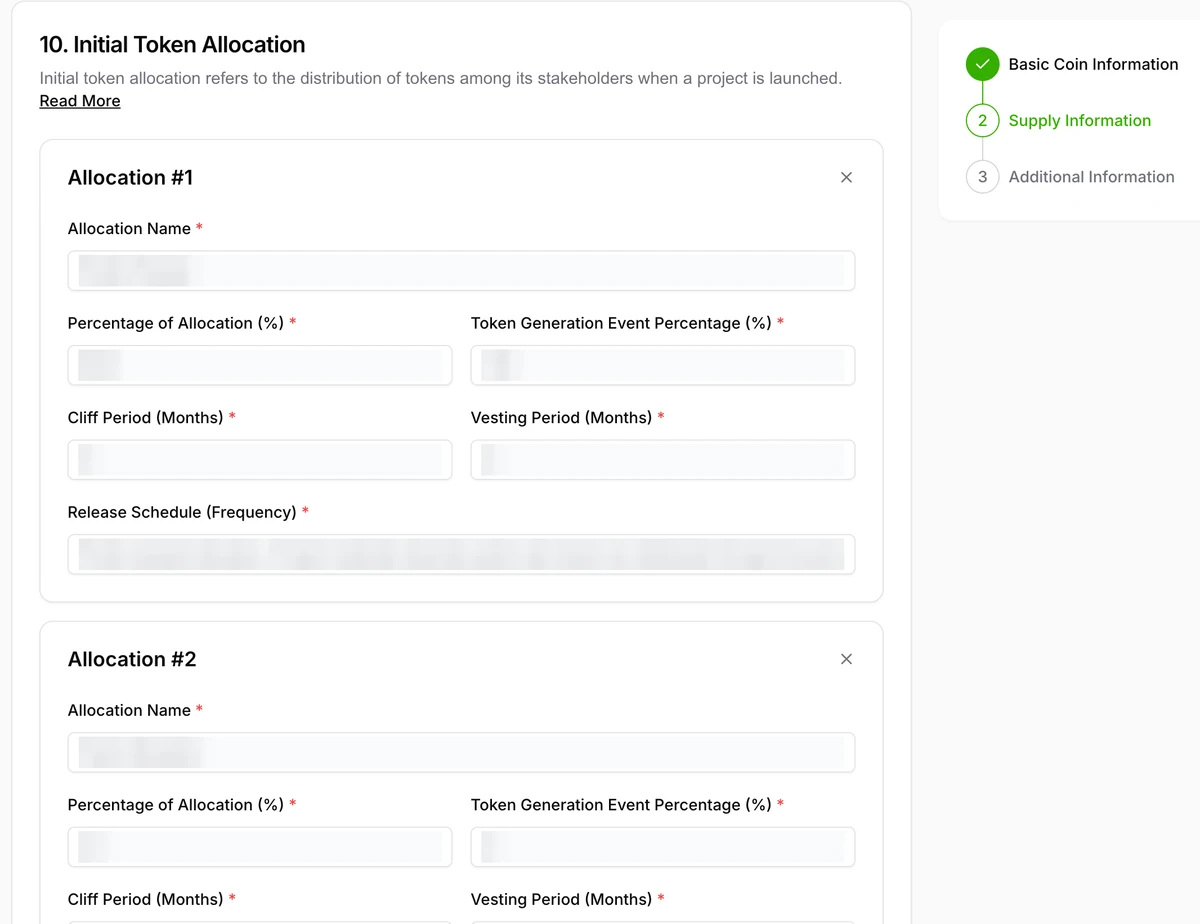
Supply and tokenomics information
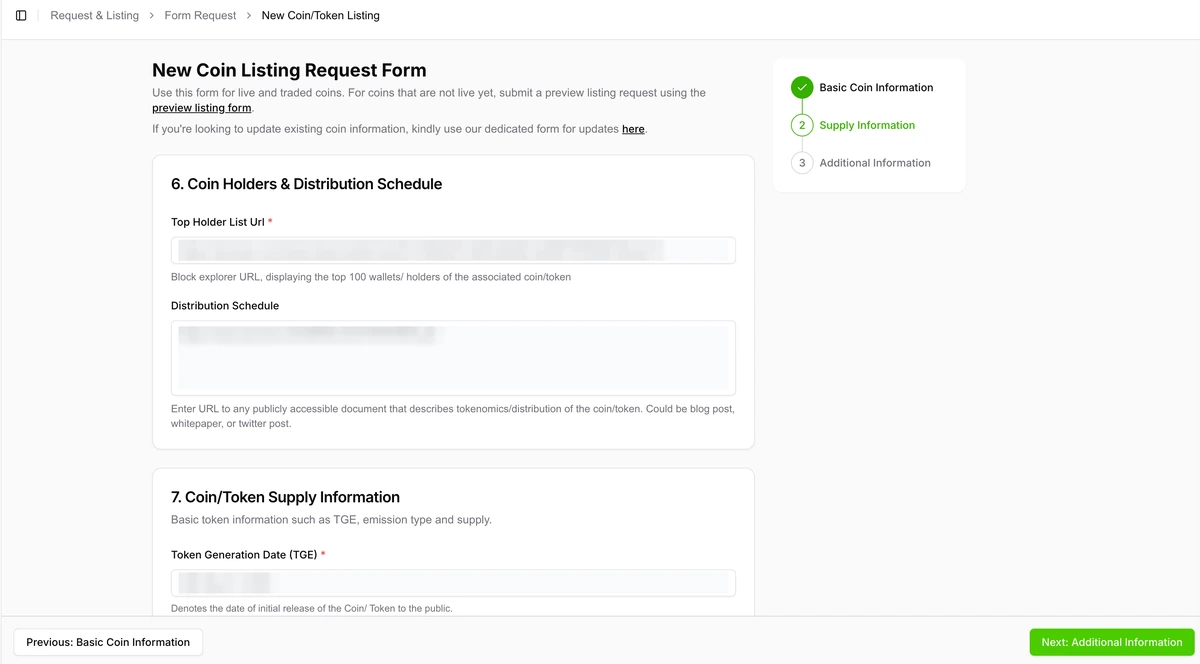
Provide top holder list and distribution schedule. Use explorer holder pages and public docs that show allocation, vesting, lockups, burns, treasury wallets, team wallets, and release assumptions.
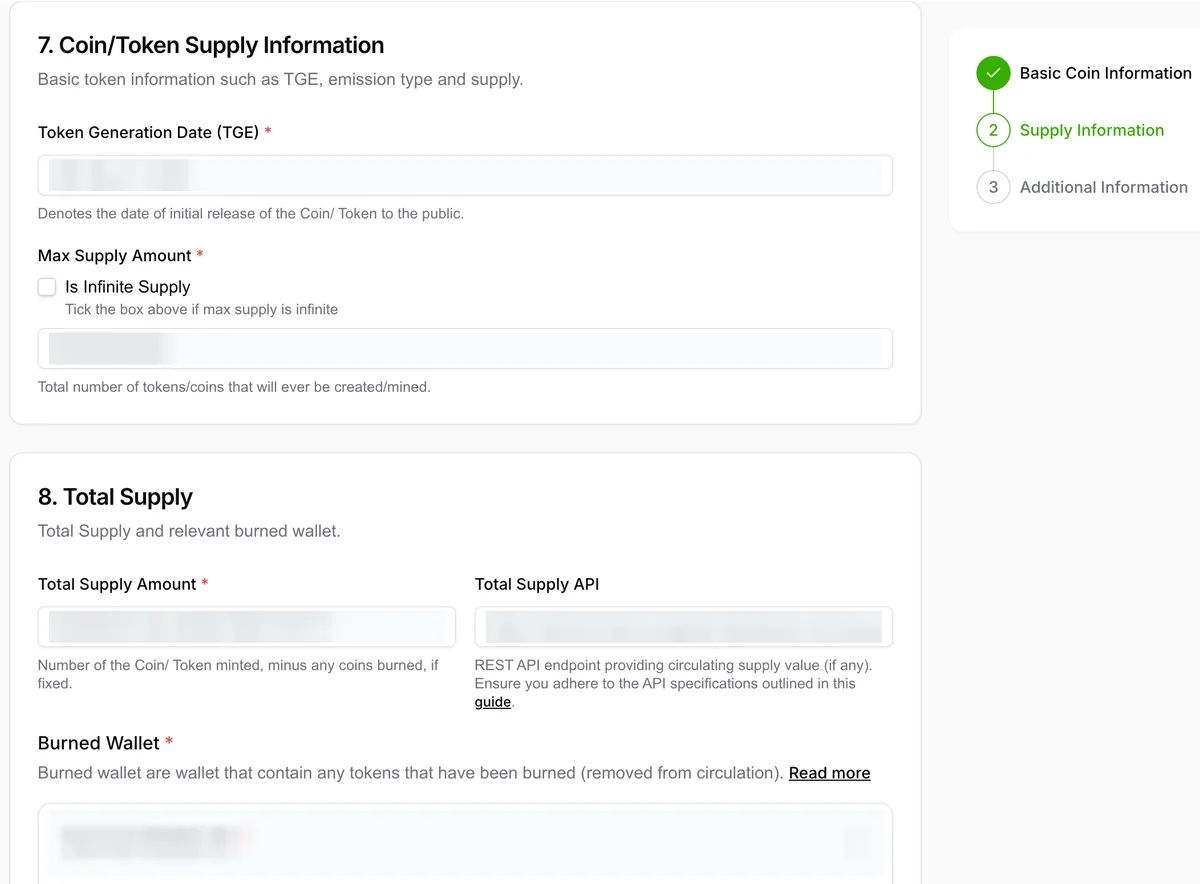
Enter TGE date, max supply, total supply, and burn-wallet details. CoinGecko’s supply guidance treats burned tokens and locked or vested wallets as important inputs for total and circulating supply review.
Add circulating supply, API endpoints, and locked or vested wallets. If you provide supply APIs, make them public, stable, and JSON-based. CoinGecko may prioritize team disclosures and on-chain sources, so API values should reconcile with explorer and documentation data.
Break down token allocation with TGE percentage, cliff, vesting, and release schedule. Use precise numbers and mention any gaps honestly. If a lock proof is not available, say so rather than implying one exists.
Use additional supply information to explain assumptions and caveats. This is the right place to explain burn mechanics, unminted tokens, excluded wallets, lock schedules, bridges, and supply formulas.
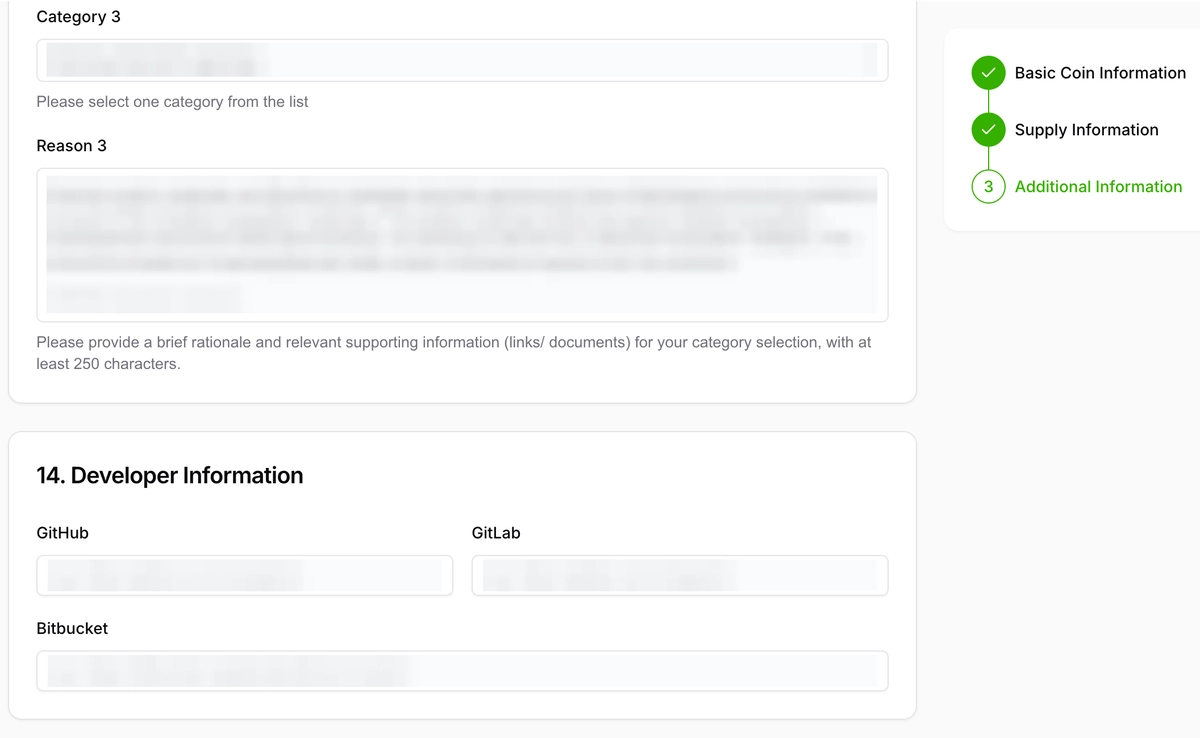
Community links, categories, developer links, images, remarks, and final declarations
Add official X, Telegram, and other community links. Use only channels controlled by the project. Remove or avoid dead, private, low-quality, or unrelated links.
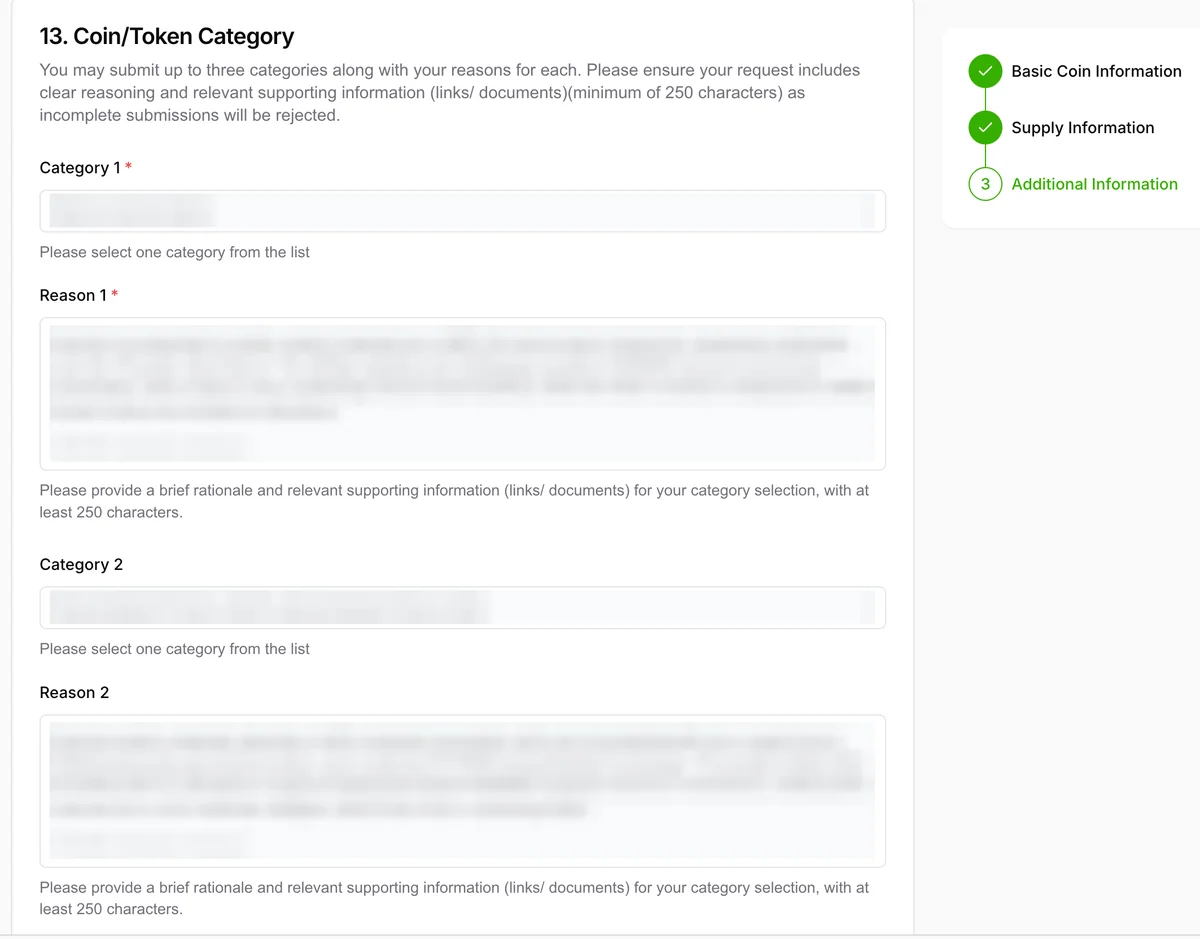
Select categories only when you can support them with evidence. CoinGecko category requests should be backed by clear reasoning and verifiable documentation. If a category is based on a future roadmap item, say that it is planned instead of presenting it as live.
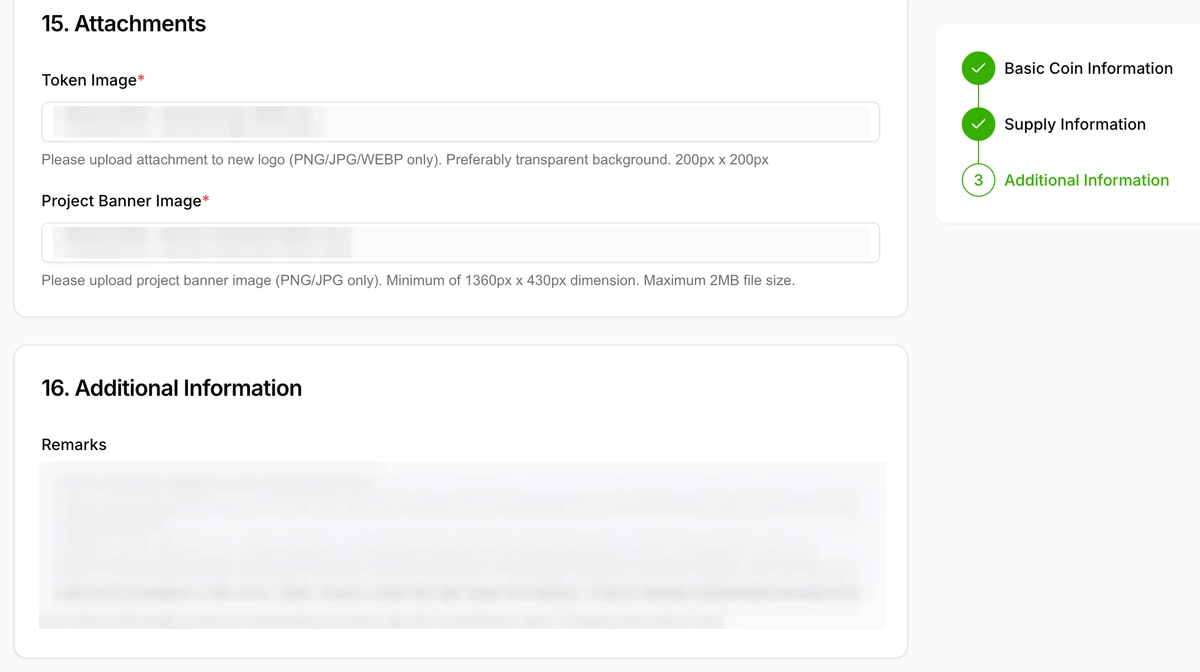
Review developer links, images, remarks, and terms before submitting. Add GitHub, GitLab, or Bitbucket links when they exist. Upload a clean token logo and project banner if the live form requests them. Use remarks to add useful context such as audit references, GeckoTerminal presence, market notes, or ownership-verification details.
Add developer repositories, upload images, enter remarks, choose review speed, and confirm terms. Check every declaration carefully. Submitting inaccurate data can create avoidable support requests or rejection risk.
E. Common mistakes to avoid
- Claiming the token is “guaranteed” to be listed or that Fast Pass guarantees approval.
- Submitting a contract address that is not the actual traded token contract.
- Using an inactive website, private community links, or socials that are not linked from the official website.
- Providing market links that do not show the exact pair, chain, or pool being submitted.
- Leaving supply assumptions unexplained, especially burned, locked, vested, treasury, bridge, or team wallets.
- Selecting categories because they are popular rather than because the project has evidence for them.
- Creating the public verification post after submission and forgetting to reply with the Request ID.
- Sending repeated or incomplete requests instead of responding through the dashboard when CoinGecko asks for more details.
F. What to do after submitting
- Save the Request ID. You will need it for follow-up, dashboard checks, and the public verification reply.
- Reply to the verification post. Add the exact Request ID as a reply to the original public verification post.
- Monitor the Request and Listing tab after submission. Watch for Pending, Action Needed, Approved, or Rejected status changes.
- Respond quickly to Action Needed. If CoinGecko asks for more information, answer with objective evidence and keep the response concise.
- Keep data consistent. Do not change contracts, websites, pools, tokenomics, or socials without updating project documentation and, if needed, filing the correct update request.

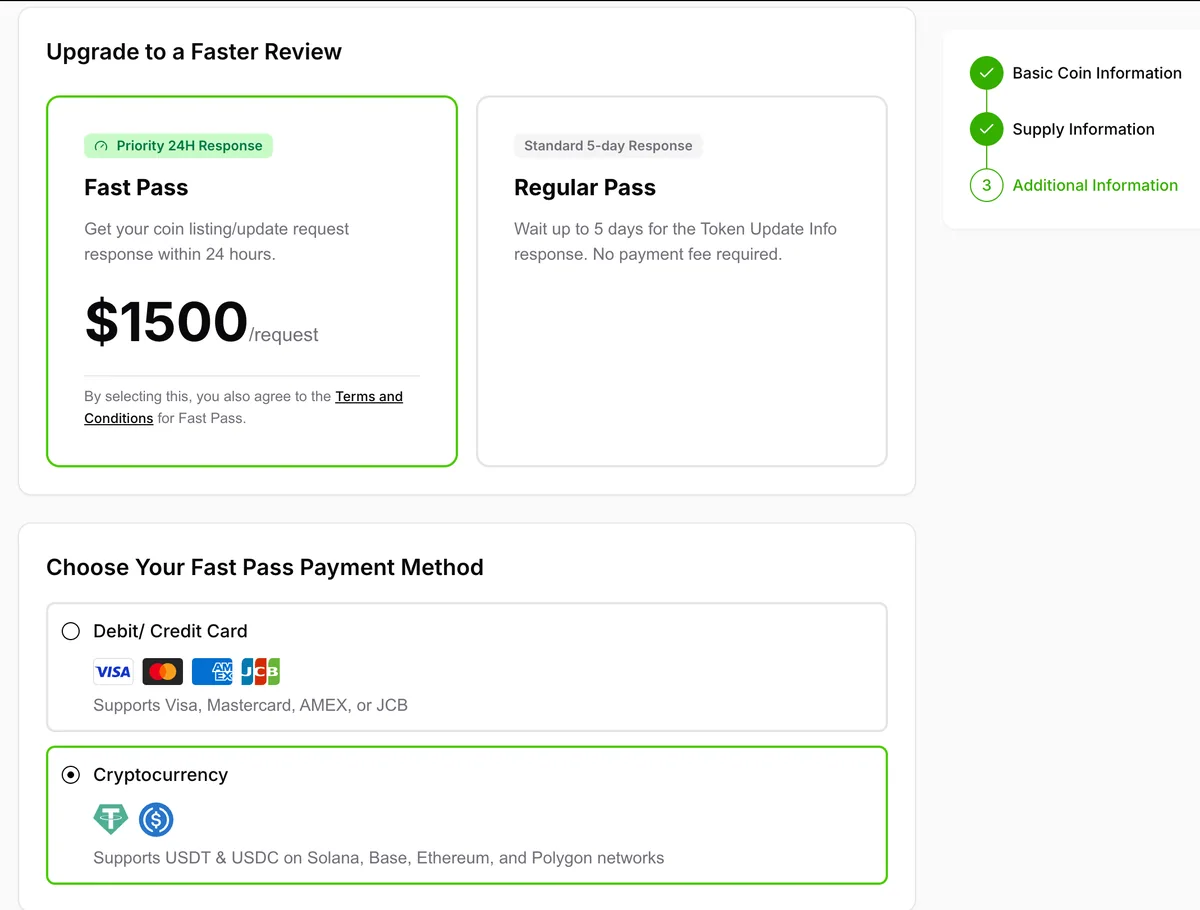
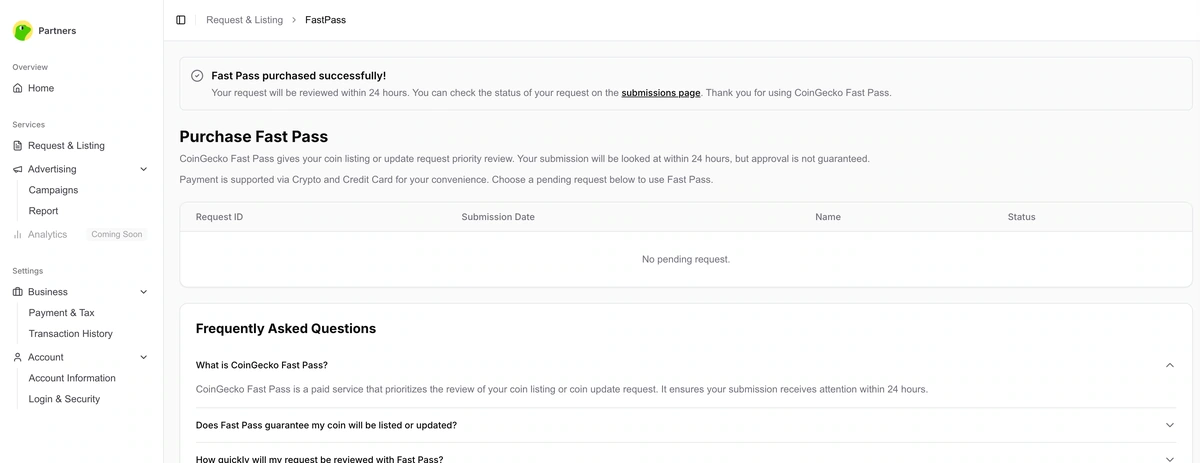
Fast Pass notes
Fast Pass is optional and does not guarantee approval. It is a paid priority-review service, not a paid listing. CoinGecko still applies its standard review criteria, and incomplete or non-compliant submissions can still be rejected.
Complete ownership verification and understand Fast Pass before paying. Fast Pass can be selected before submission or purchased after submission from the success page, dashboard, or confirmation email when the option is available.
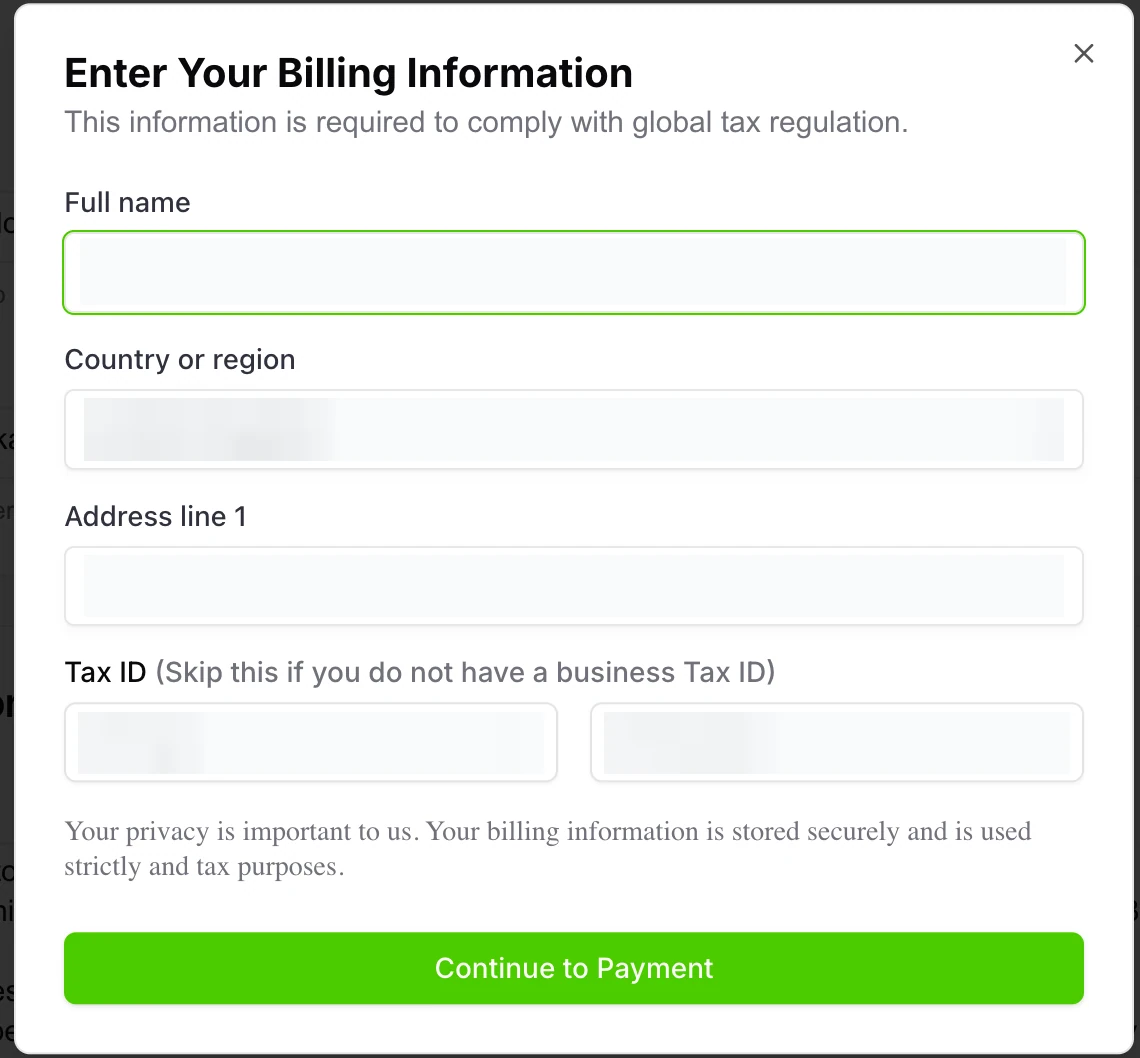
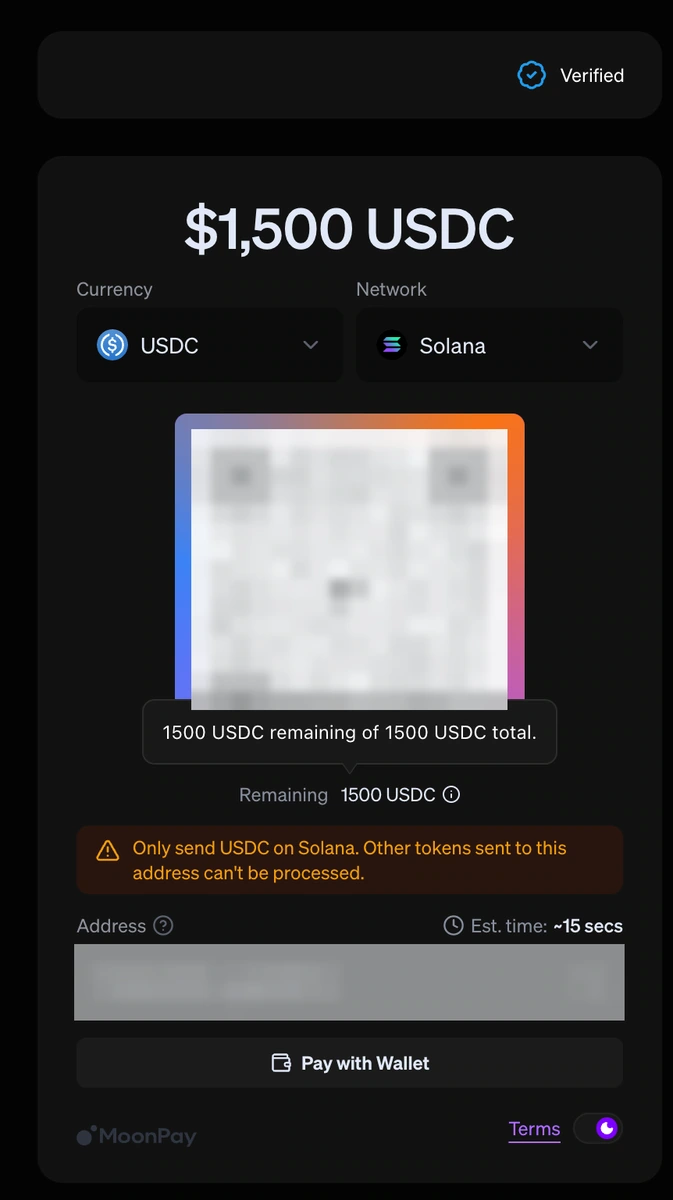
Complete billing details if you buy Fast Pass. CoinGecko’s official guidance says payment can be made by card or cryptocurrency where available. Use the live price shown in the current CoinGecko checkout, because fees may change.
Select cryptocurrency payment if available and follow the checkout flow. Keep the payment confirmation and invoice for your records.
Use the Fast Pass payment walkthrough only after deciding that priority review is worth the fee. A faster response can help teams with launch timing, but it should not replace a complete, evidence-backed form.
G. FAQ
Does CoinGecko guarantee that my token will be listed?
No. CoinGecko reviews submissions against its own listing criteria. A complete form can improve submission quality, but it does not guarantee approval.
Do I need an exchange or DEX market before submitting?
For an active listing, prepare direct evidence of at least one active market that CoinGecko can verify. Preview-listing workflows are different and should be checked on the live form.
Should I include GeckoTerminal?
Include the GeckoTerminal URL when the project is listed there, especially in the public verification post and remarks. It helps connect DEX market data with the submission.
What token logo should I prepare?
Prepare a clean square logo in PNG, JPG, or WEBP. CoinGecko’s logo guidance prefers a 200 by 200 image and a transparent background.
What should I write in the remarks field?
Use remarks for helpful review context: audit links, GeckoTerminal presence, supply assumptions, exchange notes, ownership proof, or any caveat that prevents misunderstanding.
What happens if CoinGecko marks my request as Action Needed?
Read the reviewer’s message in the dashboard and reply with accurate supporting evidence. Respond promptly because unanswered requests can be rejected automatically.
Is Fast Pass worth it?
Fast Pass may be useful when timing matters and the submission is already complete. It only prioritizes review; it does not guarantee listing, update approval, or a specific outcome.
How to check the status?
After the form’s submission, watch the status of your application at any time by doing the following:
- Log in to your CG account.
- Open the status page.
How long does it take to get listed?
The listing process can take from a few days to a few weeks, depending on Coingecko’s workload and the quality/completeness of your application. Providing all necessary details and documentation upfront will speed up the review and approval process. Under normal circumstances, Coingecko aims to review applications within 2 to 20 business days. However, you can utilize the Fast Pass to list your token on CG within 24 hours.
Reasons for being Rejected and solutions
Some common reasons for Coingecko to refuse a coin listing application include lack of vol., liquidity, or community support. So, don’t be surprised to see a red “Rejected” remark on the status page in few days after the form’s submission. Read the following paragraphs with the explanations on overcoming different rejections from Coingecko.
TIP
Send another listing request to Coingecko only after two weeks. Don’t send another request before the 2-week cooldown period. Otherwise, CG tags your application as spam. So, it will cause further delays to your listing request.
Suspected security risk in the smart contract
Another serious rejection reason is: “Unfortunately, the submission has been rejected due to suspected security risk identified in the smart contract.” This usually means that CoinGecko, or one of the external security platforms used during its review, detected a possible issue related to the token contract. In many cases, the problem is not the website, logo, whitepaper, or social media activity. Instead, the issue comes from contract-level warnings or negative signals shown on public scanners and audit platforms.
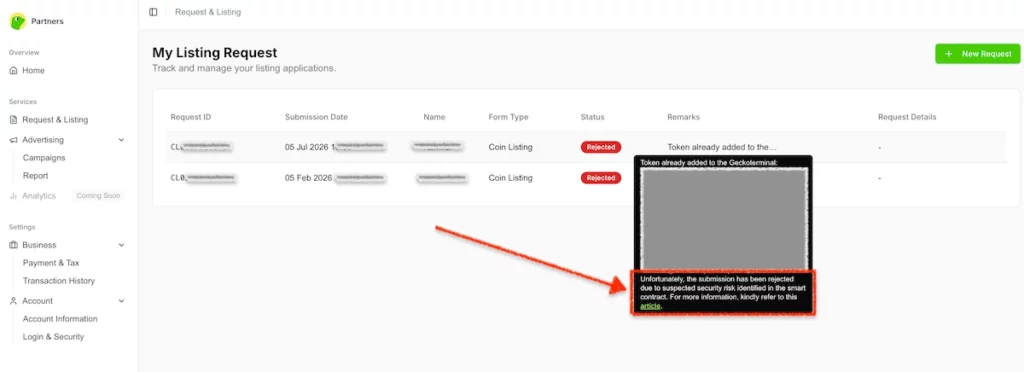
Why CoinGecko gives this rejection
CoinGecko may reject a token when its review team sees security-related warnings on external platforms such as GoPlus, RugCheck, Token Sniffer, Honeypot.is, DEXScreener security checks, DEXTools, Etherscan, BscScan, or public audit pages. Typical red flags include unverified source code, proxy or upgradeable contracts, non-renounced ownership, hidden owner privileges, blacklist or freeze functions, pause functions, mint functions, modifiable buy or sell tax, unusually high tax, anti-whale restrictions, transfer cooldowns, suspicious transfer logic, unlocked liquidity, unresolved audit findings, or honeypot-related warnings. Even if the token owner believes the contract is safe, CoinGecko may still reject the project if these public indicators look risky.
How to identify the exact warning
The first step is to check the token across several security platforms and write down every warning you find. Do not rely on just one scanner. Review the token on GoPlus, RugCheck, Token Sniffer, Honeypot.is, DEXScreener, DEXTools, Etherscan or BscScan, and the public page of your auditor if an audit exists. Then compare all findings carefully. This helps you understand whether the rejection comes from a real contract issue, an outdated scanner result, or a false positive. Save direct links and screenshots of every relevant warning, because they will be useful when you prepare the next submission.
How to fix real smart-contract issues
If the warnings are valid, fix them before sending a new CoinGecko application. Common actions include verifying the source code on the blockchain explorer, renouncing ownership, removing or disabling dangerous admin controls, reducing or locking tax settings, removing blacklist or freeze functions, locking liquidity, and publishing a public audit. If the auditor’s page shows unresolved findings, work with the auditor to resolve or acknowledge them properly. Also, make sure the public security report reflects the latest contract state. A token that still shows unresolved risks on external platforms has a much weaker chance of passing CoinGecko’s review.
How to deal with false positives
Sometimes the scanner is wrong or outdated. In that case, contact the relevant platform directly and request a manual review or rescan. Provide clear proof, such as the verified contract link, owner-renouncement transaction, current owner() value, liquidity lock proof, public audit report, and links to the live trading pairs. Ask the platform to update the public token page after reviewing the evidence. This step is important because CoinGecko often relies on those public indicators. If the scanner continues to show a warning, CoinGecko may reject the token again even if the team believes the warning is incorrect.
Keep your public claims consistent
Make sure your website, whitepaper, listing form, and public materials do not contradict the contract or the scanner data. For example, do not claim “zero tax” if the contract still contains active or switchable tax logic. Do not state “ownership renounced” unless the blockchain explorer clearly shows the owner as the zero address. Do not say “liquidity locked” unless there is a public proof link. CoinGecko reviewers compare your listing form, website, contract, market pages, scanners, and audit results. Any mismatch can create doubts and lead to another rejection.
When migration is the better solution
Some projects cannot remove the warning because the risky logic is permanently built into the deployed contract. In that case, the strongest long-term solution may be a migration to a clean standard token contract. A simple token with verified source code, no proxy, no mint function, no blacklist, no freeze or pause function, no modifiable tax, no transfer cooldown, and no anti-whale restriction usually has a much better chance of passing CoinGecko’s security review. However, migration is a major decision because the token address, liquidity pools, website, whitepaper, explorers, exchanges, and community announcements must all be updated.
When to re-submit the CoinGecko form
After fixing the issue, do not immediately submit the same request again. Wait at least 14 days after the rejection, gather all updated proof, and then submit a new CoinGecko application. In the remarks field, clearly explain that the previous smart-contract security warning has been resolved. Include links to the corrected scanner pages, verified contract, ownership proof, liquidity lock proof, and public audit report. If the issue was a false positive, explain that the relevant security platform reviewed the token manually or updated its status. A re-submission supported by clean public indicators has a much better chance of being approved.
Project’s volume is too low
If you see the reason for rejection, like “Project’s volume is too low, ” increase trading vol. Do it by getting listed on more exchanges and enabling auto-trading software. Also, read again step #2 above. Besides, remember to re-submit the Coingecko’s form 14 days after getting a rejection.
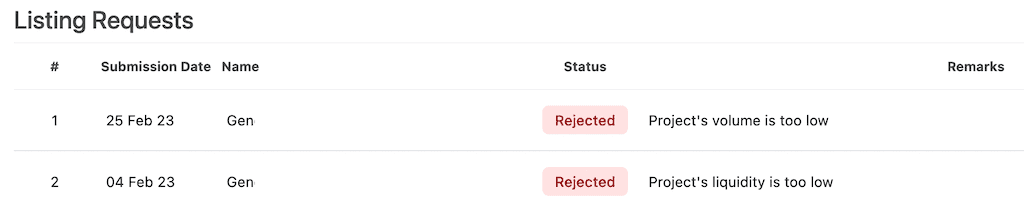
Project’s liquidity is too low
If you see the reason for rejection, like “Project’s liquidity is too low” then increase the size of your pool on DEX (for tokens traded only on PancakeSwap, Uniswap, and other DEXs). If your coin is tradable on CEX, increase the size of the BIDs and ASKs to $1500 (or higher) inside the 2% spread. Also, you can do it by hand or by activating market-making software. In addition, read again step #2 above. Besides, don’t forget that CG’s managers hate over-submissions. Therefore, after improving your token’s liquidity, re-submit the form only fourteen days after the last submission.
Unable to detect sufficient organic attention around the project
Sometimes, projects try to list coins on CoinGecko but have just 10-50 followers on their social accounts. That’s not enough. So, such a project gets a rejection: “Project has bad sentiment on their social media (Low social media engagement/ presence/ adoption/ audience growth rate.)” or “Unable to detect sufficient organic attention around the project.”
How to solve.
Build the community by increasing social media followers, engagement, and visibility. A robust and active community signals that a coin is established and reputable. Also, delete social channels with a miserable number of followers from the project’s website. However, a startup can have a lot of followers on social accounts but still get such a rejection. In that case, make an airdrop and let CG know about it next time (re-submit the form in 14 days).

Not original project
Another common reason for rejections is that the “Project infringes another’s trademark or consists of inappropriate content”. That’s one of the most severe reasons for refusal.
How to solve.
Avoid any plagiarism on your website and white paper. Also, don’t imitate other reputable projects already on the market. In other words, build your own “original” blockchain project.
Project contains unverified/proxy contract
When a coin-tracker refuses to list a token due to “unverified/proxy contract” issues, it indicates concerns about the project’s smart contract security or transparency. Here’s a brief explanation:
- Unverified Contract: The smart contract code hasn’t been verified on blockchain explorers like Etherscan, making it difficult to confirm its authenticity and security.
- Proxy Contract: This serves as an intermediary in transactions, potentially complicating security assessments.
To resolve these issues, ensure your contract is verified and audited by reputable firms. Provide thorough project documentation and, if feasible, simplify or secure proxy contract implementations. Engage with coin-trackers to address their concerns and foster a strong community to support your project’s credibility.

It is an outstanding achievement to be visible on CoinGecko in the correct section. It is even better if you have tags related to your project. However, many projects find their update requests rejected. But why does this happen? Starting in 2024, CoinGecko has tightened its rules for approving updates. Therefore, simply having a landing page with your token contract address is no longer sufficient. Even extensive descriptions of your plans are not enough.
To overcome this hurdle, you should consider releasing a tangible product prototype. This concrete evidence will allow CoinGecko’s managers to assess your project more accurately. As a result, they can place it under the appropriate category.
I still can not get a verification
If you still can not get verification on Coingecko (after fixing all rejections and after several re-submissions), do the following:
- Improve your website. Build a project’s web without using Wix, WordPress, and similar themes.
- Decrease taxation to around 3-5% if your token has enormous taxes.
- Re-create a token and try to submit a form again.
- Use a turn-key outsource solution.
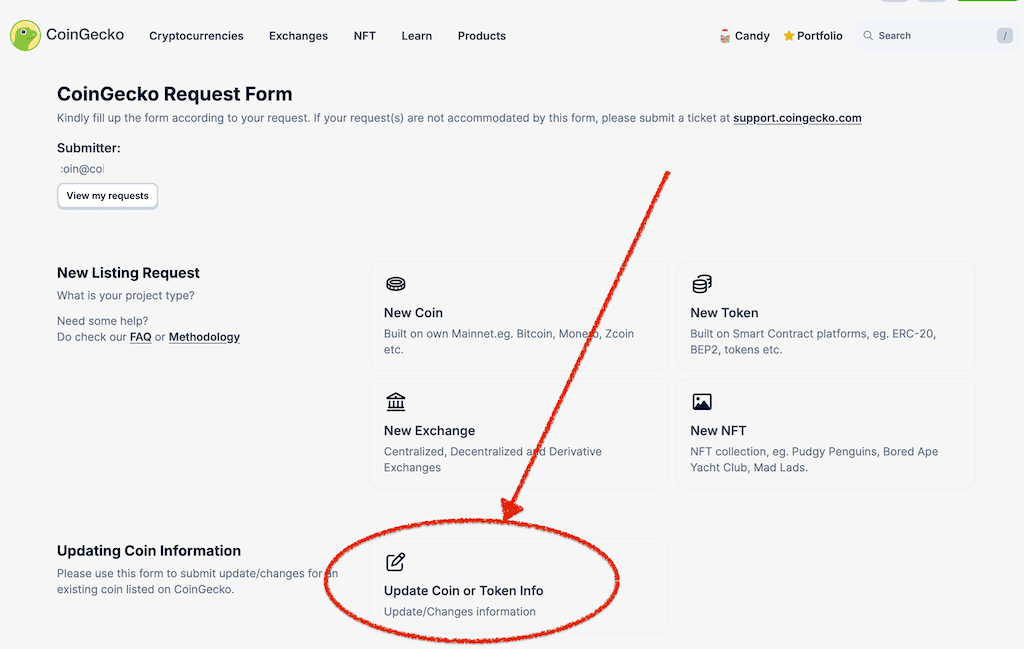
How to add additional market
Listing an asset on Coingecko is not the “end of the game.” Sooner or later, your coin will start trading on new exchanges, or a new pair will appear. So, follow the steps below to add additional exchange(s) or market(s):
- Sign in to your CG account.
- Open the Coingecko’s request form page and click on the “Update Coin or Token info” tab in the “Updating Coin Information” section.
- Then, select “New Listings on Exchange/New Market Addition”.
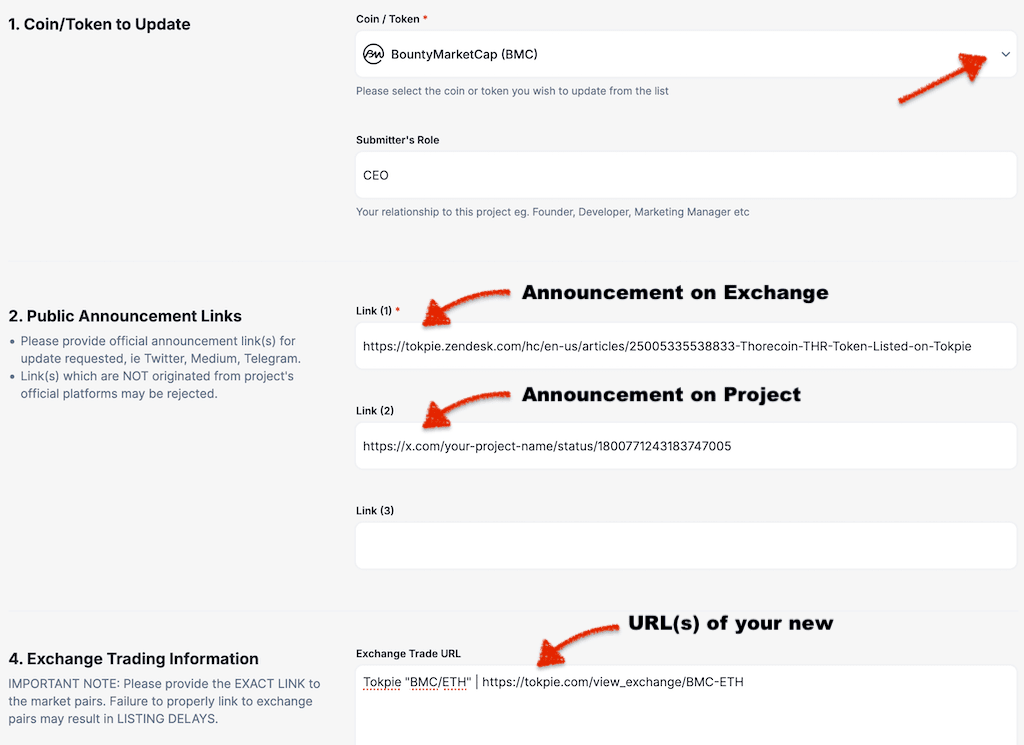
- After that, fill in several fields in the form, as shown in the images below. Remember to enter the correct public link to your new market(s), for example:
Tokpie “BMC/ETH” | https://tokpie.com/view_exchange/BMC-ETH/.
If you don’t know that link, ask the exchange manager who sold you the listing. - Press the Submit button.
- Now, wait for 24-72 hours. If you do everything correctly, your new marker will appear on your coin’s Coingecko page.


Update Circulating Supply: Market Cap and Rank
After two or three different exchanges appear on your coin coingecko’s page (example in the image below), you could update a Circulation Supply. As a result, your asset will get a dynamic Market Cap and Ranking on CG. So, use an ultimate guide on how to enable Circulation Supply on Coingecko.

It is important to note that you must keep the price of your coin the same on all your markets/exchanges. Otherwise, Coingecko will reject your application.
Quarter End Review
Analyse the historic confidence curve against your own KPIs every three months. Correlate score peaks with user-growth spikes, thus uncovering causal links. Present these findings in board reports to justify strategy pivots. Long-term, this habit fosters evidence-based governance.
Alternative to CoinGecko: other coin-trackers
Expanding your altcoin’s presence on multiple coin trackers boosts visibility and attracts a diverse audience of buyers and investors. Platforms like Coinpaprika and CoinMarketCap are key for reaching a broad crypto community. Additionally, specialized trackers like BitDegree, Coindar, CoinLore, and Coinranking target niche groups, extending market reach. Each listing enhances visibility and credibility, drawing attention from various investor communities. So, to further increase your token’s visibility, consider these actions:
- Get the cryptocurrency included in the CoinMarketCap (CMC) list of assets for increased exposure.
- Likewise, find out how to gain CoinCarp traction and keep your budget intact.
- Besides, feature the altcoin on the Coinpaprika platform 🌶️ to attract more attention.
- Furthermore, add the currency to BitDegree’s learning hub to reach knowledgeable investors.
- In addition, place the altcoin on Coindar’s event calendar to boost visibility.
- Next, elevate the coin’s profile on the CoinLore tracker to widen its audience.
- Also, ensure the currency is available on the Coinbase exchange for broader trading access.
- Furthermore, list the cryptocurrency on Binance’s free listing to access a vast market.
- Additionally, display the coin on TokenInsight for comprehensive data and market insights.
- Moreover, include the altcoin in the Blockspot directory to enhance its online presence.
- Besides, make sure the currency is shown on the Coincost price aggregator to reach more investors.
- Also, verify the altcoin’s listing on DigitalCoinPrice to engage with active traders.
- After that, get the coin listed on Coindataflow for detailed market analysis.
- Next, add the cryptocurrency to the CoinCheckup investor insight tracker for greater appeal.
- Furthermore, feature the currency on the LiveCoinWatch market tracker to attract more interest.
- In addition, showcase the altcoin on the CoinCodex platform to boost discoverability.
- Besides, ensure the cryptocurrency is visible on Coinranking’s exposure list.
- Finally, advertise the coin on popular token voting websites to build community support.
Additional Strategies to Boost Your Cryptocurrency
Consider strategies beyond traditional listings to expand your token’s reach. Use emerging platforms and wallets to boost visibility. Ensure your token’s logo appears on wallets like MetaMask and Trust Wallet to increase awareness. Keep information updated on sites like Etherscan and BscScan for better recognition.
Look for more opportunities to elevate your token:
- See how to display a token logo on Solscan.
- Besides, initiate Uniswap integration: best practices for token logos.
- Additionally, dive into the future of cryptocurrencies for insightful investments and discover emerging trends.
- Also, learn how AI can optimize a crypto project’s growth and streamline management tasks.
- Furthermore, find the steps to add a coin’s logo to MetaMask 🦊 to increase wallet visibility.
- In addition, maintain accurate cryptocurrency data on Etherscan and BscScan for better credibility.
- Moreover, ensure the altcoin’s logo is displayed on Trust Wallet to enhance recognition among users.
- Additionally, feature the cryptocurrency on the Listing-Fundraising DAPP for maximum exposure.
- Furthermore, rent liquidity to generate profits and gain listings on CoinMarketCap and CoinGecko.
- Also, follow the Ultimate Guide to launching a successful cryptocurrency and gain competitive insights.
- Next, increase the coin’s liquidity on decentralized exchanges (DEXs): PancakeSwap and Uniswap.
- Additionally, register the altcoin in the MEW (MyEtherWallet) asset catalog for wider audience reach.
- Furthermore, add the cryptocurrency to the Trezor wallet to make it accessible to hardware wallet users.
- Additionally, keep token details up-to-date on BscScan and Etherscan for improved market accuracy.
- Finally, enable payment options like bank cards and Apple Pay on the website 💳 to attract more buyers and enhance user convenience.
Also, you can scale your project to popular chains like the Ethereum ecosystem, TON blockchain, Tron network, and Solana platform. Additionally, explore issuing on BNB Smart Chain (BSC), Polygon chain, and the Arbitrum ecosystem. But, if your asset runs on Base, use this Base token submission checklist for CMC and CoinGecko to complete the tracker rollout. Learn more about the Base protocol. Summarizing, expanding across multiple chains can help grow awareness.
For any questions or cooperation, contact Tokpie at [email protected] or [email protected].