Crypto entrepreneurs, startup founders, and blockchain project leaders often strive to get their tokens featured on major aggregators like CoinMarketCap (CMC) and CoinGecko. Listing on these platforms can significantly boost visibility, credibility, and investor interest. Moreover, if you aim to list the Solana token on CMC or list the Solana token on Coingecko, you will find actionable strategies throughout this guide. The following sections also cover Phantom wallet setup, Raydium DEX listing, and recommended practices to ensure a smooth journey. Also, teams preparing a Solana meme token can use this data-backed meme coin launch guide to plan positioning, transparency, liquidity communication, and listing readiness before applying to CoinMarketCap or CoinGecko.
Launching a Token on the Solana Blockchain (SPL Token Creation)
Overview: Before You List Solana Token on CMC or Coingecko
Before you attempt to list the Solana token on CMC or list the Solana token on Coingecko, it is necessary to deploy your token on the Solana blockchain. Solana tokens follow the SPL standard, which is similar to ERC-20 on Ethereum. This section outlines each critical step. Anyone seeking additional insights into Solana may explore the Solana blockchain in depth. However, remember that a strong foundation is crucial for successful listings down the line.
Step 1: Set Up Solana CLI Tools
Begin by installing the Solana Command Line Tools, which include solana and spl-token for token creation and management. Keeping your environment secure is vital; besides, you should maintain updates regularly. Those wishing to explore additional blockchains can reference the instructions for listing a token on the Base blockchain guide.
Begin by installing the Solana command-line tools and the SPL Token program. Using the Solana CLI, generate a keypair and configure it to use the correct network (e.g., mainnet-beta). For example, you can set the RPC URL to Solana’s mainnet endpoint with
solana config set --url https://api.mainnet-beta.solana.comOnce configured, create your token mint and token account using the SPL Token CLI commands. For instance, the following commands create a new token mint and an associated token account, then mint an initial supply to that account:
rubyCopyEdit$ spl-token create-token
Creating token AQoKYV7tYpTrFZN6P5oUufbQKAUr9mNYGe1TTJC9wajM
Signature: 47hsLFxWRC...Q5qYrsRG4​:contentReference[oaicite:4]{index=4}

$ spl-token create-account AQoKYV7tYpTrFZN6P5oUufbQKAUr9mNYGe1TTJC9wajM
Creating account 7UX2i7SucgLMQcfZ75s3VXmZZY4YRUyJN9X1RgfMoDUi
Signature: 42Sa5eK9dM...RLVikvkHkyfy​:contentReference[oaicite:5]{index=5}

$ spl-token mint AQoKYV7tYpTrFZ...wajM 100
Minting 100 tokens
  Token: AQoKYV7tY...wajM
  Recipient: 7UX2i7Su...MoDUi​:contentReference[oaicite:6]{index=6}
Each command’s output includes the new token’s mint address and a transaction signature as confirmation. Be sure to save your token mint address. This unique identifier will be used to register the token’s info and request listings.
Step 2: Create a Wallet and Keypair
Generate a new Solana wallet (keypair), which will function as the mint authority for your token. Protect the private key at all times, and fund this wallet with a small amount of SOL to cover transaction fees. Developers looking to extend their reach across other chains can use the guide to list a Polygon token on CMC and CG, or take similar steps with a TRC20 token. Therefore, a multi-chain approach often enhances project visibility.
Step 3: Create the Token Mint
Use the SPL token CLI to create your token, generating a unique mint address. Keep that address on hand, as it is required for wallet integrations and exchange listings. Developers interested in broader ecosystems should review how to list an Arbitrum-based token or add a Ton-based token to top trackers. Furthermore, ensuring correct token parameters at this stage prevents future complications.
Step 4: Create a Token Account and Mint Tokens
After creating the token, configure an associated token account to hold it. Next, mint your initial supply of tokens to that account using the spl-token CLI. Keep decimals in mind, which typically range from six to nine for Solana tokens. Once minted, you may show a token logo on Uniswap if you anticipate cross-chain operations to Ethereum (though Uniswap DEX currently lacks Solana support). Hence, planning ahead can simplify expansions.
Step 5: Set Token Metadata
To ensure a proper name, symbol, and logo in wallets, apply either the Token Metadata program or the Solana token registry. Otherwise, your token will only be identifiable by its mint address. So, discover how to place your token logo on Solscan.
In cases where visibility in user wallets requires a partial token migration from Solana to Ethereum-compatible networks, display your token’s price on Metamask and add a token logo to Metamask. Besides, these guides often clarify best practices for multi-network tokens.
Step 6: Secure Your Token’s Authorities
Finally, determine whether to renounce the mint authority to prevent future token issuance. Some DEXs, including Raydium, also require the freeze authority to be disabled. Thus, align these decisions with your project’s broader objectives.
Setting Up a Phantom Wallet for Solana
Installation and Configuration
Phantom is a well-known browser extension and mobile app wallet for Solana. Install Phantom from its official website and safeguard your wallet by properly backing up the Secret Recovery Phrase. Moreover, to enhance purchase methods for users, see how to enable bank card and Apple Pay Solana token sales to expand adoption. However, remember that stable user access to your token fosters trust.
Funding and Adding Your Token
After Phantom is installed, fund the wallet with SOL to cover transaction fees. If the token registry recognizes your asset, it should appear automatically in Phantom. Otherwise, manually add it by entering the mint address. For those seeking broader wallet compatibility, consider displaying a Solana-based token in Trust Wallet or including it in Trezor’s list. Therefore, giving users multiple storage options can boost accessibility.
Verifying Token Details
Verify that your token’s name, symbol, and icon are properly displayed. If not, update the Solana token registry or incorporate on-chain metadata. Double-check the freeze authority settings before listing on DEXs. To dive deeper into cross-chain listing tactics, explore liquidity outsourcing options for CMC and CG listing. So, thoughtful planning reduces friction during future expansions. Additionally, if you want Phantom to show your Solana token icon and track its price, use the Phantom wallet logo and price checklist.
Listing Solana Token on Exchanges to Eventually List Solana Token on CMC and Coingecko
Exchanging your Solana-based token on credible platforms is crucial if you plan to list Solana token on CMC or list Solana token on Coingecko. Below are two affordable choices—Raydium (DEX) and Tokpie (CEX)—plus a reference to a comprehensive guide to Tokpie Exchange for a deeper look at centralized listings.
Raydium DEX
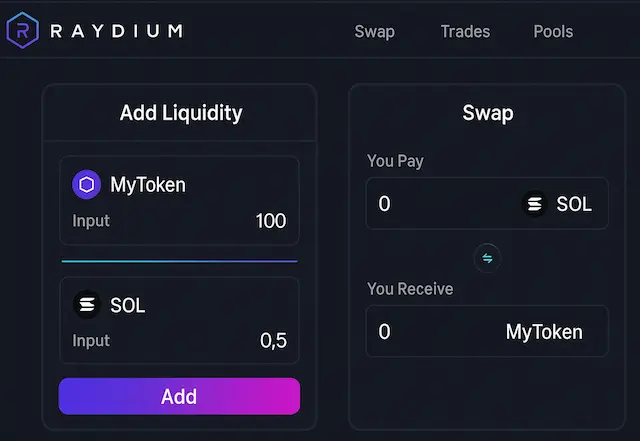
What’s Raydium? It’s a decentralized exchange (DEX) on Solana, offering an automated market maker (AMM) and substantial liquidity. Listing on Raydium makes your token accessible for trading without centralized oversight. Users create liquidity pools, typically pairing the new token with SOL or USDC. This pairing provides direct market exposure. Raydium also supports yield farming and staking features, rewarding liquidity providers. Its user-friendly interface and versatile tools make Raydium a powerful option for projects launching on Solana. Furthermore, building a strong DEX presence is a cornerstone for aggregator listings.
Why Choose Raydium
CoinMarketCap and CoinGecko both require active, public trading on at least one recognized exchange. Raydium meets this criterion and is tracked by popular data aggregators. Projects eager to reach more platforms might follow a guide for listing on Coinlore or use the ultimate guide for Coincheckup to expand visibility. Hence, diversifying exchange listings can reinforce liquidity and pave the way to list Solana token on CMC or list Solana token on Coingecko more smoothly.
Steps to Create a Liquidity Pool
- Open Raydium’s interface and connect your Phantom wallet.
- Select “Create Pool,” specifying your token’s mint address and a quote token (often USDC).
- Set an initial price, then deposit enough tokens from both sides to encourage trading.
- Confirm the transaction. Your token becomes tradable on Raydium once finalized.
Verifying Live Trading
Perform a small test swap to confirm the trading pair works correctly. To attract more liquidity, you may launch a yield farm, although that requires planning for reward distribution. Additional tips can be found in the CoinDataflow integration guide and a tutorial for adding tokens to CoinCodex. Therefore, a seamless DEX experience can boost user trust before you aim to list Solana token on CMC or list Solana token on Coingecko.
Tokpie CEX
While Raydium covers a decentralized approach, Tokpie caters to those who prefer a centralized exchange (CEX). CEXs often attract users seeking a more traditional trading experience, including higher liquidity, diverse order types, and simpler interfaces. Listing your token on both a DEX like Raydium and a CEX such as Tokpie broadens your audience. Get further insights into the Tokpie’s trading environment. Thus, combining both exchange types strengthens a project’s market appeal.
Why Choose Tokpie
Tokpie offers a streamlined listing process, robust trading infrastructure, and a large user base to accelerate adoption. It is known for strong security measures and compliance, reassuring investors. Additionally, Tokpie provides promotional support, including social media announcements and built-in marketing channels, which can enhance your reach. Because of this ecosystem, listing with Tokpie can lend credibility to your project and integrate it into a network of reputable platforms that track Tokpie’s markets.
Steps to Create a Market
Listing your token on Tokpie involves the following:
- Click the Apply Button: Submit a listing application via Tokpie’s official site. Check each step of the listing procedure and provide all required details.
- Wait for a Reply: Tokpie’s team typically responds within one to seven hours. Monitor your inbox for any follow-up questions or confirmation.
- Integrate: After approval, Tokpie’s managers handle the technical integration (24-96 hours). This setup includes deposits, withdrawals, and trading functionalities.
- Listing: Upon integration completion, your token is officially tradable, with deposits and withdrawals active.
- Promote Your Listing: Use Tokpie’s promotional tools to announce your token. Encourage your community to join token-voting sites to amplify reach.
Verifying Live Trading
Once your token is live, place a few buy and sell orders to ensure everything functions properly. Keep an eye on volume trends, and use social channels to gather feedback. If any issues surface, contact Tokpie’s support team. Cross-promotion of your Raydium listing alongside Tokpie can drive liquidity across both platforms and strengthen your community base. Consistent trading activity also helps when you eventually list the Solana token on CMC or list the Solana token on Coingecko.
Minimum Requirements to List Solana Token on CMC or to List Solana Token on Coingecko
Checklists and Key Considerations
Both CMC and CoinGecko have overlapping requirements to ensure legitimacy and sufficient market activity. At a minimum, confirm you have the following:
- Active trading on at least one recognized exchange (e.g., Raydium).
- A functioning project website and a valid block explorer link.
- Clear token details (name, symbol, contract address, launch date, total supply, and circulating supply).
- A professional point of contact with an official email domain.
- Community engagement, although not strictly necessary, often enhances credibility.
- A high-quality logo for display on platforms.
Lacking any of these elements may result in delays or rejections. For broader market presence, find steps to appear on Coinpaprika or learn how to display your token on Coinranking. Furthermore, thorough preparation ensures a smoother acceptance process.
To integrate with even more external trackers, you can add your coin to Livecoinwatch and seek listing on Digitalcoinprice. Besides, pursuing a Coinbase listing could be an additional growth avenue, though stricter requirements apply.
Essential Steps to List Solana Token on CMC (CoinMarketCap)
Step 1: Eligibility Confirmation
Therefore, if you want to list Solana token on CMC, ensure that your token meets all CMC guidelines. Failure to comply—such as lacking an active trading pair or having an incomplete website—results in immediate rejection.
Step 2: Gather Data and Documentation
Compile details on tokenomics, block explorer links, and official social media. Prepare a concise project description that highlights genuine utility. To learn more about advanced liquidity measures, see how to list your token on Blockspot or include it on Coincost. Remarkably, publish your cryptocurrency on CoinCarp for free in just a few steps. Furthermore, organized data can expedite acceptance.
Step 3: Access the CoinMarketCap Application Form
Go to the official CMC site, locate the “New Listing” form for tokens, and log in or create an account. Maintain factual and neutral wording. For more tips, visit the quick CMC listing guide.
Step 4: Fill Out the Form Thoroughly
Provide your token’s name, symbol, mint address, website, social links, and market data. Include references to your Raydium or any additional exchange listings. Hence, robust proof of market activity is essential to list Solana token on CMC successfully.
Step 5: Submit and Wait
So, once you have submitted the forms to list Solana token on CMC, remain patient. CMC’s review can take several weeks. If any questions arise, respond swiftly to expedite feedback. To further expand your aggregator portfolio, consult instructions on adding your asset to Coindar.
Step 6: Fast-Track Options
CoinMarketCap does offer paid, expedited reviews, although such payments do not guarantee approval. Projects seeking additional reach may benefit from listing on BitDegree to engage broader audiences.
Key Stages to List Solana Token on Coingecko
Step 1: Satisfy CoinGecko’s Requirements
Hence, if you plan to list Solana token on Coingecko, be aware that active trading on a recognized exchange is mandatory. Review all details in the comprehensive Coingecko listing guide.
Step 2: Create a CoinGecko Account
Register on CoinGecko to access its listing request form, allowing you to track application progress. For more sophisticated marketing, use AI-driven strategies like ChatGPT to streamline community engagement.
Step 3: Locate the Listing Request Form
CoinGecko’s platform provides a dedicated listing form where you specify whether your token is actively trading or only in the pre-launch stage. On the other hand, be clear and concise with your data to avoid delays.
Step 4: Provide Complete Token Information
Supply essential details like your Solana mint address, official website, social channels, and a concise project description. Include any security audits or unique features to strengthen your case.
Step 5: Logo Upload and Additional Details
Upload a high-quality logo to present a professional appearance on CoinGecko. Focus on highlighting any distinct advantages or collaborations your project has secured. Besides, a polished brand image can impact how you list Solana token on Coingecko successfully.
Step 6: Submit and Await Verification
Finally, once you submit your form to list Solana token on Coingecko, anticipate a review period of at least several business days. Should the CoinGecko team request clarifications, respond thoroughly to avoid delays. Thus, proactive communication can smooth the approval path.
Tips and Common Pitfalls to Avoid
Maintaining Healthy Trading Volume
Most aggregators reject tokens with negligible trading activity or liquidity. Sustain a sensible marketing campaign or liquidity program to generate consistent volumes. Furthermore, active markets demonstrate credibility to both CMC and CoinGecko.
Providing Accurate Information
Thoroughly verify each detail—contract addresses, websites, supply data—before submission. Errors or omissions may prolong the review or lead to outright denial.
Avoiding Spam Tactics
Overwhelming aggregator support teams with repetitive messages or calls for listings can backfire, leading to blacklists. Instead, broaden your reach naturally, for instance, by referencing the top coin trackers for free token listing.
Staying Alert for Scams
Be wary of anyone who claims guaranteed listings through private deals or unverified channels. Official fast-track services may shorten wait times, but they never promise acceptance.
Emphasizing Project Value
Major trackers look favorably upon tokens that have unique utilities, active communities, and transparent leadership. Underscore these attributes in your application. Additionally, consider token-voting platforms to build early momentum.
Patience and Persistence
Receiving a rejection notice is not the end. Address any shortcomings—ranging from trading volume to community engagement—and reapply once your project is stronger. For comprehensive transformation ideas, consult the ultimate guide to creating a best cryptocurrency.
Data-First Culture
The crowd sentiment datapoint keeps teams aligned by replacing opinions with numbers. Over time, a data-driven culture improves execution and reduces internal friction.
Conclusion
Bringing a Solana token onto CoinMarketCap and CoinGecko involves a balance of technical preparation and thorough documentation. Begin with an SPL token deployment, manage it using Phantom, and add liquidity on Raydium. Once your market meets the basic prerequisites, present your data-driven listing applications to the aggregators. A successful listing often boosts a project’s visibility and opens doors for additional growth opportunities in the rapidly evolving crypto space. For those seeking multi-chain solutions, explore the fundraising tool for new tokens and list your token on Binance for free to reach broader audiences.