Creating a token on Solana (an SPL token) is just the beginning. Next, you need to add token logo to Solscan. To fully recognize your token on explorers like Solscan and in wallets, you must provide proper metadata. You also need to register the token within the Solana ecosystem. Solana now uses an on-chain token metadata standard through the Metaplex Token Metadata program. This new standard replaces the old off-chain token list.
In this guide, we’ll walk you through making your token’s logo visible on Solscan. Additionally, we’ll cover different scenarios based on how you created your token. Specifically, we’ll address:
- Logo requirements: file format, dimensions, and size.
- How to prepare and upload the logo and metadata.
- Steps to register the token’s metadata on-chain.
- Submitting your token to Solana directories and verifying it.
- Solscan-specific procedures to ensure your logo appears through its reputation system.
Note: We separate the steps clearly for tokens created via the Solana CLI, Token Creator dApps, and other common tools. Regardless of your creation method, you must attach metadata to your token’s mint and meet Solscan’s verification criteria. Making your Solana Token Logo Visible on Solscan is a crucial achievement for your cryptocurrency success.
Solana Token Logo Requirements and Preparation
Before uploading your logo, ensure it meets the standard guidelines for Solana token icons:
- Dimensions: Use a square image, ideally 512×512 pixels. You can also use images up to 1024×1024 pixels.
- Format: Preferably use PNG, as it supports transparency. However, JPEG or GIF formats are also acceptable.
- File Size: Keep your file size under 100 KB for quick loading. While not strictly enforced, staying under 100 KB is considered best practice.
- Quality: Ensure the logo is clear even at thumbnail size. Your image frequently appears as a small icon in wallets and explorers.
Next, host your logo online in a reliable, permanent location. Common choices include:
Decentralized Storage: Upload the image to IPFS or Arweave. These platforms provide content links, such as IPFS CIDs or Arweave transaction URLs.
Web URL: Alternatively, you can use a static URL directly linking to the image. Examples include raw GitHub links or URLs from your project’s website. Always ensure these URLs use HTTPS and remain accessible permanently.
Once the logo is hosted, create a token metadata JSON file. You will reference this JSON on-chain. It must include at least the following details:
{
  "name": "Your Token Name",
  "symbol": "TOKEN",
  "description": "Optional description of your token.",
  "image": "https://link.to/your-token-logo.png"
}
This JSON adheres to the Metaplex token metadata schema. At minimum, it must contain the token’s name, symbol, and image link. Including a description is optional but recommended. Finally, upload this JSON to a permanent location, similar to the image. You will reference this JSON’s URI when registering your metadata on-chain.
Token Created Using the Solana CLI
If you created your token using the Solana CLI (for example, with the spl-token command-line tool), follow these steps to add a logo and metadata:
1. Create the Token and Initial Supply (via CLI)
If not already done, use the Solana CLI to create your token and supply. For example:
- Create a new token mint:
spl-token create-tokenThis returns the new mint address of your token.
- (Optional) Create an associated token account for your wallet to hold the token:
spl-token create-account <YourTokenMintAddress> - Mint some tokens to your account (if you want an initial supply):
spl-token mint <YourTokenMintAddress> <amount> <YourTokenAccountAddress>
Make sure to keep the Mint Authority for now. The CLI retains your key as the mint authority by default. You need this authority to add metadata. Therefore, avoid renouncing or transferring the mint authority until you complete metadata setup. Similarly, if using other tools, select the “Keep Mint Authority” option. Doing this allows your wallet to manage token metadata. You can later renounce authority for fixed-supply tokens, but only after adding metadata.
2. Prepare the Logo and Metadata JSON
Ensure your logo image and JSON file are prepared and hosted as described earlier. Note down the public URL of your JSON file, as you’ll use this URI for your on-chain metadata. Additionally, verify that the URL in the JSON’s image field is correct and that the image loads properly in your browser.
3. Attach Metadata On-Chain
This is the crucial step – creating a Metadata Account for your token’s mint via the Metaplex Token Metadata program. There are a few ways to do this:
Using a Command-Line Tool (Metaplex CLI)
Metaplex offers a CLI tool in its library for managing token metadata. You can compile this tool from the source code. After building it, you can run the following command to create your token’s metadata:
./metaplex-token-metadata-test-client create_metadata_accounts \
  --mint <YourTokenMintAddress> \
  --name "Your Token Name" \
  --symbol "TOKEN" \
  --uri "https://link.to/your-token-metadata.json" \
  --keypair <path/to/your/wallet.json> \
  --update-authority <YourPublicKey>
This command calls the CreateMetadataAccount instruction using your data. Internally, Metaplex uses CreateMetadataV2 or CreateMetadataV3 to set up the metadata account. You must sign the command with your mint authority keypair (using the --keypair flag). Additionally, the Metaplex CLI or library generates the metadata PDA (program-derived address) from your token mint. Finally, it attaches the JSON URI you provided. Verify your data format matches the example provided earlier.
Using a Web Tool (No-Code Method)
If you prefer not to compile Rust programs, you can use web tools to set the metadata:
Editing Token Metadata Using the Strata Protocol Token Launchpad
The Strata Protocol Token Launchpad provides a user-friendly web interface to easily edit token metadata. After creating your token via the CLI, navigate to Strata’s website and connect your wallet. Then, choose the option “Edit My Token’s Name, Symbol, or Image.” Next, select your token mint from your wallet’s list, enter the token’s name and symbol, and paste your JSON link (which includes the image URL). Finally, submit the transaction, and Strata will automatically perform the necessary on-chain updates. Likewise, you can reach another audience via the CoinLore submission guide.
Updating Token Metadata Using the Token Creator dApp
The Token Creator dApp offers an “Update Metadata” option for your tokens. First, connect your wallet to the app. Next, input your token’s mint address and provide the metadata URL (the link to your hosted JSON). Note that this tool doesn’t directly upload images. Therefore, ensure your JSON contains a valid image URL. After filling in your token’s name and symbol, submit the transaction. Your wallet will then send a Metaplex metadata update transaction to the blockchain.
Alternative Tools for Creating Metadata
Several community tools and scripts can simplify creating token metadata. Examples include the Metaboss tool or custom scripts using the @metaplex-foundation/js libraries. The underlying principle remains consistent: call the create_metadata_accounts instruction from the Metaplex program with your token data. For instance, using JavaScript, you could leverage the createCreateMetadataAccountV2Instruction function provided by the Metaplex JS SDK. This function requires your token information and the URI pointing directly to your metadata JSON file.
Whichever method you select, confirm that the transaction completes successfully. This step creates an on-chain metadata account linked directly to your token mint. Next, verify the result on Solscan. Go to your token’s page, then inspect the Metadata section. You should clearly see the token’s name, symbol, and JSON link. Additionally, Solscan offers a “View URI Metadata” button. Use this button to check your JSON content, including the image link. Completing the DigitalCoinPrice listing flow further broadens your data coverage. Afterward, consider the CoinCost listing walkthrough to keep market data synchronized. Also, learn to boost SEO and exposure with a free CoinCarp token listing.
4. Register with the Solana Token List (Legacy, Optional)
Historically, Solana maintained an off-chain token registry on GitHub known as the Solana Token List. Projects submitted pull requests to include their token details, such as mint address, name, symbol, logo URL, and website. Wallets and explorers then used this information. However, in 2022, Solana archived and set this repository to read-only mode. Consequently, it no longer accepts new token submissions. Instead, the recommended method now is to use on-chain metadata. Thus, you no longer need to submit your token details to the token list. Solscan and modern wallets now directly read token information from the on-chain Metaplex metadata standard.
That said, if your token existed before the transition and appeared on the old token list, Solscan and certain wallets might still show legacy information. Previously, some wallets prioritized old list data over on-chain metadata. Newer wallet versions are gradually addressing this issue. Therefore, moving forward, always use on-chain metadata for the most accurate information.
5. Verify Your Token in the Wider Ecosystem
Since your goal is a token for public trading, you should also ensure your token is recognized outside of just the blockchain metadata:
CoinGecko and CoinMarketCap
Getting listed on major aggregators like CoinGecko and CoinMarketCap is crucial. Follow this fast‑track CoinMarketCap listing walkthrough to speed up that step. Solscan specifically checks if a token appears on these platforms before displaying its logo. Therefore, you should follow CoinGecko and CoinMarketCap’s token submission guidelines carefully. Typically, this process includes providing your token’s mint address, detailed token information, and proof of sufficient market activity or volume. Moreover, achieving a listing on these platforms enhances credibility and helps meet Solscan’s criteria for a “Neutral” reputation.
The ultimate handbook for securing a CoinGecko page breaks every requirement down in detail. Also, SPL creators can consult the guide to listing a Solana token on both CMC and CoinGecko for blockchain‑specific tips.
Project Transparency
Additionally, create a simple website or landing page for your project. Next, establish official social media channels like Twitter/X, Telegram, and Discord. Solscan requires these social media links during the verification process. Having an active website and engaging social media presence proves your project’s legitimacy. Consequently, this significantly simplifies and strengthens the verification procedure.
Double-Check Metadata
You can verify your metadata’s availability using Solana’s official explorer or alternative platforms such as Solana Beach and SolanaFM. On these explorers, search your token’s mint address to confirm if the name and icon appear correctly. Most explorers retrieve metadata from the Metaplex standard or legacy token lists. Ranking engines also matter; follow this CoinRanking submission process to appear there.
6. Solscan Token Verification (Reputation System)
As of February 2025, Solscan uses a reputation system to determine if a token’s logo displays. All new tokens initially receive an “Unclassified” status, showing only a generic icon without the logo. To make your logo appear on Solscan, your token must achieve at least a “Neutral” reputation. Follow these steps to upgrade your token’s status:
Provide Required Info to Solscan
Solscan asks token creators to submit information about the token/project. You can email [email protected] or use the official form. In this request, include:
Step-by-Step Instructions to Fill Out Solscan’s Token Update Form
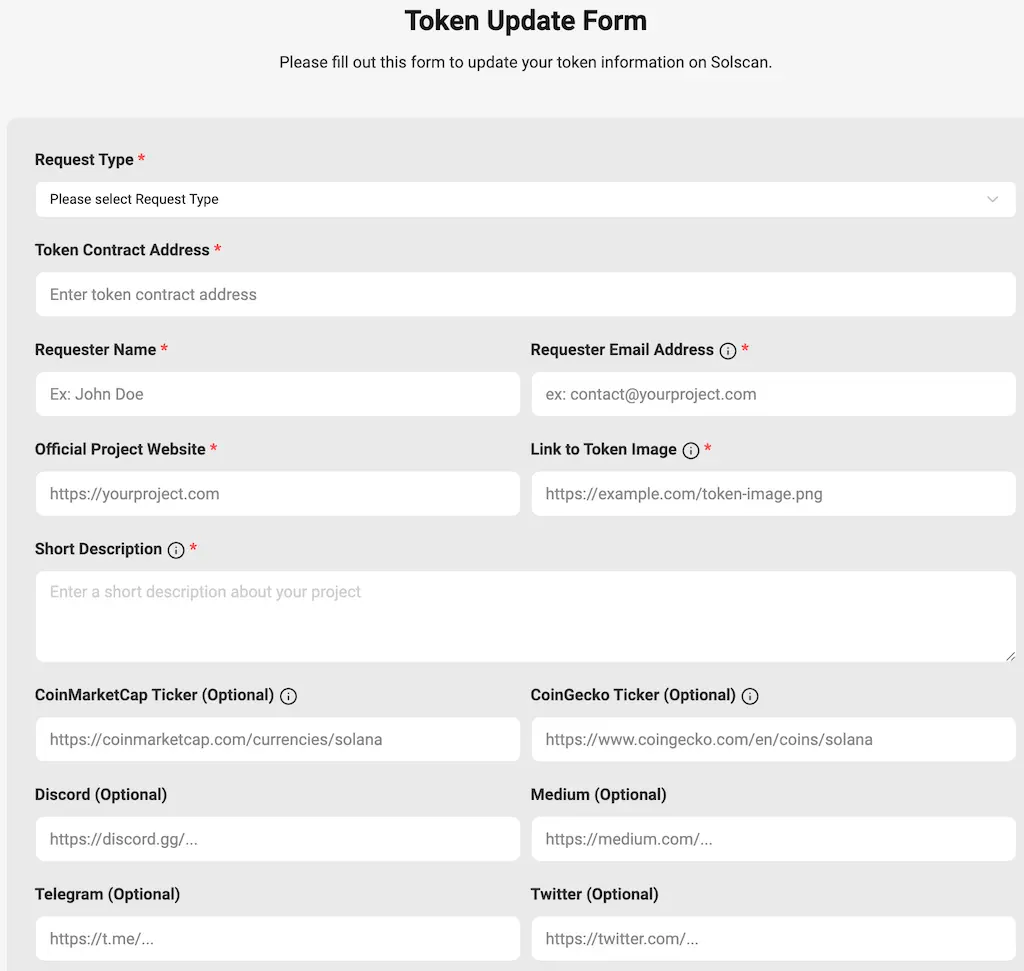
1: Request Type
- Select the appropriate request type from the dropdown menu.
- Example: Choose “New Token Submission” if you’re adding a new token for the first time.
2: Token Contract Address (required)
- Enter your Solana token’s mint address. This is the public address users need to add your token.
- Example:
9hN2jG7aPpDQrYWGrj8KY7XWqX8gdh1J9L5sQe3PQnZN
3: Requester Name (required)
- Provide your full name or project name representative.
- Example:
John Doe
4: Requester Email Address (required)
- Enter the official email address associated with your project. This should be actively monitored.
- Example:
contact@ mycryptoproject .com
5: Official Project Website (required)
- Insert the URL of your token’s dedicated website. This adds legitimacy to your project.
- Example:
https: //mycryptoproject .com
6: Link to Token Image (required)
- Provide a direct URL to your token’s logo. This must match the logo in your on-chain metadata.
- Example:
https: //ipfs .io/ipfs/Qm123TokenLogo
7: Short Description (required)
- Briefly describe your token or project, clearly stating its purpose or value proposition.
- Example: “MyCryptoProject aims to revolutionize decentralized finance by providing fast, low-cost transactions on the Solana blockchain.”
8: CoinMarketCap Ticker (optional, highly recommended)
- Enter the CoinMarketCap URL for your token, if available. This supports credibility.
- Example:
https://coinmarketcap.com/ currencies/mycryptoproject
9: CoinGecko Ticker (optional, highly recommended)
- Provide your token’s CoinGecko URL, if available. This assists in credibility verification by Solscan.
- Example:
https://www.coingecko.com/ en/coins/mycryptoproject
10: Social Media Links (optional but recommended)
Social media links indicate an active community. Community buzz can also be amplified through free token‑voting platforms that list your asset. Enter links to the platforms your project uses:
- Discord:
https: //discord.gg/mycryptoproject - Medium:
https: //medium.com/@mycryptoproject - Telegram:
https: //t.me/mycryptoproject - Twitter:
https: //twitter.com/mycryptoproject
Final Step: Review and Submit
- Double-check all provided details to ensure accuracy.
- Submit your form and wait for Solscan’s review. They usually respond within a few days.
Following these exact steps ensures your token will be correctly registered and verified on Solscan, clearly displaying your logo, enhancing credibility, and improving overall user trust in your crypto project.
Meet the Neutral Reputation Criteria
Solscan evaluates your submitted information carefully. To earn a Neutral reputation, you must provide comprehensive project details to establish transparency. Additionally, ensure all mandatory information, such as website, logo, contact email, and social media links, is included. Furthermore, your token should appear on major aggregators like CoinGecko and CoinMarketCap. Most importantly, demonstrate clearly that your token is legitimate and free from any red flags or scam indicators.
Result of Neutral Rep
After Solscan approves your token as Neutral, go to your token’s page on Solscan. You will now see the token’s name, symbol, and logo instead of the mint address. Additionally, Solscan displays extra details such as holder count, price, market cap, and links to your website and social profiles. Achieving this status also allows you to add social media links directly within Solscan’s interface. Besides, boost onboarding even further with the bank‑card & Apple Pay integration tutorial.
Higher Reputations (Optional)
Beyond the Neutral reputation, Solscan offers additional reputation levels: OK, Scam, and Spam. Achieving a Neutral status is essential for your token logo’s visibility. Furthermore, obtaining an OK reputation signifies greater confidence from Solscan. Criteria for this include clear project objectives, a well-known team, and potential exchange listings. For a flagship exchange roadmap, see the free strategy to list on Binance. On the other hand, Scam and Spam labels indicate issues you should clearly avoid. As long as your project maintains transparency and honesty, progressing to Neutral or OK reputation happens naturally over time.
Achieving mainstream reach is also helped by this no‑cost Coinbase listing playbook.
7. Final Check on Solscan and Wallets
Your token’s logo, name, and symbol should appear on Solscan after a short delay; contact support if issues persist. Wallets like Phantom and Solflare will display your token details if they use on-chain metadata. Refresh or re-add the token if it initially appears as “Unknown.” By the way, the TrustWallet users can do the same via this simple add‑token procedure tailored for that app. So, after completing the above:
Confirm Token’s Logo Visibility on Solscan
On Solscan your token’s detail page displays the custom logo, name, and symbol in the top-left corner. However, if a placeholder still appears, wait a few days, as updates are not always immediate. Afterward, if the logo remains missing, promptly contact Solscan support for assistance.
Ensure Token Visibility in Phantom and Other Solana Wallets
In wallets like Phantom or Solflare, your token will display its icon and name if it uses on-chain metadata. Most modern Solana wallets actively fetch this metadata. However, if Phantom initially labeled your token as “Unknown,” remove and re-add it or refresh the wallet. Additionally, remember each wallet has unique verification standards. Many rely either on the Solana Token List or on-chain data. For example, Phantom previously used the token list but is now likely transitioning to on-chain metadata. Once your metadata is set and recognized by Solscan and major aggregators, wallets will correctly show your token. If you bridge to Ethereum later, this MetaMask logo‑insertion guide will keep branding consistent.
Tokens Created Using a Token Creator DApp
If you created your token using a web-based Token Creator dApp or launchpad (such as CoinFactory’s SPL Token Generator, Strata Launchpad, or SlerfTools), adding your logo usually happens during token creation. Here’s how to do it step-by-step:
1. Token Creation via the DApp
Follow the DApp’s steps to create the token. Typically, these platforms will prompt you for token details such as:
- Name and Symbol:
First, enter your token’s display name and ticker symbol. - Supply and Decimals:
Next, define your token’s initial supply. Additionally, set the number of decimal places and decide if the supply is fixed. - Logo Upload:
Most DApps allow you to upload your token’s logo during creation. Always provide a square image (512×512 pixels, under 100 KB). Some platforms host the image directly, usually on IPFS. Alternatively, you might be asked to provide an IPFS or Arweave URL to your hosted logo image. - Metadata Details:
Furthermore, advanced platforms let you include extra details. If available, add your token’s description and social media links right away. Doing so now saves time later. - Permissions:
Then, set your token authorities (mint, freeze, metadata update). Usually, for public tokens, creators renounce mint authority after confirming the supply to prevent inflation. However, keep your metadata update authority until all details are finalized. By retaining update authority, you can easily correct your token’s name, symbol, or logo. You can always renounce this authority later. - Execute Creation:
Finally, submit your token creation request. The DApp immediately creates your token mint and attaches your metadata through the Metaplex program. You’ll approve transactions through your wallet, including mint creation, metadata attachment, and potentially IPFS uploads. Educational visibility can also be gained by following the BitDegree token‑adding instructions.
2. After Creation – Verify Metadata
Once the token is created:
- First, copy your token mint address from the DApp or your wallet’s token list.
- Next, open Solscan and enter your token’s mint address into the search bar. Your token’s dedicated page should appear. Check if the token name and symbol display at the top instead of only the mint address. Additionally, review the Metadata section for details such as the JSON link and other information.
- If your logo isn’t yet visible on the main page, don’t worry. Logo visibility depends on your token’s reputation, which we’ll address shortly. However, you can still verify the logo by clicking on “View URI Metadata” to confirm your JSON content.
- If you notice an issue like a typo in the token name or a broken image link, you can fix it quickly. Provided you kept the metadata update authority, editing is straightforward. Many DApps offer built-in features for metadata updates after creation.
- For example, on the Strata Launchpad, you simply select your token and edit its metadata fields before resubmitting.
- On other platforms, you might redo the creation process using the same mint address or use a specific update feature.
- If your platform lacks an editing option, you can always use the CLI method or scripts from the Token Creator tools. Just ensure you still possess the metadata update authority.
3. Ensuring Ecosystem Visibility
Even if your token creator DApp handled your on-chain metadata, it’s essential to confirm your token appears externally.
- Firstly, some token creation platforms might automatically submit your token to specific databases or token lists. Check your DApp’s documentation to confirm. For instance, CoinFactory sometimes integrates directly with its listing services.
- However, the Solana Token List repository is now considered legacy. Therefore, if your DApp references submitting to this token list, treat it as historical and not actively updated. Instead, prioritize your token’s on-chain metadata and other verification processes.
- Additionally, proactively list your token on CoinGecko and CoinMarketCap, as previously outlined. Typically, DApps don’t manage these submissions for you. Completing these listings yourself significantly supports your token’s visibility and helps Solscan’s verification process. However, obtaining a direct listing on Tokpie Exchange can bridge that gap quickly.
Lastly, token creator platforms often offer helpful guides or links about next steps. These typically suggest actions like getting listed on exchanges or aggregator platforms. Follow these closely to enhance your token’s ecosystem presence further. A handy comparison of top free coin‑tracker portals shows which sites to target next.
4. Solscan Logo Display (Reputation Requirements)
Regardless of creation method, Solscan treats your token the same way under the hood. After using a DApp, your token will also be Unclassified on Solscan initially, meaning the logo won’t display. Now do the following:
- First, gather all necessary information for Solscan. If your DApp provided a verification package, use it directly. Otherwise, compile essential details yourself, including the token mint address, website URL, social media links, contact email, logo URL, and CoinGecko ID.
- Using a recognized launchpad or DApp might have already built initial community trust. However, you still must complete Solscan’s verification process. Fill out Solscan’s Google form or email their support directly. Clearly state the launchpad or platform you used to create your token. Most importantly, ensure you provide detailed and convincing evidence of your token’s legitimacy.
- Additionally, follow up promptly with major aggregator listings like CoinGecko if not already done. Solscan explicitly checks aggregator listings when assigning Neutral reputation. Once you secure these listings, immediately provide the respective links or IDs to Solscan. You can easily submit this information through a follow-up message to their support team.
Once Solscan approves your submission, your token achieves a Neutral reputation. At this point, your logo and related statistics become visible on Solscan. However, approval may take some time. Meanwhile, continue strengthening your token’s presence. For instance, ensure your token has active holders and regular transactions. Tokens without activity might face delays in verification. Also, you may outsource market‑making via the CMC & CG liquidity service to satisfy that requirement.
5. Confirm in UI
- Solscan:
First, open your token’s page on Solscan. Ensure the custom logo appears clearly in the top-left corner next to your token name. Additionally, check the displayed reputation label (Neutral, OK, etc.). If your token still shows as “Unclassified” or lacks a logo after some time, contact Solscan support. They may require additional information. Also, for broader discovery, submit your coin to Coinpaprika using this straightforward tutorial. In addition, secure analytics coverage by following the CoinCodex listing ultimate guide. - Wallets:
Next, verify your token’s visibility in wallets like Phantom or your preferred option. Since your token is now recognized, especially after listings on CoinGecko or CoinMarketCap, wallets should display your custom icon. However, if Phantom still shows the generic icon, remove and re-add your token. Alternatively, updating the wallet app might help clear any cached data. New users adding your token should immediately see the correct name and logo. By 2025, most wallets, including Phantom, will fully rely on on-chain metadata for new token visibility. You can go further by following this walk‑through on showing live prices inside MetaMask so holders can track value instantly. Also, the hardware‑first communities can also consult the Trezor token inclusion guide once main wallet support is live.
Tokens Created Using Other Common Tools
There are other ways to create SPL tokens – for example, using the Strata Token Launchpad directly, using custom scripts or SDKs, or third-party services like Bitbond, Solana Forge Labs, Smithii, etc. Regardless of the method, the steps to make the logo visible are similar because they all must utilize Solana’s token metadata standard. Here we’ll assume a couple of typical scenarios:
1. Token Creation via Alternate Tool or Script
Suppose you launched a token using a method outside the Solana CLI or a simple creator UI:
Using Strata Protocol’s Launchpad
Strata’s Launchpad functions similarly to other Token Creator DApps. First, you create your token, then immediately add or edit its metadata. Ensure you provide your logo URL during creation or right after using the editing option. Strata automatically calls the Metaplex metadata program. As a result, your metadata gets attached directly—simply confirm this on Solscan afterward.
Using Custom Scripts or SDKs
If you used a custom script or SDK (like Solana’s web3 or Metaplex JS SDK), extra steps are necessary. Creating a mint with tools like spl-token or web3 doesn’t automatically attach metadata. Therefore, explicitly call the metadata program afterward. For example, with Metaplex JS SDK, use the createCreateMetadataAccountV2Instruction along with the DataV2 structure. This structure includes your token’s name, symbol, and URI. Ensure your mint authority signs the instruction. Finally, verify the metadata exists on-chain after running your script.
Using Other Third-Party Launch Services
If you utilized other no-code tools or launchpads, carefully review their documentation. Some tools only create your token mint without adding metadata. In this case, manually add metadata using methods discussed previously. If the platform integrates directly with the Metaplex metadata program, ensure you’ve provided your logo URL during the process.
2. Upload Logo & JSON (if not already done)
If your method didn’t already handle the logo and JSON, do it now:
- Firstly, upload your logo image to IPFS or Arweave. Next, upload your JSON metadata file to a reliable and permanent location, as previously described.
- Then, create your token’s metadata account using an appropriate tool. If you’ve already built the Metaplex CLI, run the
update_metadata_accountsinstructions with your new URI. Use this if you’re updating existing placeholder metadata. If you haven’t yet created metadata, use thecreate_metadata_accountsinstructions instead. - For example, in code, call
create_metadata_accounts_v2. Ensure you provide all necessary parameters clearly: the mint address, your wallet as authority, the token name, symbol, and URI. The exact steps depend on your tool, but always invoke the Metaplex Token Metadata Program explicitly. - Alternatively, use user-friendly web apps like Strata Launchpad or Token Creator to handle metadata. These tools allow you to set or update metadata without coding. Thus, if your token currently lacks metadata, you can easily correct this through these intuitive platforms.
3. Check Metadata on Solscan
After adding your metadata, verify it on Solscan. You can boost traffic at the same time by appearing on LiveCoinWatch – here’s how. Alternatively, you can use the spl-token meta command if available. First, navigate to your token’s dedicated page on Solscan. Next, check if a Metadata account appears.
If Solscan displays “No metadata account” or only basic mint information, the metadata creation likely failed. In this case, retry the process using a previously mentioned reliable method. Once fixed, increase reach via the CoinDataFlow listing tutorial.
However, if the metadata exists, you’ll clearly see a Metadata tab or section containing your URI. This indicates your token information is correctly registered and available for wallets and blockchain explorers. For directory backlinks, use the Blockspot token‑adding tutorial.
4. Solana Ecosystem Directories & Listings
Now that your token metadata is on-chain, you can treat it as a fully public token.
- First, announce your token on relevant Solana forums or social media platforms. Doing this ensures community indexers pick up your token quickly. Sites like Solana FM or Solana Beach might list your token even without full verification. However, having proper on-chain metadata guarantees these platforms display at least your token’s name and symbol. Event‑driven exposure is easy when you publish updates through CoinDar’s calendar listing guide.
- Additionally, promptly list your token on CoinGecko and CoinMarketCap. These listings significantly improve visibility and credibility. Solscan specifically checks these listings before assigning a Neutral reputation. Keep in mind that CoinGecko and CoinMarketCap listings typically require some trading history. To meet this requirement, create a liquidity pool on decentralized exchanges such as Raydium or Orca. Plan these steps carefully into your overall token launch timeline. If you later open an Ethereum pool, see the Uniswap logo upload walkthrough to keep branding aligned.
5. Solscan Reputation & Logo Appearance
Finally, go through the Solscan verification process:
- Next, contact Solscan through their verification form or via email, as mentioned previously. Clearly provide all necessary details about your token and project. Although this step might feel repetitive, it is essential for your logo to appear on Solscan. Remember, Solscan only displays logos once a token earns at least a Neutral reputation. This measure helps prevent scam or spam tokens from appearing credible.
- If your token already has complete metadata and a strong foundation (website, social media presence, aggregator listings), communicate these clearly. For instance, state explicitly: “Our token’s metadata is fully on-chain, and our logo is hosted securely on IPFS. Additionally, we have an active CoinGecko listing, an official website, and engaged Twitter followers.” Providing this information directly addresses Solscan’s verification criteria.
- Once Solscan upgrades your token’s reputation, your logo will immediately appear on their platform. Typically, achieving a Neutral status or higher also results in your token being marked “Verified.” Many wallet applications trust Solscan’s data, ensuring your token displays correctly in these wallets as well.
6. Continuous Updates
Remember, you can update your token’s logo or other metadata if you retained the metadata update authority. To make changes, follow a metadata update procedure similar to your initial setup. However, use the metadata update instruction instead. Optionally complete the CoinCheckup submission checklist to reinforce legitimacy.
Keep in mind, updating metadata after your token’s launch might confuse your community. Additionally, Solscan may require re-verification if updates raise concerns. Therefore, finalize your token’s logo and metadata early to avoid unnecessary changes later. If an update becomes necessary, promptly inform Solscan support. Doing so helps ensure your token’s status remains unaffected. Also, passing an audit from firms on this shortlist of smart‑contract security providers can pre‑empt many such issues.
Moreover, Solscan continuously monitors tokens through its reputation system. Maintain your project’s active online presence and avoid raising red flags. For example, promptly fix website downtime and prevent spam-like activities, such as unsolicited airdrops. By communicating clearly and actively addressing potential issues, maintaining a Neutral reputation is straightforward. Also, tracking the Token‑Sale Confidence Index helps quantify community trust in real time.
Additionally, if you start launching a multi-chain TRC-20 asset, it is vital to meet the specific standards required to populate your token’s icon and market data on the TronScan explorer.
What is the Solscan?
Solscan is the leading blockchain explorer for the Solana network, similar to Etherscan for Ethereum. With Solscan, anyone can easily search Solana transactions, accounts, blocks, and tokens in real time. Since launching, Solscan has rapidly become the standard explorer within the Solana ecosystem. Consequently, millions of users visit Solscan each month, and more crypto projects regularly issue tokens on Solana. For instance, as of mid-2025, approximately 20% of all crypto projects actively issue their tokens using the Solana blockchain.
For token creators, Solscan serves as an essential public platform. Whenever someone searches for your Solana Program Library (SPL) token, they typically use Solscan to find details like supply, holders, and transactions. Furthermore, Solscan offers advanced features such as dashboards, APIs, NFT tracking, and DeFi analytics. All these features come in a user-friendly interface. In short, Solscan is the primary hub where the Solana community finds trusted token and blockchain information.
Solscan’s traffic
Solscan’s popularity generates substantial web traffic, highlighting its importance as a token information hub. As of mid-2025, the website receives approximately 6.2 million visits every month. This volume shows how regularly Solana users depend on Solscan for accurate blockchain data. Furthermore, the platform attracts a global audience, with roughly 37% of its visitors from the United States and significant user bases in the UK and Asia. Its audience primarily consists of crypto-savvy adults, around 74% male, with the largest age group being 25–34. Clearly, active traders and developers frequently rely on Solscan. Such extensive traffic and global adoption make Solscan a highly trusted platform. Listing and verifying your token here provides excellent exposure to potential investors and token holders.
Advantages of Solscan
For creators launching a new token on Solana, Solscan offers several benefits that can enhance your project’s transparency and credibility:
Rich Token Metadata Display
Solscan offers a detailed and user-friendly token page showcasing your SPL token’s key information. Users quickly see essential on-chain metadata like token name, symbol, total supply, decimal precision, and mint authority. Furthermore, Solscan displays your token’s logo, description, and external links when you fully update and verify its data. After your token gains verified status and a solid reputation, Solscan prominently features its logo and official name. Additionally, users see real-time supply figures, live price updates, and market capitalization data. As a result, this rich metadata presentation enables visitors to grasp your project’s details instantly, eliminating the need to navigate complex blockchain records.
Token Reputation System for Trust
Solscan features a unique token reputation system to build user trust. The Solscan team assigns tokens various statuses. New tokens start as “Unclassified,” while credible projects earn “Neutral” or “OK” ratings. Conversely, problematic tokens receive negative labels like “Suspicious” or “Scam.” This rating system helps users quickly evaluate unfamiliar tokens. As a legitimate token creator, achieving a “Neutral” or “OK” status significantly benefits your project. It signals to users that you’ve provided sufficient information and have no apparent issues. Consequently, positive reputations unlock comprehensive details on your token’s page, including logos, social links, and live price data. This transparency gives your token legitimacy within the community. In contrast, tokens without a positive reputation may have vital information like logos or websites hidden. Therefore, building trust through Solscan’s reputation system is a clear and valuable advantage.
Holder and On-Chain Analytics
Solscan provides detailed insights into your token’s distribution and activity, benefiting you and potential investors. Each token page includes a “Holders” tab showing wallet addresses sorted by the largest holdings. This feature allows everyone to quickly identify whale holders and assess how concentrated the token supply is. Additionally, an “Analysis” tab offers visual analytics. For instance, it displays holder distribution charts, historical prices, and transaction volumes. Using these tools, you can actively track your project’s growth, such as increasing holder counts over time. Investors also benefit from these clear visuals. They can swiftly evaluate whether the token has broad ownership and growing liquidity. Overall, Solscan’s comprehensive analytics facilitate transparent, data-driven engagement with your token.
DEX Integration and Market Visibility
Solscan integrates market data from Solana’s DeFi exchanges, clearly showing where and how your token trades. On your token’s page, the “Markets” section lists active trading pairs and liquidity pools from major Solana decentralized exchanges (DEXes). Additionally, the “DeFi Activities” tab highlights recent trades or swaps involving your token. For example, if you provide liquidity on platforms like Raydium or Orca, Solscan immediately displays those markets. Users can then easily click through and trade. Aggregating DEX information directly on Solscan significantly boosts your token’s visibility. Token creators particularly benefit from this integration. Potential buyers no longer need to search multiple platforms to discover trading venues. Instead, Solscan conveniently displays each trading location, complete with direct links to price charts and order books. Ultimately, this streamlined access drives increased organic trading interest in your token.
Conclusion and Additional Resources
Making your token’s logo visible on Solscan involves both technical and administrative steps. First, upload your logo and token details in a JSON file. Next, link this metadata to your token mint using the Metaplex Metadata program. After completing the technical setup, complete Solscan’s verification process. Once verified, Solscan will display your token’s logo, name, and symbol. Additionally, your token details will appear correctly in wallets and other blockchain explorers that rely on the same metadata. By following these steps, you ensure your token gains visibility and credibility across the Solana ecosystem.
Additional resources
Solana Token Registry (GitHub)
The Solana Token Registry on GitHub previously maintained token listings. Although this repository is now archived and doesn’t accept new entries, it remains a helpful resource. You can review it to understand the format previously used for token submissions. Specifically, it demonstrates the JSON schema for fields like token name, symbol, and logo URI. While submissions are discontinued, this archive provides valuable historical insights for formatting token metadata.
Metaplex Token Metadata Program Documentation
The Metaplex documentation clearly outlines the token metadata standard and related instructions. It covers essential methods like CreateMetadataAccounts and UpdateMetadataAccounts. If you plan to handle metadata entirely through code, this resource is particularly helpful. It provides detailed guidance, ensuring you accurately implement metadata operations for your token.
Strata Launchpad & Token Creator Tools
Tools like Strata Launchpad and the Token Creator demo simplify creating or editing token metadata without coding. You can access Strata’s launchpad directly through their official site. Additionally, the open-source Token Creator demo is available on GitHub. Using these user-friendly tools saves you time and helps minimize errors when managing your token’s metadata.
Solscan Knowledge Base – Token Updates
Solscan’s Knowledge Base contains detailed information on updating token details. Specifically, it confirms that Solscan uses the Metaplex metadata standard. Additionally, the guide emphasizes the requirement of a JSON file containing your token’s name, symbol, and logo image. Thus, this resource clearly validates the importance of using on-chain metadata.
Solscan Reputation Announcement
To fully understand Solscan’s reputation levels, review Solscan’s official announcements or community summaries. For example, resources like the CoinFactory blog clearly explain Solscan’s updated rules. These sources describe what a Neutral reputation means. Additionally, they clarify why new tokens initially have hidden logos until verified. Using these resources helps you navigate Solscan’s reputation system effectively.
Community Q&A
If you encounter issues, community resources can help. For example, if your logo isn’t appearing or you face metadata transaction problems, consult forums like Solana Stack Exchange or developer Discord communities. Common issues often include JSON formatting errors or lacking the proper authority during metadata creation. Typically, these forums document practical solutions clearly, such as correctly structuring your JSON and verifying its accessibility. Leveraging these community discussions can quickly resolve your token-related challenges. You can also harness AI by learning how ChatGPT enhances crypto projects.
By following this comprehensive guide and leveraging the provided resources, you’ll ensure your token gains maximum visibility. Your logo will clearly appear on Solscan, in wallets, and across the Solana ecosystem. Good luck launching your token and growing your project! For an even broader strategy, study the blueprint for a successful cryptocurrency launch.