Launching a token on Base is only the first mile. To win trust and attract holders, you must show up in wallets and trackers. That means presence on the two biggest aggregators. In this guide, you follow a simple path. Configure Base. Deploy and verify your contract. Create public markets on a DEX and a CEX. Then submit complete, verifiable forms. Finally, keep data accurate and liquidity healthy after approval. Your project scales without constant firefighting. Think of this as a founder’s manual, fast now and easy to maintain later. For a broader perspective on running a successful crypto project, you can consult this ultimate guide to launching a successful cryptocurrency.
Before you open any forms, match what reviewers expect. They want a verified contract on the Base Explorer. They also expect an official site, active socials, and at least one market they already track. So your first tasks are clarity and liquidity. Set up your wallet for Base. Deploy an ERC-20 (or equivalent) and verify the source code. Seed a DEX pool and add a CEX market. Reviewers should see price, volume, and depth on public pages. Doing this early cuts back-and-forth and shortens review time.
- Wallet on Base with ETH for gas.
- Contract deployed and verified so anyone can read the code.
- At least one Base DEX pool with sensible depth and spreads.
- One order-book market on a recognized exchange to support the DEX.
This dual-venue setup boosts trust and improves data quality for both aggregators. Save all links and screenshots now. You will paste them into the forms and use them to answer reviewer questions fast.
Step 1 — Configure Base in Your Wallet
Add the Base mainnet so you can sign transactions and pay gas. Open the networks panel and choose “Add network.” Enter a name, Chain ID 8453, an RPC endpoint, and the explorer URL. Save, then switch to the new network. For safety, confirm all fields in official docs. Never paste untrusted RPCs. Turn on a custom token view. Later you will paste your contract address and see balances after deployment. If you’ve set up liquidity on Uniswap (or another DEX on Base), ensure to follow a guide to add your token’s logo on Uniswap. So, traders see your token’s icon when swapping. This setup prevents mis-sends and helps reviewers confirm your on-chain footprint when you apply to the trackers. If you’re new to Base, check out this comprehensive guide on Base blockchain and token listing advantages. As a result, you’ll better understand the network you’re building on.
Step 1.1 — Fund ETH on Base for Gas
Move a small amount of ETH to Base to cover deployment and liquidity. Bridge from another network or withdraw from an exchange that supports Base. Teams launching on Tron’s TRC-20 can follow a similar playbook. There’s a TRC-20 token listing guide covering CoinMarketCap, CoinGecko, and Tokpie integration for Tron projects. Start with a small test to confirm routing. Keep a buffer for several actions: deployment, approvals, liquidity adds, and submissions. Track the nonce and confirm each transaction on the explorer. If you work as a team, set a policy: one hot wallet for ops and one multisig or hardware wallet for treasury. Good key hygiene cuts risk during the window when you seed pools and later fill in the forms for both trackers.
Step 2 — Deploy and Verify Your Token Contract
With gas ready, deploy your ERC-20 using a mature library and tools you know. Define name, symbol, decimals, and initial supply. Publish to Base mainnet. Record the contract address at once. You will reuse it for liquidity, forms, and community posts. After deployment, verify the source on the Base explorer by matching compiler settings and metadata. Verification lets reviewers and holders read your code. To further boost confidence in your contract, you might consider an independent security audit. So, reviewing top smart contract audit providers can help you choose a firm to certify your token’s code.
It also proves there are no hidden mint or blacklist functions. Upload your logo. Set the token name and symbol in explorer metadata when possible. If the explorer update is slow, you can speed up token info updates on BscScan and Etherscan by using a fast-update method. Prepare a short project description. Collect everything in one doc address, explorer link, logo, and a short story. You will finish submissions faster when you apply to both trackers.
Step 3 — Create a DEX Market on Base
Launch a pool on a reputable Base AMM so trading can start and price can form in the open. The same principles apply on Polygon: a Polygon token listing guide outlines the steps to list a Polygon token on CoinMarketCap and CoinGecko, mirroring much of this Base token process. Connect your wallet and import the token address. Create a pair against ETH or a stablecoin on the network.
Also, approve spending and supply both assets. Note: The process for an Arbitrum token is very similar. You can follow a step-by-step guide to list an Arbitrum token to see how it parallels the Base token approach. Set an initial price you can defend. Confirm the transaction to mint LP tokens. Share the pair address in public. You will paste this link into submission forms. Run a small test swap to check routing and decimals. Then watch slippage, depth, and early flow. Steady activity gives clear proof that the asset trades, which is key before you submit forms to each tracker.
Step 3.1 — Liquidity Depth, Pricing, and LP Safety
Set a liquidity budget that fits your target cap and community size. During review, aim for low slippage on $500–$1,000 swaps. Keep spreads tight to deter opportunistic prints. Pick a fee tier that matches volatility. If the AMM supports concentrated liquidity, center the first range near the target price and widen it as volume grows. Protect LP tokens with a multisig policy. Consider time-locks if they fit your tokenomics. If your project’s aim is stability, you could even create a stablecoin. Such a stablecoin creation guide details how to design and launch a successful stablecoin as part of your ecosystem. Publish treasury and LP custody rules. Healthy depth and stable pricing cut noise. Predictable ranges make markets easy to audit and raise confidence during review.
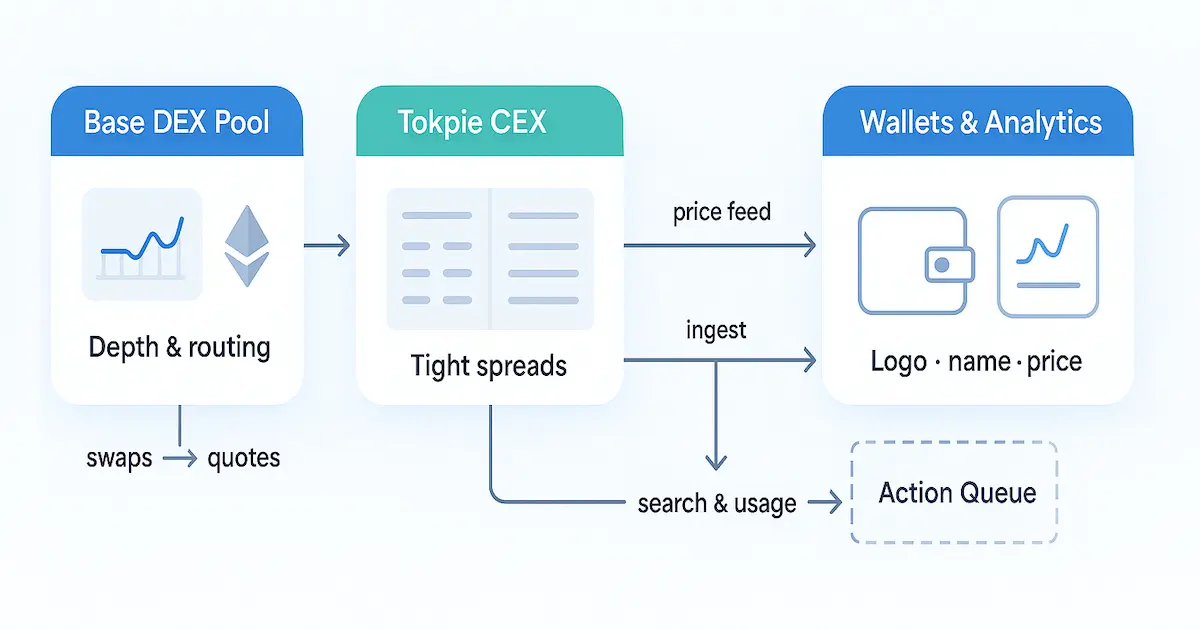
Step 4 — Add an Order-Book Market (CEX) Tracked by Aggregators
Practical tip for Base teams: open your first order-book pair on Tokpie CEX. It supports Base deposits and has clear public market pages. Reviewers can verify price, depth, and recent trades with ease. Pair your Base DEX pool with a Tokpie USDT or ETH market. You gain better price discovery, a second data source for trackers, and a signal of operational readiness. Many founders use this “DEX + Tokpie” path to show a clean market structure before they file forms. For more details on exchange listing, refer to the Tokpie exchange listing guide to list your token on Tokpie successfully.
Prepare a tight package: contract address, verified explorer link, square logo, short description, and official socials. After Tokpie approves and the pair goes live, share the market page. Seed initial bids and asks to tighten spreads. Announce the listing to drive early, organic flow. The DEX + CEX setup improves discovery and reduces review friction. Data is visible on independent pages that aggregators already monitor. Furthermore, Tokpie’s self-listing and fundraising dApp allows you to list your token on the exchange in a few simple steps, enabling you to raise liquidity from the community at the same time.
Why a Tokpie-first CEX step speeds review
Aggregators check for public, login-free market proof. Tokpie shows an order book, trade history, and ticker pages. That makes it easy to show real activity and orderly quotes. Teams that list on Tokpie early avoid common blockers like “insufficient market data” or “no tracked order-book venue.” As a result, once basic thresholds are met, your page can move from “Untracked” to “Tracked” faster, especially with healthy DEX liquidity.
Swipe left or right to view the entire table.
| Step | Action | Evidence | Target | Why it matters (transition) |
|---|---|---|---|---|
| 1 | Apply for a Base pair on Tokpie (USDT/ETH) | Public market page | Approval & go-live | Then reviewers can verify order-book depth and real trades. |
| 2 | Seed quotes and align with DEX price | Bid/ask screenshot | <2% spreads | Consequently, price discovery stabilizes across venues. |
| 3 | Publish custody rules for LP/MM | Policy note | Transparent | Therefore, reviewers trust the sustainability of markets. |
Step 5 — Assemble a Bulletproof Submission Package
Before you open any forms, gather a single, tidy document with everything reviewers need. Include: token name, symbol, contract address, launch date, and explorer link; a concise, plain-English project description; a square logo (at least 200×200); official website and socials; and clear tokenomics with supply breakdowns and vesting. Add public market pages for every trading pair, your Base DEX and the Tokpie order-book market, plus notes on liquidity custody (who holds LP tokens or MM inventory, any locks, and addresses). Finally, list two responsive contacts and a short changelog you’ll update after each milestone. This preparation answers most reviewer questions up front and speeds approvals.
Swipe left or right to view the entire table.
| Item | Where it lives | Attach to | Status | Reviewer’s check |
|---|---|---|---|---|
| Verified contract | Base explorer | Both forms | Verified | Can code be read and compiler settings matched? |
| DEX pair | AMM analytics | Markets section | Live | Does the pool show depth and recent swaps? |
| Tokpie order book | Tokpie market page | Markets section | Live | Are quotes orderly and trades authentic? |
| Brand assets | Logo & tagline | Branding fields | Square, crisp | Does the logo render well at small sizes? |
Step 6 — Complete the CoinMarketCap Form Like a Pro
When the CoinMarketCap form asks for chain and contract, select Base and paste the exact address from the explorer. Provide the same naming everywhere to avoid mismatches. Link your live markets with public pages that show price, volume, and trade history; avoid link shorteners. Upload a crisp square logo and ensure your website isn’t “under construction.” In the description, explain the problem you solve in two sentences, then add one line on utility or roadmap. List all active pairs, your Base DEX and the Tokpie order-book market; so, reviewers can verify “material” trading, not sporadic prints.
In addition, mention near-term venue additions in “Additional Notes.” Accurate, consistent entries minimize back-and-forth. Once listed, you can even enable your token’s price to appear in MetaMask; this MetaMask price integration guide shows how to display your token’s live price in-wallet. Even Solana projects follow analogous steps: a Solana token listing guide covers how to get a SOL-based token onto CoinMarketCap and CoinGecko, much like what we’ve outlined for Base.
Step 6.1 — Manage Review, From “Untracked” to “Tracked”
After submission, monitor your inbox and reply to questions within 24 hours. Keep markets active: maintain depth, hold spreads tight, and avoid volume cliffs. Many assets appear first as “Untracked,” then upgrade to “Tracked” once markets meet internal thresholds; this is normal. If you add a new pair or update branding, submit a single, consolidated update rather than multiple tickets. Expect review windows of roughly one to three weeks on the free path; during that time, grow genuine watchlists, ship small product updates, and publish clear announcements. Your objective is to give reviewers and future users consistent, verifiable signals that the market is real and the project is alive. Meanwhile, you can unlock CoinCarp visibility by following a CoinCarp listing guide, a zero-cost walkthrough to get your token listed on that tracker.
Step 7 — Submit to CoinGecko with Precision
Create or log in to your account, then open the token listing form and complete every field consistently with your prior submission. If you need guidance, this ultimate guide to listing a token on CoinGecko walks through every step of the submission process. Select the Base network (or specify it clearly if it isn’t shown), paste the exact contract, and link the explorer page where your code is verified. Provide your website, socials, and a crisp square logo that still looks good at small sizes. In the markets section, add all active pairs with public pages that show price, depth, and recent trades, your Base DEX and Tokpie order-book market included. Keep the description plain and factual: problem, approach, and current status. While you wait for review (often several days to a couple of weeks), maintain healthy trading and update docs so follow-ups are easy to answer.
Step 7.1 — Avoid Rejections: Common Issues and Quick Fixes
Most delays come from data gaps or weak markets. Thin liquidity and sporadic prints look risky, so widen your liquidity band, increase pool depth, and seed a tighter order book on Tokpie to keep spreads in check. Broken links, unfinished websites, or mismatched names and symbols also trigger questions. So, fix them before applying. An unverified contract is a frequent blocker; verify with the same compiler settings you used at deployment. Don’t simulate volume; inorganic patterns are easy to spot. Encourage real users to trade small amounts, publish a simple tokenomics page, and keep an official contact email responsive. If feedback cites “insufficient activity,” improve depth on DEX and Tokpie, then submit one consolidated update documenting the changes.
Step 8 — Post-Listing Maintenance Cadence (Weekly & Monthly)
Treat aggregator presence as ongoing operations. Weekly: review liquidity depth, spreads, and routing; aim for predictable execution on common trade sizes. Check explorer metadata, socials, and your website for consistency, and update both aggregator profiles when anything changes. Additionally, remember to update your details on CoinCheckup. This step-by-step guide shows how to add your token on CoinCheckup for consistency across all platforms. Track watchlists, holder count, and organic volume; include these in a living metrics sheet. One metric to monitor is the Token Sale Confidence Index, a single score that blends volume, marketing, and holder trends to forecast your token’s momentum.
Additionally, monthly: audit token pages, add any new pairs, and consolidate updates into a single, well-formatted request. During these monthly check-ups, make sure you’ve also completed listing your token on LiveCoinWatch, as it’s another platform where investors might look for your coin. When you launch features or partnerships, publish a short announcement and refresh the description so new users get the latest context. Assign a single “listing owner” to manage responses within 24 hours. Over time, this steady rhythm compounds visibility and reduces the risk of inactivation if a venue pauses or volume temporarily dips.
Step 9 — Distribute to Wallets, APIs, and Token Lists
Once you’ve added your Base token to the major aggregators, make sure wallets and data services recognize it. Notably, being listed on CoinMarketCap will also make your token appear on Binance’s platform automatically; here’s how to list your token on Binance for free. Likewise, after a CoinMarketCap listing, your coin will show up on Coinbase’s asset explorer at no cost, essentially a free way to list your coin on Coinbase.
So, start by updating the explorer metadata so your name, symbol, and logo render correctly. For instance, you can follow a guide to add your token’s logo in MetaMask so that your coin’s name and icon show up properly for holders. Solana developers should know how to add their token logo on SolScan, the Solana explorer, to ensure their asset is properly identified on that network’s equivalent of Etherscan.
Submit official assets to token-list repositories
Next, submit official assets to token-list repositories used by popular wallets. Make sure to use the Trust Wallet token submission guide to include your token in Trust Wallet’s repository, so mobile users see your logo and info in their wallets. Encourage your community to “watchlist” your token; watchlists improve surface area across third-party dashboards. Beyond the big two, CoinDataFlow offers a free listing guide; adding your token there can attract users who rely on its data feeds. Keep market links consistent everywhere: explorer page, DEX pair, and Tokpie order-book market.
So, even hardware wallets like Trezor maintain token lists. Therefore, following the steps to list your token with Trezor ensures your asset appears correctly for Trezor users as well. If you change branding or add new venues, batch those edits and submit a single, tidy update to each aggregator. Therefore, checks are quick and predictable. Also, ensure your token’s price and market cap are displayed on blockchain explorers like BscScan and Etherscan by following the official update process. To plan your expansion, you might review the top coin tracking sites for free token listings, which highlight many platforms you can join without cost.
Step 10 — Announce and Prove Traction the Smart Way
Plan a seven-day communication arc instead of a single blast.
- Day 1: Post the listing news with links to your verified explorer page and live DEX + Tokpie markets.
- Days 2–3: Share a short thread explaining your utility and roadmap; invite users to follow official channels.
- Day 4–5: Host an AMA and highlight holder growth, depth, and spreads across both venues.
- Days 6–7: Publish a “what’s next” note with near-term deliverables.
Throughout, avoid manufactured volume. Reviewers and algorithms spot inorganic prints quickly. In parallel, consider adding your project’s events to Coindar, listing your project on Coindar can publicize your roadmap and milestones to interested followers. Focus on real usage, small but steady trades, and transparent liquidity policies. This approach builds durable credibility and keeps your aggregator pages trending for the right reasons, supporting sustained discovery beyond the initial announcement window.
Step 11 — Monitor Weekly Health Metrics and Fix Issues Fast
Adopt a simple scorecard. Track total liquidity, slippage on $500–$1,000 trades, bid–ask spreads on the order book, holder count, watchlists, and organic daily volume. If metrics slip, act quickly: widen or replenish liquidity ranges, encourage market-maker quotes, and refresh stale descriptions. If your page appears as “Untracked” or gets inactivated, it usually means the markets went quiet. Restore activity on at least one recognized venue and submit one consolidated update with evidence. Keep all public pages, explorer, markets, and aggregators aligned after each change. This weekly cadence prevents avoidable flags and preserves trust with both reviewers and users as your Base token matures across DEX and CEX venues.
Step 12 — Field-by-Field Walkthrough for the CMC Form
Open the listing form and complete it with exact, verifiable data. Select the Base network, paste your contract address, and include the explorer link that shows a verified code badge. Use a consistent token name and symbol everywhere: website, socials, images, and the form. Even on the TON blockchain, projects face similar listing hurdles; this guide on listing a TON token details the steps to list TON-based tokens on exchanges and trackers. Upload a square logo (minimum 200×200) that remains legible at small sizes.
Also,iIn “Description,” explain the problem you solve in two sentences, then add one line on utility or roadmap. In the “Markets” section, provide public pages for each active pair (your Base DEX and Tokpie order-book venue). Avoid link shorteners and placeholder sites. Add a role-based contact email, plus brief “Additional Notes” if more exchanges or features are imminent. Accuracy and completeness reduce follow-ups and speed the path to a tracked page.
Step 12.1 — Field-by-Field Walkthrough for the CG Form
Sign in, open the token submission form, and mirror the same canonical data used previously. If the chain selector lists Base, choose it; if not, specify “Base (EVM L2)” clearly in the notes. Provide the exact contract, verified explorer link, website, socials, and a crisp square logo. In the markets area, add every live pair with public, login-free pages that show price, depth, and recent trades. Some versions of the form ask for decimals and circulating supply. Enter them precisely and keep a short rationale handy for circulation methodology. Expect faster turnaround when markets are healthy, especially with a Tokpie pair live.
Step 13 — One-Page Ops Runbook (Weekly & Monthly)
Create a single living document that any teammate can follow. Weekly: check liquidity depth, slippage at typical ticket sizes, spreads on your order-book venue, holder count, watchlists, and organic daily volume. Update explorer metadata if branding changes. Also, list any branding updates on directory sites like Blockspot. This guide shows how to add your token on Blockspot to keep information uniform.
Besides, consolidate any edits and send a single tidy change request to each aggregator. In your updates, consider adding CoinCost to your list of platforms, following an CoinCost listing guide will ensure your token’s data is reflected there as well. Monthly: audit all public pages, add new pairs, refresh the description, and reconfirm contact emails. Assign one “listing owner” to reply within 24 hours to reviewer messages. Micro-case: a Base meme token raised liquidity so $1,000 trades slipped under 1.5% (down from 8%), halved spreads, and doubled watchlists from 1,200 to 2,500 in two weeks after adopting this runbook [Add data source]. The result was steadier discovery and fewer status downgrades during quiet periods.
Step 14 — Copy-Paste Submission Checklists (Fast)
Before opening any forms for how to add Base token to CoinMarketCap or how to add Base token to CoinGecko, run this quick preflight. For a dedicated tutorial on expediting a CoinMarketCap listing, see the fast-track guide on listing a token on CoinMarketCap. Core assets: verified Base contract (same compiler settings), explorer link, consistent name/symbol/decimals, square logo ≥200×200, website, and socials. Markets: at least one public DEX pair on Base and a live Tokpie order-book venue; link the pair/market info pages (no shorteners). Content: 2–3 sentence description, circulation method (if asked), tokenomics summary, LP/MM custody notes, and a responsive role-based email. Quality checks: live links, mobile-friendly site, matching metadata everywhere. Submission hygiene: list every active pair, paste canonical URLs, add “Additional Notes” for near-term upgrades, and keep a changelog for follow-ups. This single doc reduces rework and compresses reviews on both aggregators.
Step 15 — Rejection-Rescue Playbook
If feedback cites insufficient activity, widen liquidity ranges, add depth so $500–$1,000 swaps slip minimally, and seed quotes on your order-book venue; then submit one consolidated update with evidence. For teams struggling with liquidity or volume requirements, renting liquidity to expedite CoinMarketCap and CoinGecko listing is an option, essentially outsourcing the liquidity to meet thresholds.
- Mismatched data: unify name/symbol/decimals across explorer, site, images, and forms.
- Unverified contract: re-verify using the exact compiler and optimization settings you deployed.
- Broken links or placeholder sites: ship fixes before reapplying.
Avoid inorganic prints. Reviewers recognize wash patterns. Micro-case: a Base utility token raised pool depth by 3×, tightened spreads from 4.8% to 1.6%, and moved from “Untracked” to “Tracked” within 10 days after a single, well-documented update [Add data source]. Treat every rejection as a specification; fix precisely what’s cited, then reply once with a clean, auditable paper trail.
Step 16 — Monthly Performance Template (Paste into Ops)
Create a living sheet with five dials: liquidity depth, slippage on typical tickets, spreads on the order book, watchlists/holders, and organic daily volume. Set thresholds that trigger actions (e.g., if $1,000 swaps slip >2.5%, replenish or widen ranges; if spreads >2%, encourage tighter quotes). Add data freshness checks: site, explorer metadata, aggregator descriptions, and batch changes into one monthly update per platform. As part of your routine, use a guide to list your token on DigitalCoinPrice so that it reaches that platform’s audience with up-to-date info.
Likewise, a guide to list your token on CoinLore can help ensure you haven’t missed that aggregator in your outreach, extending your reach even further. Include a short narrative (“what changed, why it matters, next milestone”). Micro-story: one Base meme token used this template to cut slippage from ~6% to ~2% and doubled watchlists in three weeks, improving discovery and stabilizing its page rank [Add data source]. This cadence turns listings into a growth flywheel instead of a one-off event. As part of that growth strategy, don’t overlook BitDegree’s tracker; a BitDegree listing guide can help you feature your token on their platform to reach an education-focused audience.
Step 17 — Final Pre-Submission QA (15-Minute Sweep)
Do a tight quality pass before you press “submit.” Confirm your explorer page shows a verified contract, correct decimals, and the same name/symbol used across your site and socials. Open each market link you’ll provide and check that price, depth, and recent trades are visible without login. Test your website on mobile and desktop; fix slow images and broken links. Re-read your two-to-three sentence description for clarity and remove hype. Ensure your logo is a clean square that remains legible at small sizes. Finally, consolidate everything into a single one-pager: contract, explorer, logo, short description, market URLs (DEX + Tokpie), tokenomics, custody notes, and a role-based contact email. Teams that run this sweep cut avoidable back-and-forth and move faster from “submitted” to “live.”
Quick-Start CTA: 7-Day Adoption Sprint
Once you file the forms for how to add the Base token to CoinMarketCap and how to add the Base token to CoinGecko, launch a one-week adoption sprint.
Day 1: Announce with links to verified explorer data and live markets (DEX + Tokpie).
Days 2: Publish a “how to trade” walkthrough and pin it. For example, you could share Tokpie’s trading guide as part of this walkthrough, so new community members learn how to trade your token step-by-step.
Day 3: Share a concise thread about utility and near-term roadmap.
Days 4–5: Host an AMA and highlight stable slippage, depth, and spreads.
Day 6: Reward genuine on-chain engagement (not wash activity).
Day 7: Post a recap with metrics: watchlists, holders, and liquidity.
Keep swaps of typical sizes executing with minimal slippage and maintain orderly order-book quotes. Since Base is developed by Coinbase, make sure to follow the Coinbase Wallet (Base App) listing guide so that your Base token’s logo and details show up correctly in Coinbase Wallet for all your users. This rhythm compounds credibility during review and sets expectations for the first month after approval.
Conclusion: From “Accepted” to “Adopted”
Getting onto the major trackers is a milestone, not a finish line. If you plan to expand your project beyond Base, it’s useful to read an exploring Solana ecosystem guide to understand how another chain’s community and tooling might influence your approach. Treat listings as a reliability pipeline into wallets, APIs, and dashboards. Innovative tools like AI can also amplify your efforts; for instance, harnessing ChatGPT for crypto projects might enhance your marketing and user engagement as you grow. Maintain weekly ops (depth, spreads, routing, metadata), batch updates into single, tidy submissions, and reply to reviewer questions within 24 hours.
Also, expand selectively. Add a complementary pair when organic flow justifies it, publish a brief circulation methodology if asked, and coordinate cross-project integrations on Base. For example, integrating a bank card or Apple Pay checkout into your dApp can remove purchase friction. This guide shows how adding bank card and Apple Pay options can help sell more tokens. A steady cadence, supported by your one-page runbook and monthly metrics template, keeps your pages accurate and visible long after the initial buzz. If momentum stalls, revisit fundamentals: verifiable markets, clear messaging, and responsive communications. Execute those well, and your token earns durable mindshare as the network grows and new users discover assets through trusted data channels.
FAQ
Q1: What are the non-negotiables before I try to get a Base token on CoinMarketCap?
Have a verified contract on the Base explorer, a functional website and socials, and at least one actively traded market on a tracked exchange. A DEX pool plus a Tokpie order-book pair makes it straightforward for reviewers to validate price and volume from public pages without guesswork.
Q2: Do I really need both a DEX pool and a CEX market?
A DEX alone can be enough if it’s recognized and shows real activity, but pairing it with an order-book market improves depth, spreads, and reviewer confidence. Dual venues also create redundancy for data and price discovery across trackers; Tokpie is a practical first CEX for Base teams.
Q3: How long do reviews typically take on each aggregator?
Expect roughly one to three weeks on the free path for CoinMarketCap, and often several days to a couple of weeks for CoinGecko, depending on backlog and market completeness. Fast, accurate replies to reviewer questions and steady activity on DEX + Tokpie help compress that window.
Q4: What causes the most rejections or delays?
Common issues include thin liquidity, broken links, unfinished websites, inconsistent names or symbols, and unverified contracts. Fix verification, unify branding, and show reliable activity across your DEX pool and Tokpie order-book to resolve the majority of escalations during review.
Q5: What assets should I prepare for the forms?
Collect your contract address and verified explorer link, square logo (≥200×200), website and socials, a crisp 2–3 sentence description, tokenomics highlights, and public pages for every active trading pair, specifically your Base DEX and Tokpie market.
Q6: How much liquidity should I seed before applying?
There’s no universal number, but aim for predictable execution on typical tickets (e.g., $500–$1,000) with minimal slippage and orderly spreads on Tokpie. Healthy, stable markets are a stronger signal than sporadic large prints.
Q7: My token appears as “Untracked.” What does that mean?
It usually indicates the listing exists, but markets haven’t met internal thresholds yet. Maintain real trading, deepen liquidity, and reply quickly to questions. Once activity is confirmed across your DEX and Tokpie pages, the profile can advance to a fully tracked state.
Q8: Can I speed discovery after going live on both trackers?
Yes. Encourage watchlists, keep explorer metadata current, and syndicate accurate information to additional trackers and wallet token lists. For example, you can pursue a free token listing on CoinPaprika to broaden your project’s exposure beyond the top two aggregators. Similarly, listing your token on CoinCodex is another effective way to reach users on a popular third-party dashboard. Another way to rally community support is by using free token voting platforms. Getting on these sites lets real users vote for your token and boost its visibility without any listing fee. Publish concise milestone updates so users and reviewers see a living, active project. Then, point to your DEX and Tokpie pages for clear market evidence. In addition, a Coinranking listing walkthrough is available to help you get your token on CoinRanking and tap into its community.
Q9: What if I need to rebrand or update key details later?
Prepare a single, consolidated change request with updated branding, logos, and links. Keep the contract address constant when possible; if migration is unavoidable, document the swap mechanics and timelines clearly before submitting updates.
Q10: Is a paid fast track necessary for success?
No. The free route works well if your submission is complete and markets are healthy. Paid queues can reduce waiting time, but they don’t replace fundamentals verified code, working links, and active, credible markets on your DEX and Tokpie.